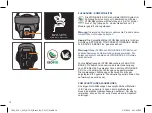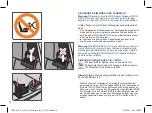
Note!
Do not place any objects in the leg room in
front of your ATON BASE 2-FIX.
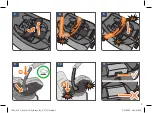
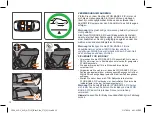
INSTALLING THE ATON BASE 2-FIX - 3-POINT-BELT
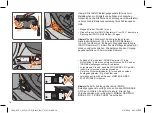
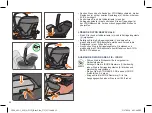
• Unfold the support leg (u).
• Place the ATON BASE 2-FIX on a suitable car seat position,
according to the enclosed typelist.
• To unlock, turn the locking mechanism (v) 90° counterclockwise
and lift the fastening device (w) up to the maximum position.
• Insert the lap belt (k) under the fastening device (w) across the
ATON BASE 2-FIX and insert the buckle tongue into the vehicle
seat buckle (q).
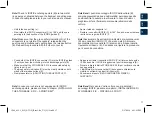
• Now please fasten the lap belt (k) slightly by pulling on the
shoulder belt (l), to avoid any slack in the belt.
Note!
Don’t fasten the lap belt too tight or you will have
problems to finalize the installation process properly.
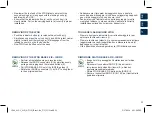
• Guide the shoulder belt (l) parallel and over the lap belt (k)
across the ATON BASE 2-FIX back under the fastening device
(w).
Warning!
The buckle of the vehicle seat belt must not project
into the frame of the ATON BASE 2-FIX.
Note!
The shoulder belt (l) must be positioned over the lap
belt (k). Do not twist the belt.
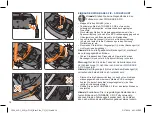
• Push the fastening device (w) down until it engages with an
audible CLICK. Make sure that the dial of the locking mechanism
(v) points at the correct symbol.
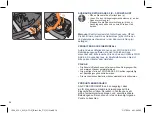
• Jiggle the ATON BASE 2-FIX to check that it is securely installed.
Note!
Please check in regular intervals that ATON BASE
2-FIX is still securely fastened. If necessary, retighten the
vehicle seat belt as there may be slack after prolonged use.
Nota Bene!
Non lasciare mai oggetti nel pozzetto di
fronte alla ATON BASE 2-FIX.
INSTALLAZIONE DI ATON BASE 2-FIX - CINTURA A 3 PUNTI
• Mettere in posizione il piede di supporto (u).
• Appoggiare ATON BASE 2-FIX sul sedile in una delle posizioni
possibili, secondo l‘elenco allegato.
• Aprire il meccanismo di bloccaggio (v) ruotandolo in senso
antiorario di circa 90° e sollevare il dispositivo di fissaggio (w)
al massimo.
• Far passare la parte di cintura addominale (k) sotto il dispositivo
di ancoraggio (w) attraverso la base ATON BASE 2-FIX ed
agganciare l‘estremità nell‘apposita fibbia sul sedile (q).
•
Per ottimizzare il fissaggio della cintura addominale (k) tirare la
parte diagonale (l), assicurandovi che la tensione sia corretta.
Nota Bene!
La tensione della cintura addominale non deve
essere eccessiva per permettere la corretta chiusura del
sistema di ancoraggio.
• Far passare la cintura diagonale (l), sovrapponendola alla cintura
addominale (k), sotto il dispositivo di ancoraggio (w) attraverso la
ATON BASE 2-FIX.
Attenzione!
La fibbia di aggancio delle cinture del veicolo non
deve superare in altezza la struttura della ATON BASE 2-FIX.
Nota Bene!
La parte di cintura diagonale (l) deve scorrere
sopra la cintura addominale (k). Non attorcigliare mai la
cintura.
•
Spingere verso il basso il dispositivo di ancoraggio (w) fino a
sentire il CLICK di aggancio. Verificare che la manopola del
meccanismo di blocco (v) sia rivolta verso il simbolo corretto.
•
Scuotere con una certa forza ATON BASE 2-FIX per verificare
che sia installata saldamente.
Nota Bene!
Eseguire il controllo dell‘ancoraggio di ATON
BASE 2-FIX ad intervalli regolari. Nel caso di uso prolungato,
se necessario, provvedere a tendere nuovamente le cinture.
19
DE
UK
IT
C100_823-1_01D_ATON_Base2-fix_UG_SG1.indd 19
5/17/2018 4:31:03 PM
Содержание ATON BASE 2-FIX
Страница 2: ...C100_823 1_01D_ATON_Base2 fix_UG_SG1 indd 2 5 17 2018 4 31 00 PM ...
Страница 5: ...3 4 5 10 11 9 3 C100_823 1_01D_ATON_Base2 fix_UG_SG1 indd 3 5 17 2018 4 31 01 PM ...
Страница 7: ...5 10 11 3 9 4 5 C100_823 1_01D_ATON_Base2 fix_UG_SG1 indd 5 5 17 2018 4 31 01 PM ...
Страница 8: ...C100_823 1_01D_ATON_Base2 fix_UG_SG1 indd 6 5 17 2018 4 31 01 PM ...
Страница 34: ...32 C100_823 1_01D_ATON_Base2 fix_UG_SG1 indd 32 5 17 2018 4 31 05 PM ...
Страница 60: ...58 C100_823 1_01D_ATON_Base2 fix_UG_SG1 indd 58 5 17 2018 4 31 09 PM ...
Страница 86: ...84 C100_823 1_01D_ATON_Base2 fix_UG_SG1 indd 84 5 17 2018 4 31 13 PM ...

