background image

CyberResearch

® 

Panel PCs 


STE 1xGTx Series 


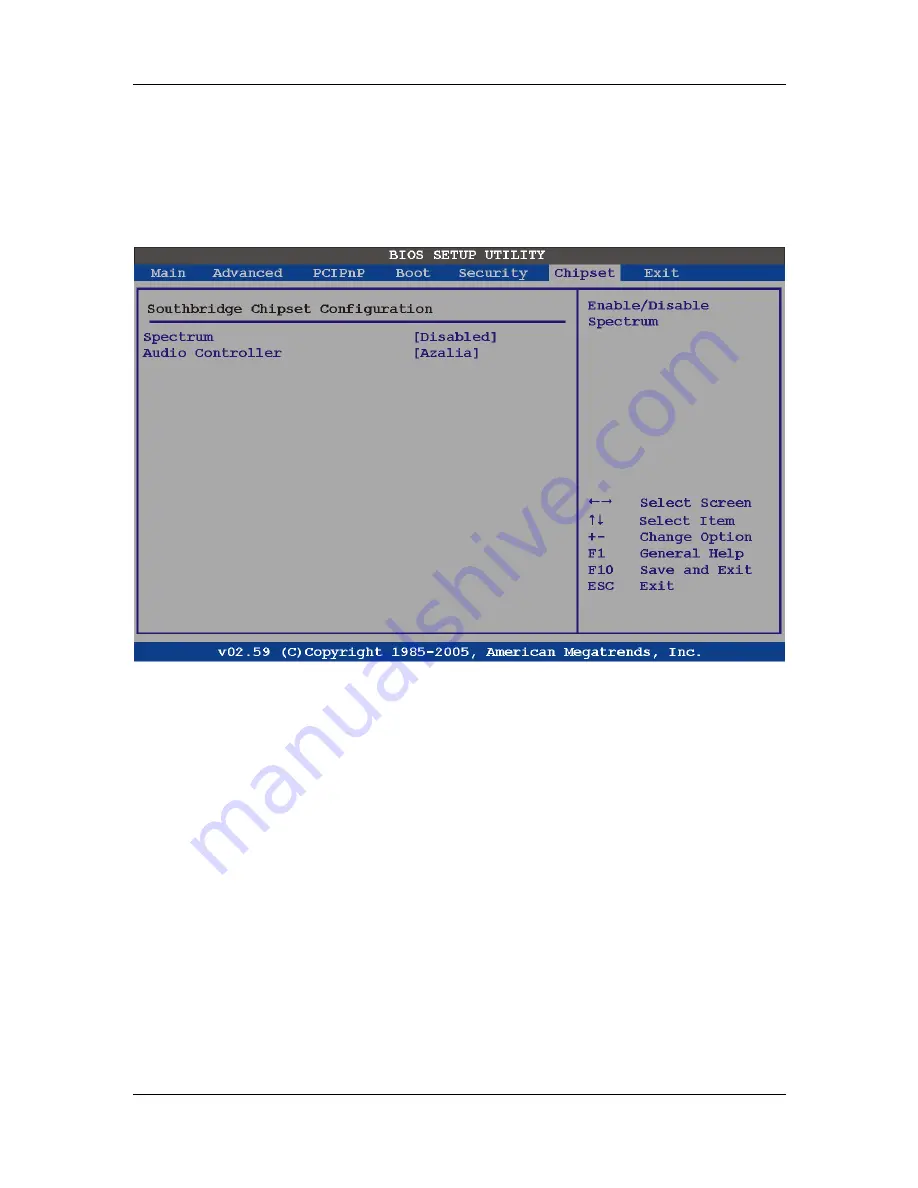
5.7.2 Southbridge Configuration 

The Southbridge Configuration menu (

BIOS Menu 24

) allows the Southbridge chipset to 

be configured. 

BIOS Menu 24:Southbridge Chipset Configuration


Î


Spectrum [Disabled] 

Use the 

Spectrum

 option to reduce the EMI. Excess EMI is generated when the system 

clock generator pulses have extreme values. Spreading the pulse spectrum modulates 

changes in the extreme values from spikes to flat curves, thus reducing the EMI. This 

benefit may in some cases be outweighed by problems with timing-critical devices, such 

as a clock-sensitive SCSI device. 

Î


Disabled D

EFAULT


EMI not reduced 

Î


Enabled 

 EMI 

reduced 

CyberResearch, Inc

.  

117 

25 Business Park Drive 


P: (203) 643-5000; F: (203) 643-5001 

Branford, CT USA 


www.cyberresearch.com


Содержание STE 1xGTx Series

Страница 1: ...et PCI Expansion AC or DC Power Input and USB Panel PCs USER S MANUAL VER 2 0C Feb 11 No part of this manual may be reproduced without permission CyberResearch Inc www cyberresearch com 25 Business Pa...

Страница 2: ......

Страница 3: ...for identification purposes only and may be trademarks and or registered trademarks of their respective companies NOTICE CyberResearch Inc does not authorize any CyberResearch product for use in life...

Страница 4: ...STE 1xGTx Series CyberResearch Panel PCs Revision History Revision Description Date of Issue 1 0 Initial Release August 1 2008 2 0C Revision February 19 2011 iv Copyright 2011 CyberResearch Inc...

Страница 5: ...in permanent damage to the STE 1xGTx or personal injury to the user Please take warning messages seriously CAUTION Cautionary messages should also be heeded to help reduce the chance of losing data or...

Страница 6: ...rein can help avoid making mistakes Notes are easy to recognize The word note is written as NOTE both capitalized and bold and is followed by text The text is the cautionary message A note message is...

Страница 7: ...cyberresearch com The items listed below are included with the STE 1xGTx package many are pre installed in the unit itself 1 x Hard drive bracket 1 x IDE cable 40 pin to 40 pin 1 x IDE cable 44 pin to...

Страница 8: ...STE 1xGTx Series CyberResearch Panel PCs viii Copyright 2011 CyberResearch Inc...

Страница 9: ...NS 9 2 1 INTRODUCTION 10 2 1 1 System Specifications 10 2 1 2 Motherboard Specifications 12 2 1 3 Flat Panel Screen 13 2 1 3 1 STE 15GTx Screen 13 2 1 3 2 STE 17GTx Screen 14 2 1 3 3 STE 19GTx Screen...

Страница 10: ...rial Ports 30 2 10 3 Parallel Port 30 2 11 GIGABIT ETHERNET 31 2 12 FRONT PANEL 31 2 12 1 Flat Screen 32 2 12 2 Touch Screen 32 2 13 CUSTOMIZATION 32 3 UNPACKING 33 3 1 ANTI STATIC PRECAUTIONS 34 3 2...

Страница 11: ...Installation 51 4 7 MOUNTING THE SYSTEM 56 4 7 1 Wall Mounting 56 4 7 2 Panel Mounting 59 4 7 3 Rack and Cabinet Installation 62 4 7 4 Arm Mounting 63 4 8 EXTERNAL PERIPHERAL INTERFACE CONNECTORS 64 4...

Страница 12: ...torage Device Configuration 102 5 4 PCI PNP 104 5 5 BOOT 106 5 5 1 Boot Settings Configuration 107 5 5 2 Boot Device Priority 109 5 5 3 Hard Disk Drives 109 5 5 4 CD DVD Drives 111 5 6 SECURITY 113 5...

Страница 13: ...50 B TERMINOLOGY 154 C DIGITAL I O INTERFACE 158 C 1 INTRODUCTION 159 C 2 DIO CONNECTOR PINOUTS 159 C 3 ASSEMBLY LANGUAGE SAMPLES 160 C 3 1 Enable the DIO Input Function 160 C 3 2 Enable the DIO Outpu...

Страница 14: ...gure 2 5 SO DIMM Socket 26 Figure 2 6 CompactFlash Slot 27 Figure 2 7 SATA Hard Drive Slot 28 Figure 2 8 Expansion Card Slot 28 Figure 2 9 USB Ports 29 Figure 2 10 Serial Ports 30 Figure 2 11 Parallel...

Страница 15: ...e 6 5 Select Audio Drivers 124 Figure 6 6 Select All Windows 124 Figure 6 7 Audio Driver Installation 125 Figure 6 8 Windows Logo Testing 126 Figure 6 9 InstallShield Wizard Complete 126 Figure 6 10 S...

Страница 16: ...t Clip Locations 143 Figure 7 2 Top Panel Elevated Platform Screws 143 Figure 7 3 Side Panel Elevated Platform Screws 144 Figure 7 4 Bottom Panel Elevated Platform Screws 144 Figure 7 5 Internal Eleva...

Страница 17: ...s 42 Table 4 4 LCD Resolution Settings 43 Table 4 5 Monitor Settings 43 Table 4 6 CF Card Setup Jumper Settings 43 Table 4 7 COM1 RI and Voltage Selection Jumper 44 Table 4 8 COM2 RI and Voltage Selec...

Страница 18: ...Menu 11 Advanced Power Management Configuration 94 BIOS Menu 12 Remote Access Configuration Advanced 97 BIOS Menu 13 USB Configuration 100 BIOS Menu 14 USB Mass Storage Device Configuration 102 BIOS...

Страница 19: ...CyberResearch Panel PCs STE 1xGTx Series Chapter 1 1 Introduction CyberResearch Inc 1 25 Business Park Drive P 203 643 5000 F 203 643 5001 Branford CT USA www cyberresearch com...

Страница 20: ...ernal device connections including USB serial and parallel port connectors Storage options include a 2 5 hard drive and a CompactFlash slot allowing for flexibility in choosing solid state drives or t...

Страница 21: ...also makes it an ideal choice for public access computers Some possible applications include Automated manufacturing processes Public information gathering point Plant environment monitoring system Fa...

Страница 22: ...rear panel provides screw holes for wall and an arm mounting The right panel provides access to a slim type CD drive bay and a floppy disk drive bay The bottom panel provides access to external interf...

Страница 23: ...circled in Figure 1 3 Figure 1 3 STE 1xGTx Rear View 1 2 3 Top Panel The top panel has two fan vents eight mounting clamp slots and three retention screws for securing the drive bay bracket The retent...

Страница 24: ...t connector 1 x Power switch 4 x USB connectors 1 x Reset button 2 x RJ 45 GbE connectors 1 x PS 2 mouse connector 1 x PS 2 keyboard connector 5 x Serial port COM connectors 1 x PCI add on card slot 1...

Страница 25: ...wo internal fans The retention screws are circled in Figure 1 6 Figure 1 6 Left View 1 2 6 Right Panel The right side panel provides access to a slim type CD drive bay and a FDD drive bay shown in Fig...

Страница 26: ...Figure 1 8 supports the hard drive and optical drive brackets Below the PSU cover bracket is the power supply On the same level as the power supply is the motherboard Below the motherboard and PSU le...

Страница 27: ...CyberResearch Panel PCs STE 1xGTx Series Chapter 2 2 Specifications CyberResearch Inc 9 25 Business Park Drive P 203 643 5000 F 203 643 5001 Branford CT USA www cyberresearch com...

Страница 28: ...STE 1xGTx system are listed in Table 2 1 SPECIFICATION DESCRIPTION Front Panel Aluminum Front Panel meets IP 65 standard Chassis Heavy duty Steel LCD Panel High luminance TFT LCD Resolution STE 15GTx...

Страница 29: ...shock One slim type CD drive bay One slim type FDD bay One CompactFlash slot Power Supply Input voltage 90 265 V AC 50 60 Hz Output rating 180 W Output voltage 3 3 V 16 8A 5 V 12A 12 V 10A 12 V 0 8A 5...

Страница 30: ...e 2 1 STE 1xGTx Specifications 2 1 2 Motherboard Specifications The technical specifications for the STE 1xGTx motherboard are listed in Table 2 2 SPECIFICATION DESCRIPTION CPU LGA775 Intel 1 8 GHz Du...

Страница 31: ...1 x IrDA interface Table 2 2 Motherboard Specifications 2 1 3 Flat Panel Screen The STE 1xGTx comes with a flat panel TFT LCD screen Screen specifications for each model are detailed below 2 1 3 1 STE...

Страница 32: ...ight g 1100 Table 2 3 15 TFT LCD Monitor Specifications 2 1 3 2 STE 17GTx Screen The STE 17GTx comes with a 17 TFT LCD monitor at the front of the flat panel PC The specifications for the LCD monitor...

Страница 33: ...ight g 1900 Table 2 4 17 TFT LCD Monitor Specifications 2 1 3 3 STE 19GTx Screen The STE 19GTx comes with a 19 TFT LCD monitor at the front of the flat panel PC The specifications for the LCD monitor...

Страница 34: ...s 2 1 4 Power Supply The STE 1xGTx flat panel PC comes with either a 180 W AC DC 1U model STx 1xGTA or a 200 W DC 1U model STx 1xGTC RoHS compliant ATX power supply The PSUs have an MTBF greater than...

Страница 35: ...2 V 12 V 5 VSB Min Load A 0 3A 0 3A 1 5A 0A 0A Max Load A 16 8A 12A 10A 0 8A 2A Ripple and Noise mV 50mV 50mV 120mV 120mV 50mV 3 3 V 5 V 61 W 3 3 V 5 V 12 V 160 W GENERAL Watt 180 W PFC Active Hold up...

Страница 36: ...0 0A Max Load A 12A 12A 15 4A 0 5A 2 0A Ripple and Noise mV 50mV 50mV 120mV 120mV 50mV 3 3 V 5 V 80 W 3 3 V 5 V 12 V 184 W GENERAL Watt 200 W PFC Active Hold up time 20ms minimum Efficiency 78 MTBF 1...

Страница 37: ...15GTx Dimensions The dimensions of the STE 15GTx flat panel PC are shown in Figure 2 1 below Figure 2 1 STE 15GTx Dimensions units in mm CyberResearch Inc 19 25 Business Park Drive P 203 643 5000 F 2...

Страница 38: ...ries CyberResearch Panel PCs 2 2 2 STE 17GTx Dimensions The dimensions of the STE 17GTx flat panel PC are shown in Figure 2 2 below Figure 2 2 STE 17GTx Dimensions units in mm 20 Copyright 2011 CyberR...

Страница 39: ...19GTx Dimensions The dimensions of the STE 19GTx flat panel PC are shown in Figure 2 3 below Figure 2 3 STE 19GTx Dimensions units in mm CyberResearch Inc 21 25 Business Park Drive P 203 643 5000 F 2...

Страница 40: ...ferent on board devices This chapter gives a brief introduction to the STE 1xGTx motherboard Figure 2 4 STE 1xGTx Motherboard 2 4 CPU Support The STE 1xGTx motherboard supports LGA775 Intel 1 8 GHz Du...

Страница 41: ...hics interface support o Multi monitor support o Dynamic display mode support o Embedded video BIOS 2 5 2 ICH7 Southbridge Chipset The ICH7 Southbridge chipset comes with the following features PCI Bu...

Страница 42: ...delivery High Precision Event Timers 1 5 V operation with 3 3 V I O o 5 V tolerant buffers on IDE PCI USB Overcurrent and Legacy signals Integrated 1 5 V Voltage Regulator INTVR for the Suspend wells...

Страница 43: ...panel The 30 pin LVDS crimp connector is connected to the Chrontel CH7308B chipset which is connected to the Intel 945G through the SDVO interface 18 24 bit outputs Up to 140 megapixels per second 2...

Страница 44: ...rive 2 8 1 CompactFlash The CompactFlash socket supports standard CompactFlash Type I and CompactFlash Type II cards The chipset flash interface is multiplexed with an IDE interface and can be connect...

Страница 45: ...ernally for the internal 2 5 SATA hard drive The second SATA port is implemented on the external connector panel through an eSATA connector SATA controller specifications are listed below Supports two...

Страница 46: ...nsion Slots The STE 1xGTx includes either a PCI or PCIe x4 expansion card slot The expansion card slots add additional functionality to the STE 1xGTx Figure 2 8 Expansion Card Slot PCI cards available...

Страница 47: ...nts to be attached to the STE 1xGTx The external communications device connectors are shown in the sections below 2 10 1 USB 2 0 Ports USB connections provide fast data transmission to external device...

Страница 48: ...ansmission protocol for easy connection to devices with a standard RS 232 interface RS 422 and RS 485 transmission capabilities for longer distance connections 2 10 3 Parallel Port The parallel port c...

Страница 49: ...ffer memory Figure 2 12 Ethernet Some of the BCM5787 controller features are listed below Integrated 10 100 1000BASE T transceiver Automatic MDI crossover function PCIe v1 0a 10 100 1000BASE T full ha...

Страница 50: ...e or less 0o C to 50o C operating temperature 2 12 2 Touch Screen The touch screen panel on the STE 1xGTx allows complete user interaction without the need for a keyboard or mouse Some of the features...

Страница 51: ...CyberResearch Panel PCs STE 1xGTx Series Chapter 3 3 Unpacking CyberResearch Inc 33 25 Business Park Drive P 203 643 5000 F 203 643 5001 Branford CT USA www cyberresearch com...

Страница 52: ...and Wearing a simple anti static wristband can help to prevent ESD from damaging the STE 1xGTx Self grounding Touch a grounded conducting material before handling and periodically while handling the S...

Страница 53: ...ch com by phone 203 643 5000 or e mail sales cyberresearch com The STE 1xGTx is shipped with the following components many of the components listed below come pre installed Quantity Item and Part Numb...

Страница 54: ...CyberResearch Panel PCs 36 Copyright 2011 CyberResearch Inc Quantity Item and Part Number Image 1 Power cord 1 Screw set 1 IDE adapter for slim DVD CD ROM 1 Driver CD DVD 1 Touch pen Table 3 1 Packag...

Страница 55: ...CyberResearch Panel PCs STE 1xGTx Series Chapter 4 4 Installation and Configuration CyberResearch Inc 37 25 Business Park Drive P 203 643 5000 F 203 643 5001 Branford CT USA www cyberresearch com...

Страница 56: ...en mounting the system onto a rack panel wall or arm please make sure that at least two people are assisting with the procedure Anti static Discharge If a user open the rear panel of the STE 1xGTx to...

Страница 57: ...STE 1xGTx Step 2 Set the jumper settings Step 3 Install HDD CompactFlash and CD DVD drive Step 4 Mount the STE 1xGTx flat panel PC Step 5 Connect peripheral devices to the bottom panel of the STE 1xG...

Страница 58: ...earch Panel PCs 4 4 Remove the Back Cover Remove all the retention screws on the back cover Lift the cover up to remove Figure 4 1 Figure 4 1 Back Cover Retention Screws 4 5 Jumper Settings 40 Copyrig...

Страница 59: ...WR_SW1 Clear CMOS 3 pin header JP2 Monitor Setup 8 pin header JP1 CompactFlash card setup 2 pin header JP7 COM port pin 9 setting 6 pin header JP3 JP4 JP5 JP6 JP8 COM5 RS 232 422 485 RX select 6 pin h...

Страница 60: ...nds then reinstall the jumper clip back to pins 1 and 2 If the CMOS Settings Wrong message displays during the boot up process try to correct the fault by pressing the F1 to enter the CMOS Setup menu...

Страница 61: ...1024 48 bit Table 4 4 LCD Resolution Settings Pins 5 8 adjust the monitor setup on the system JP1 pins 5 8 Monitor Setup OPEN LVDS CRT 5 6 LVDS 7 8 CRT 5 6 7 8 Auto Table 4 5 Monitor Settings 4 5 4 CF...

Страница 62: ...and Voltage Selection Jumper JP4 COM2 Pin 9 Setting 1 2 12 V 3 4 RI 5 6 5 V Table 4 8 COM2 RI and Voltage Selection Jumper JP5 COM3 Pin 9 Setting 1 2 12 V 3 4 RI 5 6 5 V Table 4 9 COM3 RI and Voltage...

Страница 63: ...COM5 RS 232 422 485 RX Select 4 5 6 2 COM5 RS 422 485 TX Select J3 Jumper J3 sets the COM5 serial port as RS 422 or RS 485 J3 DESCRIPTION 1 3 2 4 RS422 3 5 4 6 RS485 Table 4 13 COM5 RS 422 485 TX Sele...

Страница 64: ...istor set Closed Closed Termination resistor set Table 4 15 COM5 RS 422 485 TX Select 4 5 7 LCD Voltage Settings JP9 WARNING Do not change these settings They are set for the installed LCD panel Using...

Страница 65: ...ions below The installation process of the following drives are shown 4 6 1 Hard Drive Installation 47 4 6 2 CompactFlash Installation 50 4 6 3 CD DVD Drive Installation 51 4 6 1 Hard Drive Installati...

Страница 66: ...ATA connector cable to the bracket Figure 4 3 HDD SATA Connector Step 4 Attach the hard drive in the bracket To do this slide the hard drive onto the bracket until it connects with the SATA connector...

Страница 67: ...tall the hard drive bracket with hard drive and SATA cable attached into the STE 1xGTx and fasten the four hard drive bracket screws Step 0 Figure 4 5 HDD Retention Screws CyberResearch Inc 49 25 Busi...

Страница 68: ...e CompactFlash card please follow the steps below Step 1 Undo the CompactFlash slot cover screw and remove the CompactFlash cover plate Figure 4 6 CompactFlash Cover Plate Step 2 Insert the CompactFla...

Страница 69: ...is an IDE drive if it is a SATA drive proceed to Step 5 Attach a CD DVD drive adapter to a CD DVD drive by aligning the two retention screw holes in the CD DVD drive adapter with the retention screw...

Страница 70: ...esearch Panel PCs Figure 4 9 CD DVD Drive Adapter Installation Step 5 Undo the optical drive bracket screws and remove the optical drive bracket Figure 4 10 CD DVD Drive Retention Screws 52 Copyright...

Страница 71: ...emove the four screws from the optical drive bracket assembly Remove the blank drive plate Figure 4 11 Optical Drive Blank Plate Assembly CyberResearch Inc 53 25 Business Park Drive P 203 643 5000 F 2...

Страница 72: ...ep 7 Install the optical drive in the same position as the previously removed blank optical drive plate Fasten the same four screws to attach the optical drive to the bracket Figure 4 12 Optical Drive...

Страница 73: ...e SATA cable screws Figure 4 13 Optical Drive SATA Cable Step 9 Reinstall the optical drive bracket into the STE 1xGTx and fasten the optical bracket screws Step 0 Figure 4 14 Optical Drive Bracket Sc...

Страница 74: ...y described below 4 7 1 Wall Mounting To mount the STE 1xGTx flat panel PC onto a wall please follow the steps below Step 1 Select the location on the wall for the wall mounting bracket Step 2 Careful...

Страница 75: ...mounting screws on the monitor rear panel with the mounting holes on the bracket Step 8 Carefully insert the screws through the holes and gently pull the monitor downwards until the monitor rests secu...

Страница 76: ...it on the top panel of the panel PC Carefully mark the location of the wall mounting kit screw holes on the wall Drill a pilot hole at the marked location on the wall Secure the wall mounting kit to t...

Страница 77: ...hickness should be no more than 6 mm Step 1 Select the position on the panel to mount the STE 1xGTx Step 2 Cut out a section of the panel that corresponds to the rear panel dimensions of the STE 1xGTx...

Страница 78: ...STE 1xGTx Series CyberResearch Panel PCs Figure 4 18 15 Panel Cutout Dimensions Figure 4 19 17 Panel Cutout Dimensions 60 Copyright 2011 CyberResearch Inc...

Страница 79: ...lush against the panel Step 4 Insert the panel mounting clamps into the pre formed holes along the edges of the STE 1xGTx behind the metal frame Figure 4 21 Refer to the mounting kit packing list for...

Страница 80: ...the panel mounting clamps until the plastic caps at the front of all the screws are firmly secured to the panel Figure 4 22 Step 0 Figure 4 22 Tighten the Panel Mounting Clamp Screws 4 7 3 Rack and Ca...

Страница 81: ...purchased item Please correctly mount the arm onto the surface it uses as a base To do this refer to the installation documentation that came with the mounting arm NOTE When purchasing the arm please...

Страница 82: ...tom panel to connect the STE 1xGTx flat panel PC to a second monitor NOTE To use the dual screen option please configure this option in the Intel Extreme Graphics configuration settings To do this ope...

Страница 83: ...g the PS 2 connector at the end of the keyboard or mouse cable into the corresponding PS 2 connector on the external peripheral interface panel 4 8 5 Parallel Port Connection The parallel port is typi...

Страница 84: ...STE 1xGTx Series CyberResearch Panel PCs Chapter 5 5 BIOS Setup 66 Copyright 2011 CyberResearch Inc...

Страница 85: ...ars before the DELETE key is pressed restart the computer and try again 5 1 2 Using Setup Use the arrow keys to highlight items press ENTER to select use the PageUp and PageDown keys to change entries...

Страница 86: ...again 5 1 4 Unable to Reboot After Configuration Changes If the computer cannot boot after changes to the system configuration is made CMOS defaults Use the jumper described in Section 4 5 5 1 5 BIOS...

Страница 87: ...Overview cannot be changed The items shown in the system overview include AMI BIOS Displays auto detected BIOS information o Version Current BIOS version o Build Date Date the current BIOS version was...

Страница 88: ...the day month and year 5 3 Advanced Use the Advanced menu BIOS Menu 2 to configure the CPU and peripheral devices through the following sub menus WARNING Setting the wrong values in the sections below...

Страница 89: ...CyberResearch Panel PCs STE 1xGTx Series BIOS Menu 2 Advanced CyberResearch Inc 71 25 Business Park Drive P 203 643 5000 F 203 643 5001 Branford CT USA www cyberresearch com...

Страница 90: ...ufacturer Lists the name of the CPU manufacturer Brand String Lists the brand name of the CPU being used Frequency Lists the CPU processing speed FSB Speed Lists the FSB speed Cache L1 Lists the CPU L...

Страница 91: ...is reported in full Enabled Limits the maximum CPUID to 30h Intel SpeedStep Technology Enabled The Intel SpeedStep Technology option allows the processor to use SpeedStep if the processor supports it...

Страница 92: ...4 IDE Configuration ATA IDE Configurations Enhanced Use the ATA IDE Configurations option to configure the ATA IDE controller Disabled Disables the on board ATA IDE controller Compatible Configures t...

Страница 93: ...ATA drives Behind PATA The SATA drives are configured after the PATA drives Legacy IDE Channels PATA Pri SATA Sec SATA Only Only the SATA drives are enabled PATA Pri SATA Sec DEFAULT The IDE drives ar...

Страница 94: ...ons shown in Section 5 3 2 1 appear 5 3 2 1 IDE Master IDE Slave Use the IDE Master and IDE Slave configuration menu to view both primary and secondary IDE device details and configure the IDE devices...

Страница 95: ...s supported S M A R T Indicates whether or not the Self Monitoring Analysis and Reporting Technology protocol is supported 32Bit Data Transfer Enables 32 bit data transfer Type Auto Use the Type BIOS...

Страница 96: ...ck Multi Sector Transfer Auto Use the Block Multi Sector Transfer to disable or enable BIOS to auto detect if the device supports multi sector transfers Disabled BIOS is prevented from using Multi Sec...

Страница 97: ...Mode BIOS selection to adjust the DMA mode options Auto DEFAULT BIOS auto detects the DMA mode Use this value if the IDE disk drive support cannot be determined SWDMA0 Single Word DMA mode 0 selected...

Страница 98: ...his mode it is required that an 80 conductor ATA cable is used S M A R T Auto Use the S M A R T option to auto detect disable or enable Self Monitoring Analysis and Reporting Technology SMART on the d...

Страница 99: ...nected to the system BIOS Menu 6 IDE Master and IDE Slave Configuration Floppy A B Use the Floppy A B option to configure the floppy disk drive Options are listed below Disabled 360 KB 51 4 1 2 MB 51...

Страница 100: ...nfiguration Digital I O Address 2D8 Use the Digital I O Address option to select the digital I O port base address 2C0h DEFAULT The digital I O port address is 2C0h 2C8h The digital I O port address i...

Страница 101: ...al Port 1 mode is IrDA ASK IR Serial Port 1 mode is ASK IR Serial Port2 Address 2F8 IRQ3 Use the Serial Port2 Address option to select the Serial Port 2 base address Disabled No base address is assign...

Страница 102: ...rallel Port Mode Normal Use the Parallel Port Mode option to select the mode the parallel port operates in Normal DEFAULT The normal parallel port mode is the standard mode for parallel port operation...

Страница 103: ...s assigned as the parallel port interrupt address Serial Port3 Address 3E8 Use the Serial Port3 Address option to select the base addresses for serial port 3 Disabled No base address is assigned to se...

Страница 104: ...2 or RS422 485 RS 232 Use the Select RS232 or RS422 485 option to select the Serial Port 5 signaling mode RS232 DEFAULT Serial Port 2 signaling mode is RS 232 RS422 485 Serial Port 2 signaling mode is...

Страница 105: ...tion The Hardware Health Configuration menu BIOS Menu 8 shows the operating temperature fan speeds and system voltages BIOS Menu 8 Hardware Health Configuration CyberResearch Inc 87 25 Business Park D...

Страница 106: ...be set by the user PWM Manually mode Pulse width modulation set manually When the FAN x Mode Setting option is in the Automatic Mode the following parameters can be set Temperature Limit of OFF Tempe...

Страница 107: ...em to be damaged The Temperature Limit of Start option can only be set if the FAN x Mode Setting option is set to Automatic Mode Use the Temperature Limit of Start option to select the CPU temperature...

Страница 108: ...ng option is set to Automatic Mode Use the Fan Start PWM option to select the PWM the fan starts to rotate with after the temperature specified in the Temperature 3 Limit of Start is exceeded To selec...

Страница 109: ...red o CPU Temperature o System Temperature 1 o System Temperature 2 Fan Speeds The CPU cooling fan speed is monitored o CPU Fan1 Speed o Fan 1 Speed o Fan 2 Speed o Fan 3 Speed Voltages The following...

Страница 110: ...Supply Mode ATX Use the Power Supply Mode BIOS option to select the power supply that is connected to the system AT power An AT power supply is connected to the system and no advanced power management...

Страница 111: ...e the system enters when it is not being used S1 POS DEFAULT The system enters S1 POS sleep state The system appears off The CPU is stopped RAM is refreshed the system is running in a low power mode S...

Страница 112: ...f Use the Power Button Mode BIOS to specify how the power button functions On Off DEFAULT When the power button is pressed the system is either turned on or off Suspend When the power button is presse...

Страница 113: ...vent generated by activity on the keyboard or mouse Resume on Ring Disabled Use the Resume on Ring BIOS option to enable activity on the RI ring in modem line to rouse the system from a suspend or sta...

Страница 114: ...be roused from a suspended state Disabled DEFAULT The real time clock RTC cannot generate a wake event Enabled If selected the following appears with values that can be selected RTC Alarm Date Days Sy...

Страница 115: ...nd allows a remote host running a terminal program to display and configure the BIOS settings BIOS Menu 12 Remote Access Configuration Advanced Remote Access Disabled Use the Remote Access option to e...

Страница 116: ...stem is remotely accessed through COM1 COM2 System is remotely accessed through COM2 NOTE Make sure the selected COM port is enabled through the Super I O configuration menu Base Address IRQ 3F8h 4 Th...

Страница 117: ...the Redirection After BIOS POST option to specify when console redirection should occur Disabled The console is not redirected after POST Boot Loader Redirection is active during POST and during Boot...

Страница 118: ...13 USB Configuration USB Configuration The USB Configuration field shows the system USB configuration The items listed are Module Version x xxxxx xxxxx USB Devices Enabled The USB Devices Enabled fiel...

Страница 119: ...until a USB compatible operating system is fully booted with all USB drivers loaded When this option is enabled any attached USB mouse or USB keyboard can control the system even when there is no USB...

Страница 120: ...lay 20 Sec Use the USB Mass Storage Reset Delay option to set the number of seconds POST waits for the USB mass storage device after the start unit command 10 Sec POST waits 10 seconds for the USB mas...

Страница 121: ...using BIOS INT13h calls after selecting the proper emulation option in BIOS setup The FORMAT utility provided by Microsoft MS DOS Microsoft Windows 95 and Microsoft Windows 98 can be used for this pur...

Страница 122: ...s greater than 512 bytes can only be booted using this option 5 4 PCI PnP Use the PCI PnP menu BIOS Menu 15 to configure advanced PCI and PnP settings WARNING Setting wrong values for the BIOS selecti...

Страница 123: ...addresses are IRQ3 IRQ4 IRQ5 IRQ7 IRQ9 IRQ10 IRQ 11 IRQ 14 IRQ 15 DMA Channel Available Use the DMA Channel option to assign a specific DMA channel to a particular PCI PnP device Available DEFAULT Th...

Страница 124: ...f memory that should be reserved for legacy ISA devices Disabled DEFAULT No memory block reserved for legacy ISA devices 16K 16 KB reserved for legacy ISA devices 32K 32 KB reserved for legacy ISA dev...

Страница 125: ...ck Boot BIOS option to make the computer speed up the boot process Disabled No POST procedures are skipped Enabled DEFAULT Some POST procedures are skipped to decrease the system boot time Quiet Boot...

Страница 126: ...keyboard Number Lock automatically To use the 10 keys on the keyboard press the Number Lock key located on the upper left hand corner of the 10 key pad The Number Lock LED on the keyboard lights up wh...

Страница 127: ...le boot devices may include HDD CD DVD USB BIOS Menu 18 Boot Device Priority Settings 5 5 3 Hard Disk Drives Use the Hard Disk Drives menu to specify the boot sequence of the available HDDs When the m...

Страница 128: ...ly two HDDs are connected only 1st Drive and 2nd Drive are listed The boot sequence from the available devices is selected If the 1st Drive option is selected a list of available HDDs is shown Select...

Страница 129: ...rive HDD SM part ID NOTE Only the drives connected to the system are shown For example if only two CDs or DVDs are connected only 1st Drive and 2nd Drive are listed The boot sequence from the availabl...

Страница 130: ...STE 1xGTx Series CyberResearch Panel PCs BIOS Menu 20 CD DVD Drives 112 Copyright 2011 CyberResearch Inc...

Страница 131: ...lled select this field and enter the password After the password has been added Install appears next to Change Supervisor Password Change User Password Use the Change User Password to set or change a...

Страница 132: ...et menu BIOS Menu 22 to access the Northbridge and Southbridge configuration menus WARNING Setting the wrong values for the Chipset BIOS selections in the Chipset BIOS menu may cause the system to mal...

Страница 133: ...and 16 MB for ISA expansion cards that require a specified area of memory to work properly If an older ISA expansion card is used please refer to the documentation that came with the card to see if i...

Страница 134: ...n the Installation and Configuration chapter PID Current Jumper Setting 1 1024x768x24 The PID Current Jumper Setting shows the current setting of the flat panel resolution jumper Internal Graphics Mod...

Страница 135: ...EMI is generated when the system clock generator pulses have extreme values Spreading the pulse spectrum modulates changes in the extreme values from spikes to flat curves thus reducing the EMI This b...

Страница 136: ...s disabled Azalia DEFAULT The onboard HD Audio is enabled 5 8 Exit Use the Exit menu BIOS Menu 25 to load default BIOS values optimal failsafe values and to save configuration changes BIOS Menu 25 Exi...

Страница 137: ...figuration setup program Load Optimal Defaults Use the Load Optimal Defaults option to load the optimal default values for each of the parameters on the Setup menus F9 key can be used for this operati...

Страница 138: ...STE 1xGTx Series CyberResearch Panel PCs Chapter 6 6 Software Installation 120 Copyright 2011 CyberResearch Inc...

Страница 139: ...6 2 DVD Driver Auto run All the drivers for the STE 1xGTx Series are on the installation DVD that came with the system To install the drivers please follow the steps below Important Note The following...

Страница 140: ...l PC Monitor Drivers as shown in Figure 6 1 Step 4 Select STMxx STExx Series from the secondary menu options as shown in Figure 6 2 Figure 6 2 Select STExx Series Step 5 A tertiary menu appears select...

Страница 141: ...rivers appears as shown below Figure 6 4 Available Drivers Step 7 Read subsequent sections in this chapter for installation procedure of each driver Step 0 6 3 Audio Driver Installation Note CyberRese...

Страница 142: ...river Auto run before completing next steps To install the Audio drivers please follow the steps below Step 1 Choose AUDIO DRIVERS from the menu as shown below Figure 6 5 Select Audio Drivers Step 2 S...

Страница 143: ...as shown above Step 5 The audio driver installation begins Step 6 The Windows logo testing warning screen is shown The warning explains that the software has not passed Windows logo testing Click CON...

Страница 144: ...ep 7 The confirmation screen offers the option of restarting the computer now or later For the settings to take effect the computer must be restarted Click FINISH to restart the computer S t e p 0 Fig...

Страница 145: ...e section 6 2 DVD Driver Auto run before completing next steps To install the Chipset drivers please follow the steps below Step 1 Choose CHIPSET DRIVERS from the menu as shown below Figure 6 10 Selec...

Страница 146: ...11 Chipset Driver Installation Welcome Screen Step 3 Click NEXT to continue the installation process Step 4 The license agreement in Figure 6 12 appears Figure 6 12 Chipset Driver Installation Licens...

Страница 147: ...6 The Readme file in Figure 6 13 appears Figure 6 13 Chipset Driver Readme File Information Step 7 Read the Readme file information and then click NEXT to start the driver installation Step 8 The Set...

Страница 148: ...set Driver Installation Complete Step 9 After the driver installation process is complete click NEXT to continue Step 10 The Setup is Complete windows appears Figure 6 15 Figure 6 15 Chipset Driver In...

Страница 149: ...Video driver please follow the steps below Note If you are unsure how to arrive at the Figure below see section 6 2 DVD Driver Auto run before completing next steps To install the Video drivers pleas...

Страница 150: ...e the driver installation process Figure 6 17 Step 4 The driver welcome screen appears Figure 6 18 Figure 6 18 Graphics Driver Installation Step 5 Click NEXT to continue the driver installation Figure...

Страница 151: ...terms of the license agreement and continue installation Step 8 A new window appears with details of the drivers to be installed Figure 6 20 Figure 6 20 Graphics Driver Readme file Step 9 Click NEXT...

Страница 152: ...h Panel PCs Step 10 The driver installation progress window appears and shows details for each of the drivers as they are installed Figure 6 21 Figure 6 21 Graphics Driver Installation Notice 134 Copy...

Страница 153: ...phics Driver Installation Complete Step 0 6 6 Gigabit Ethernet Driver Installation To install the Gigabit Ethernet driver please follow the steps below Note If you are unsure how to arrive at the Figu...

Страница 154: ...23 Select Network Drivers Step 2 When the screen below appears click ALL WINDOWS Figure 6 24 Select All Windows Step 3 The Setup screen appears and prepares the InstallShield Wizard for the installat...

Страница 155: ...etup Screen Step 4 Click NEXT as shown below Figure 6 26 Select Next t Step 5 Click INSTALL to begin the installation as shown in Figure 6 27 CyberResearch Inc 137 25 Business Park Drive P 203 643 500...

Страница 156: ...tall Step 6 The InstallShield Wizard begins driver installation as shown in Figure 6 28 Figure 6 28 Driver Installation Begins Step 7 When the InstallShield Wizard ends click FINISH as shown below to...

Страница 157: ...CyberResearch Panel PCs STE 1xGTx Series Figure 6 29 Select Finish CyberResearch Inc 139 25 Business Park Drive P 203 643 5000 F 203 643 5001 Branford CT USA www cyberresearch com...

Страница 158: ...STE 1xGTx Series CyberResearch Panel PCs Chapter 7 7 System Maintenance 140 Copyright 2011 CyberResearch Inc...

Страница 159: ...onents are described below 7 2 Motherboard Replacement A user cannot replace a motherboard If the motherboard fails it must be shipped back to CyberResearch Inc to be replaced Contact CyberResearch In...

Страница 160: ...ts the back cover must be removed To remove the back cover please follow the steps below Please refer to Section 4 4 for back cover removal instructions 7 4 DIMM Replacement Please read the warnings a...

Страница 161: ...0 7 5 Elevated Platform Removal The elevated platform supports the optical drive and the hard drive It is not necessary to remove the optical drive bracket or hard drive bracket to remove the elevate...

Страница 162: ...levated platform screws on the side panel Figure 7 3 Figure 7 3 Side Panel Elevated Platform Screws Step 3 Unfasten the elevated platform screws on the bottom panel Figure 7 4 Figure 7 4 Bottom Panel...

Страница 163: ...e warnings at the beginning of Section 4 3 before attempting to access any STE 1xGTx internal components If the PSU module has been damaged it must be replaced To replace the PSU module please follow...

Страница 164: ...ct all PSU connections including those to the motherboard Figure 7 6 and any disk drives Figure 7 6 PSU Power Cables Step 4 Unfasten the screws on the inside panel Figure 7 7 Figure 7 7 PSU Bottom Pan...

Страница 165: ...Step 2 Insert the PSU module and bracket assembly into the chassis and attach the PSU bracket to the chassis with the previously removed retention screws Step 3 Secure the PSU module to the chassis b...

Страница 166: ...e system cooling fans please follow the steps below 7 7 1 Remove the Old System Cooling Fans Step 1 Remove the back cover Section 4 4 Step 2 Detach and remove the elevated platform Section 7 5 Step 3...

Страница 167: ...system cooling fans please follow the steps below Step 1 Insert the system cooling fans into the chassis and attach to the left panel with the previously removed retention screws Step 2 Rebundle the...

Страница 168: ...STE 1xGTx Series CyberResearch Panel PCs Appendix A A BIOS Options 150 Copyright 2011 CyberResearch Inc...

Страница 169: ...78 Block Multi Sector Transfer Auto 78 PIO Mode Auto 78 DMA Mode Auto 79 S M A R T Auto 80 32Bit Data Transfer Enabled 80 Floppy A B 81 Digital I O Address 2D8 82 Serial Port1 Address 3F8 IRQ4 82 Seri...

Страница 170: ...larm Disabled 96 Remote Access Disabled 97 Serial Port Number COM1 98 Base Address IRQ 3F8h 4 98 Serial Port Mode 115200 8 n 1 98 Redirection After BIOS POST Always 99 USB Configuration 100 USB Device...

Страница 171: ...By Jumper 116 PID Current Jumper Setting 1 1024x768x24 116 Internal Graphics Mode Select Enable 8 MB 116 Spectrum Disabled 117 Audio Controller Azalia 118 Save Changes and Exit 118 Discard Changes an...

Страница 172: ...STE 1xGTx Series CyberResearch Panel PCs Appendix B B Terminology 154 Copyright 2011 CyberResearch Inc...

Страница 173: ...a binary 1 BIOS The Basic Input Output System BIOS is firmware that is first run when the computer is turned on and can be configured by the end user CODEC The Compressor Decompressor CODEC encodes an...

Страница 174: ...gy EIST allows users to modify the power consumption levels and processor performance through application software The application software changes the bus to core frequency ratio and the processor co...

Страница 175: ...psets The SATA bus has transfer speeds up to 1 5 Gb s and the SATA II bus has data transfer speeds of up to 3 0 Gb s S M A R T Self Monitoring Analysis and Reporting Technology S M A R T refers to aut...

Страница 176: ...STE 1xGTx Series CyberResearch Panel PCs Appendix C C Digital I O Interface 158 Copyright 2011 CyberResearch Inc...

Страница 177: ...elected address to enable the DIO functions NOTE For further information please refer to the datasheet for the Super I O chipset C 2 DIO Connector Pinouts The following table describes how the DIO con...

Страница 178: ...functions is listed below MOV AX 6F08H Sets the digital port as input INT 15H Initiates the INT 15H BIOS call C 3 2 Enable the DIO Output Function The BIOS interrupt call INT 15H controls the digital...

Страница 179: ...CyberResearch Panel PCs STE 1xGTx Series Appendix D D Watchdog Timer CyberResearch Inc 161 25 Business Park Drive P 203 643 5000 F 203 643 5001 Branford CT USA www cyberresearch com...

Страница 180: ...chdog Timer INT 15H AH 6FH Sub function AL 2 Sets the Watchdog Timer s period BL Time out value Its unit second is dependent on the item Watchdog Timer unit select in CMOS setup Table D 1 AH 6FH Sub f...

Страница 181: ...OUNTER W_LOOP MOV AX 6F02H setting the time out value MOV BL 30 time out value is 48 seconds INT 15H ADD THE APPLICATION PROGRAM HERE CMP EXIT_AP 1 is the application over JNE W_LOOP No restart the ap...

Страница 182: ...STE 1xGTx Series CyberResearch Panel PCs Appendix E E Address Mapping 164 Copyright 2011 CyberResearch Inc...

Страница 183: ...arch Panel PCs STE 1xGTx Series E 1 Direct Memory Access DMA Figure E 1 Direct Memory Access DMA CyberResearch Inc 165 25 Business Park Drive P 203 643 5000 F 203 643 5001 Branford CT USA www cyberres...

Страница 184: ...STE 1xGTx Series CyberResearch Panel PCs E 2 Input Output IO Figure E 2 Input Output IO 1 of 2 166 Copyright 2011 CyberResearch Inc...

Страница 185: ...CyberResearch Panel PCs STE 1xGTx Series Figure E 3 Input Output IO 2 of 2 CyberResearch Inc 167 25 Business Park Drive P 203 643 5000 F 203 643 5001 Branford CT USA www cyberresearch com...

Страница 186: ...STE 1xGTx Series CyberResearch Panel PCs E 3 Interrupt Request IRQ Figure E 4 Interrupt Request IRQ 168 Copyright 2011 CyberResearch Inc...

Страница 187: ...CyberResearch Panel PCs STE 1xGTx Series E 4 Memory Figure E 5 Memory CyberResearch Inc 169 25 Business Park Drive P 203 643 5000 F 203 643 5001 Branford CT USA www cyberresearch com...

Страница 188: ...STE 1xGTx Series CyberResearch Panel PCs Appendix F F Compatibility 170 Copyright 2011 CyberResearch Inc...

Страница 189: ...s have been successfully tested on the STE 1xGTx CPU FSB Frequency L2 Cache Intel Core 2 Duo 800 MHz 3 4 GHz 1 MB F 3 Compatible Memory Modules NOTE The memory modules listed below have been tested on...

Страница 190: ...STE 1xGTx Series CyberResearch Panel PCs Index 172 Copyright 2011 CyberResearch Inc...

Страница 191: ...Screen 14 15 BIOS 67 68 69 75 99 104 108 114 118 FSB 72 C H CD DVD Drive Installation 51 CF Card Setup 43 HDD Installation 47 Clear CMOS Setup 41 42 I COM port RI and Voltage Selection 44 COM2 Port R...

Страница 192: ...Express GbE controller 31 Power Button Mode 94 Power Supply 16 Preinstalled Components 38 PSU Module Replacement 145 R Resolution 13 S Safety Precautions 171 SATA controller 27 Serial Port Connection...

Страница 193: ...ents of the signals you are trying to measure as well as the signals on the board module or power supply 4 Isolate problem areas that are not working as you expected 5 Have the source code to the prog...

Страница 194: ...STE 1xGTx Series CyberResearch Panel PCs Intentionally Blank 4 Copyright 2011 CyberResearch Inc...

Страница 195: ...ased and in lieu of all other warranties expressed implied or statutory including but not limited to any implied warranty of merchant ability or fitness and all other obligations or liabilities of sel...

Страница 196: ...STE 1xGTx Series CyberResearch Panel PCs Intentionally Blank 6 Copyright 2011 CyberResearch Inc...

Страница 197: ......

Страница 198: ...CyberResearch Inc 25 Business Park Drive Branford CT 06405 USA P 203 643 5000 F 203 643 5001 www cyberresearch com...

Отзывы: