6
6
Inserting a Disc
Hold the disc by the EDGES to
avoid touching the shiny surface.
2
Open the Disc Tray
1
Front View
3
Slide the OPEN switch to the left to open the disc tray cover.
Push the disc down onto
the spindle by using your first two
fingers in the center of the disc.
7
7
Mini-DVD Disc Playback
Pausing Play
1
Starting Play
Most discs will begin to play after the disc tray cover has been closed.
Some discs contain a menu system that allows you to choose from
various episodes, chapters or special features. Use the
keys to navigate menus and press
ENTER
to select options and play.
2
Press at any time to
pause disc play. Press this
button again to resume.
3
Stopping Play
Press at any time to
stop disc play. Press
to start playback again.
4
Skipping to the Next or Previous Chapter
To skip ahead or return to the next / previous chapter on the disc, press
and
HOLD
the or . key for
2 SECONDS
.
5
Fast Forward and Fast Reverse Scanning
MENU
ENTER
6
7
Changing Settings
Press
FUNCTION
to change
settings for disc playback and
player setup.
8
Navigating Disc Menus
Use the keys to
move around in disc menus
and the player setup screens.
To select and confirm choices
in menus, press
ENTER
.
Accessing Disc Menus
Press
MENU
to access the
disc menu on Mini-DVD discs
that support this feature.
To begin scanning through the disc in forward or reverse mode, press
the or key. Scanning begins at 2X speed. To increase
the scanning speed, repeat this procedure. The maximum scanning
speed is 32X.
To resume normal playback, press the key.
4
4
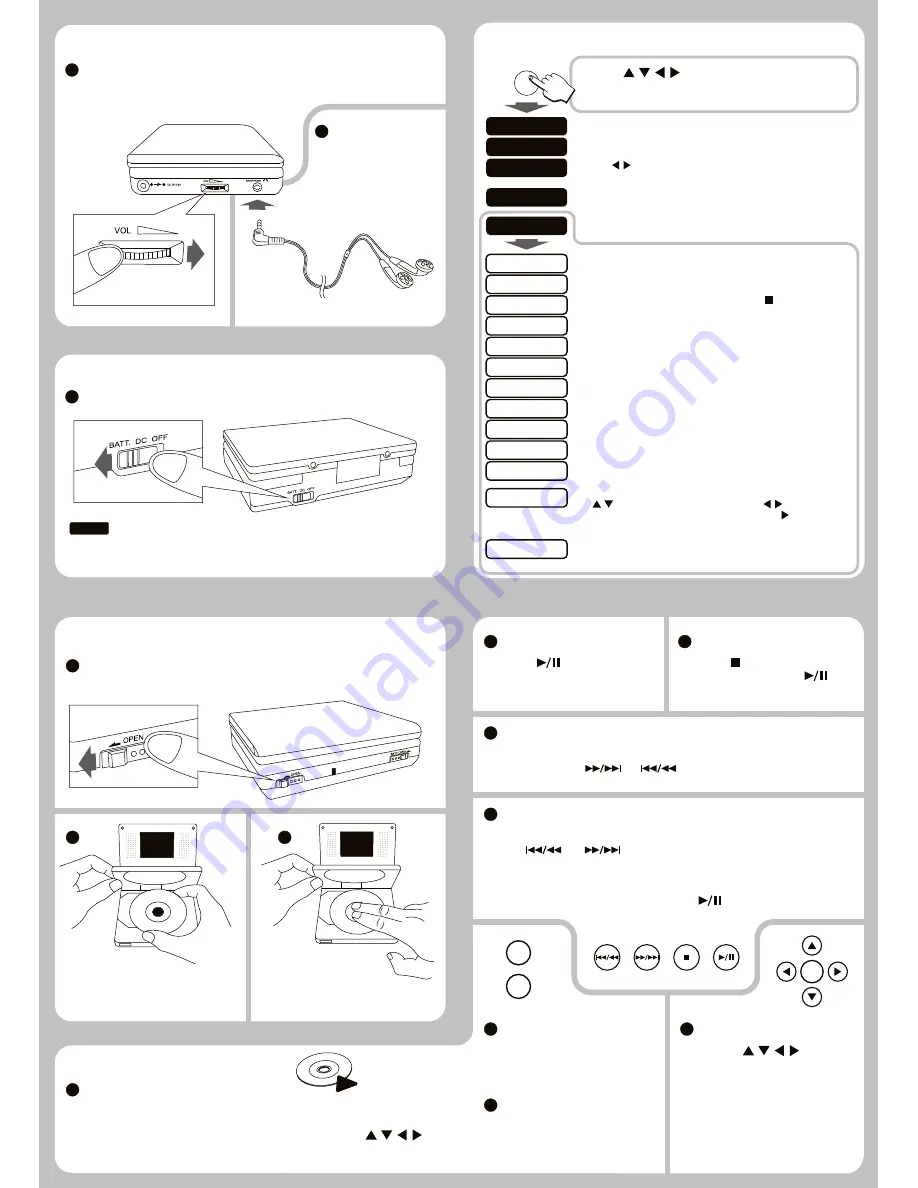
Plugging In the Headphones
Turn Volume
Down
1
2
First, Turn the Volume Down
To prevent damage to your hearing, turn the volume down first before
plugging in the headphones.
Plug the Stereo
Headphones Into
the Side Jack as
Shown.
5
5
Powering On
1
Move the Power Switch to the BATT or DC Position
To run unit using AC power, make sure unit is plugged in and
switch to DC position. Turn the player OFF when not in use.
NOTE
Side View
Back View
8
8
Changing Player Settings
Use the keys to navigate the menus.
Press
ENTER
to select a setting or to cycle through
available options.
FUNCTION
Brightness
Audio
Display
Setup
Subtitles
Select an audio track on the disc. This feature only works on discs
that support multiple audio tracks.
Use the keys to adjust. Press
ENTER
to cycle through
Brightness
,
Contrast
and
Sharpness
settings.
Use to select subtitles on discs that support this feature.
Displays the Title, Chapter and Elapsed Playback Time on-screen.
Enter or change the password to use with the parental function. Use
the keys to enter numbers 0-9. Use the keys to move
left or right. Confirm the entered password with the key. Use the
master password
1389
to override any saved value.
Software Ver
OSD Language
Screen Saver
Memory
Reset
Menu
Audio
Subtitle
Aspect
Angle Mark
CC
Parental
Password
Sets the language of the Setup Menu and Display Messages.
Turns the screen saver On or Off.
Stores current playback location. To use, press twice and turn
power off. When turned on, play resumes from where you left off.
Resets the player settings to factory default settings.
Default disc menu language for discs supporting this feature.
Default audio language for discs supporting multiple languages.
Default subtitle language for supporting discs.
On screen display of current angle for discs with multi-angle function.
Closed Captions. Turn On or Off for discs that support this feature.
Set the parental level to limit playback of discs by children to the
level specified. This option requires that the password be set.
Displays the player’s firmware version.
FUNCTION
LCD Aspect Ratio. Set to match the format of the DVD disc.


