background image

TV SETUP

TV MENU

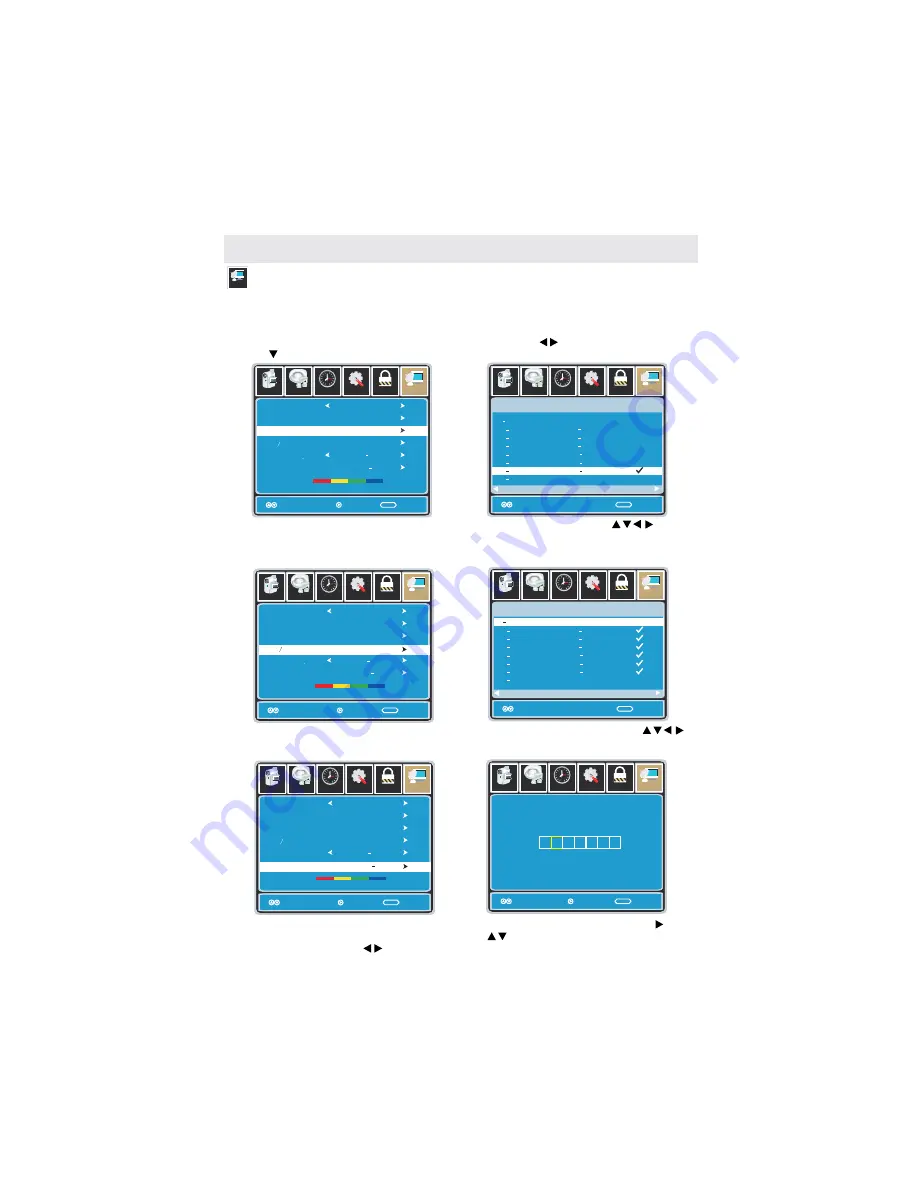
The

menu provides for the setup of your television to receive TV channels, store your favorites,

add or skip channels and label them by their call letters.

TV

Press the

button on the remote control. Navigate using the       buttons to select

.

Press the     button to highlight your preferences.

MENU

TV

Channel

Setup

Parental

12

6

Time

Picture

Audio

TV

Air

/

Cable

Auto Scan

Favorite

Add   Delete

Channel No

Channel Lable

DTV Signal

Air

Move                          Nxet                      Exit

MENU

50 3

KOCE

LB

Good

Setup

Parental

12

6

Time

Picture

Audio

TV

Move   Press ’ENTER’ Change               Exit

MENU

Channel

Program Name             Favorite

ATSC

1

ATSC

2

ATSC

3

KOCE HD
KOCE SD

KOCE LB

2 0
14 1
14 2
14 3
50 1
50 2

66 0

50 3

Prev

Next

Setup

Parental

12

6

Time

Picture

Audio

TV

Air

/

Cable

Auto Scan

Favorite

Add   Delete

Channel No

Channel Lable

DTV Signal

Air

Move                          Next                        Exit

MENU

50 3

KOCE

LB

Good

Setup

Parental

12

6

Time

Picture

Audio

TV

Move   Press ’ENTER’ Change               Exit

MENU

Channel

Program Name

Add/Delete

Prev

Next

66 0

ATSC

1

ATSC

2

ATSC

3

KOCE HD
KOCE SD
KOCE LB

2 0

14 1
14 2
14 3
50 1
50 2
50 3

• Highlight

to add channels to your Favorites List. Navigate using the               buttons

to select channels to be added or deleted from your list. Press the

button  to add or delete

a channel. A check mark indicates a channel has been added. You may also display your
list from the remote control by pressing FAV.

FAVORITE

ENTER

FAVORITE

• Highlight

to select or skip channels already in memory. Navigate using

buttons to access the list of available channels. Press the

button to change the channels

status. A checkmark indicates a channel has been added.

ADD/DELETE

ENTER

Setup

Parental

12

6

Time

Picture

Audio

TV

Air

/

Cable

Auto Scan

Favorite

Add   Delete

Channel No

Channel Lable

DTV Signal

Air

Move                          Next                        Exit

MENU

50 3

KOCE

LB

Good

Setup

Parental

12

6

Time

Picture

Audio

TV

Move                           Next

Exit

MENU

K B B C  -  D T

• Highlight

to name or rename a broadcast channel. Navigate using the    button

to enter the screen menu to re-label a channel. Use the       buttons to spell out each letter,
number or character. Use the       buttons to ad vance to the next space.

CHANNEL LABEL

How to Navigate:

25

Содержание LCD3718A

Страница 1: ...Model LCD3718A INSTRUCTION MANUAL Before using the TV please read this manual thoroughly and retain it for future reference ...

Страница 2: ......

Страница 3: ...nit On A Proper Place Turning The Unit On For The First Time Source Selection Picture Menu Audio Menu Time Menu Setup Menu Parental Menu TV Menu Zoom Function 14 16 18 19 22 25 26 1 2 2 1 3 4 7 8 3 3 5 6 9 10 2 7 7 7 8 8 9 9 10 4 5 5 6 11 12 12 12 SAFETY PRECAUTION IMPORTANT SAFETY INSTRUCTION MAINTENANCE ACCESSORIES GETTING STARTED CONTROL REFERENCE GUIDE WALL MOUNT INSTALLATION INITIAL SETUP TV ...

Страница 4: ...CONTENTS SAFETY CLASS This is an IEC safety class I product and it must be grounded for safety 11 29 12 13 27 28 30 DISPLAY MODE SPECIFICATION TROUBLE SHOOTING GUIDE PC Formats Video Formats ...

Страница 5: ...e to radio communication However there is no guarantee that interference will not occur in a particular installation If this unit does cause harmful interference to radio or television reception which can be determined by turning the unit off and on the user is encouraged to try to correct the interference by one or more of the following measures Reorient or relocate the receiving antenna Increase...

Страница 6: ...pparatus the apparatus has been exposed to rain or moisture does not operate normally or has been dropped 9 Do not defeat the safety purpose of the polarized or grounding type plug A polarized plug has two blades with one wider than the other A grounding type plug has two blades and a third grounding prong The wide blade or the third prong are provided for your safety If the provided plug does not...

Страница 7: ...eries When the batteries become weak the operating distance of the remote control is greatly reduced and you will need to replace the batteries Danger of explosion if battery is incorrectly replaced NOTES If the remote control is not going to be used for a long time remove the batteries to avoid damage caused by battery leakage corrosion Do not mix old and new batteries Do not mix ALKALINE standar...

Страница 8: ...ress to activate the Closed Captioning feature This function only works on programs broadcasted with captions Press to select between MONO sound STEREO sound and Secondary Audio Program SAP Press to confirm selections on a menu screen Press to set the SLEEP timer The unit will remain on for the time that is set and will automatically shut off afterwards Press to select the picture modes among STAN...

Страница 9: ...T VIEW TV ANTENNA Terminal 1 2 3 4 5 Green Color Blue Color Red Color IN 6 VGA AUDIO IN Jack 7 8 HDMI IN Jack 9 AC Socket 10 ON OFF Switch Y P P b r S PDIF out coaxial S VIDEO IN Jack AV IN Jack Video Yellow Color Audio R Red Color Audio L White Color Audio R Red Color Audio L White Color IN Jack VGA IN Jack 5 3 1 4 2 4 2 1 AV2 AV1 HDMI 3 HDMI 2 HDMI 1 1 9 8 7 5 4 3 2 10 BACK VIEW 6 ...

Страница 10: ...volume up 6 V Button Press to adjust the volume down 7 POWER Button Press to Select TV AV Press to display the on screen TV menu Press to change the TV channels and highlight selections on the menu screen Press to change the TV channels and highlight selections on the menu screen turn the unit on and off omponent1 omponent2 6 1 2 3 4 5 6 7 RIGHT SIDE VIEW ...

Страница 11: ...DEO OUT AUDIO IN S VIDEO IN NOTE CONNECTING DEVICES WITH A COMPOSITE YELLOW RCA TYPE VIDEO OUTPUT Connecting to a VCR Video Game System Camcorder AUDIO VIDEO OUT AUDIO VIDEO IN NOTE Connect the AUDIO and S VIDEO cable not included as shown Make sure you connect the cable from the other equipment and to this unit and Please refer to the user manual for the other equipment for more information To co...

Страница 12: ...on for use with DVD players DTV set top boxes and other digital AV devices HDMI was developed to provide the technologies of High Bandwidth Digital Content Protection HDCP as well as Digital Visual Interface DVI in one specification HDCP is used to protect digital content transmitted and received by DVI compliant or HDMIcompliant displays HDMI has the capability to support standard enhanced or hig...

Страница 13: ...our local voltage Make sure that the AC power cord is fully inserted into the unit back NOTE Be sure the AC power cord is disconnected and all Make sure that all the components are connected functions are off before making connections correctly When you are not going to use the unit for a long period of time disconnect the power cord The apparatus shall not be exposed to dripping or splashing and ...

Страница 14: ...rough all inputs except VGA The VGA does not support digital audio How To Setup Digital Output Press the MENU button on the remote control Press the right arrow button to select AUDIO Press the down arrow button to highlight SPDIF type Raw or PCM NOTE Refer to the User Manual from your home theater equipment for recommended audio settings Surround Left Speaker Surround Right Speaker Dolby Surround...

Страница 15: ... facing up Please make sure to place a soft cushioned material such as a pillow or thick piece of foam beneath the screen 3 To remove the base stand loosen screws off the holes then pull downwards to release the base stand 4 To install the base stand put the stand into the hole at the bottom of the TV then insert screws to the holes and tighten 11 MOUNTING ON THE WALL NOTE Remove the base stand be...

Страница 16: ...nnected TV AV ENTER Component1 Use or button to select the options the Component2 HDMI2 HDMI3 The screen will change to your desired s TURNING THE UNIT ON FOR THE FIRST TIME After you have initially connected your TV antenna or cable no set top box turn the television ON A screen will display asking you to run a to search and receive available local digital channels It is here where you will selec...

Страница 17: ...le Auto Scan Favorite Show Hide Channel No Channel label DTV Signal Cable Select Exit Move MENU Select Exit Move MENU Cable Mode Select if you subscribe to a pay television service including satellite CABLE Using the button to highlight CABLE Channel Auto Scan may take several minutes to complete Channel Auto Scan may take several minutes to complete How to Navigate Press the button to select Pres...

Страница 18: ...s STANDARD DYNAMIC MOIVE PERSONAL The STANDARD setting is recommended for most viewing environments Depending on the ambient light level in the room you may find one of the other options more pleasing Picture Mode To make more critical picture adjustments based on your own preferences in PERSONAL Use the button to highlight Navigate using the buttons to increase or decrease contrast intensity Use ...

Страница 19: ...trast Brightness Color Tint Sharpness Color Mode Standard Normal Move Adjust Exit MENU 50 50 50 0 50 Use the button to highlight Navigate using the buttons to select COOL more bluish tone NORMAL or WARM The default setting is NORMAL WARM mode will provide color that is calibrated to D6500 Kelvin the standard color that broadcast stations and the Motion Picture industry consider as the most accurat...

Страница 20: ...re critical audio adjustments based on your own preferences in PERSONAL Use the button to highlight Navigate using the buttons to increase or decrease low frequency intensity Bass Audio Use the button to highlight Navigate using the buttons to increase or decrease high frequency intensity Treble Surround Setup Parental 12 6 Time TV Sound Mode Bass Treble Balance Surround Audio Language Standard En...

Страница 21: ...ou may select an alternative language using the remote control by pressing Audio Language MTS Use the button to highlight Navigate using the button AVC In the ON position Automatic Volume Control will limit the level of increased volume heard during television commercials and volume differences between inputs Surround Setup Parental 12 6 Time TV Sound Mode Bass Treble Balance Surround Audio Langua...

Страница 22: ...ep Timer Time Zone Daylight Saving Time Clock Move Select Exit MENU Picture Off Pacific Off 2007 10 31 04 04PM 12 6 Time Audio Setup Parental TV Sleep Timer Time Zone Daylight Saving Time Clock Move Select Exit MENU Picture Off Pacific Off 2007 10 31 04 04PM 12 6 Time Audio Setup Parental TV Sleep Timer Time Zone Daylight Saving Time Clock Move Select Exit MENU Picture Off Pacific Off 2007 10 31 0...

Страница 23: ...Setup Audio On Lock 12 6 Time Channel Menu Language Transparency Zoom Mode Noise Reduction Advance Close Caption XVS Restore Default English Move Select Exit MENU Picture Off Normal Off Setup Audio On Parental 12 6 Time TV Menu Language Transparency Zoom Mode Noise Reduction Advance Close Caption XVS Restore Default English Move Select Exit MENU Picture Off Normal Off Setup Audio On 12 12 Parental...

Страница 24: ...ove MENU Picture CC1 Service1 Setup Audio Select Exit Use the button to highlight Navigate using the buttons to select Service 1 6 Advance Selection Parental 12 6 Time TV CC Mode Basic Selection Advanced Selection Option On Move MENU Picture CC1 Service1 Setup Audio Next Exit Use the button to highlight Press the button to enter a menu with options to customize text fonts colors and opacities Opti...

Страница 25: ...0 50 50 0 H pos V pos Setup Parental 12 6 Time Picture Audio TV Clock Phase Auto Move Adjust Exit MENU 50 50 50 0 H pos V pos Use the button to highlight Navigate using the buttons to improve focus and image stability Phase Setup Parental 12 6 Time Picture Audio TV Clock Phase Auto Move Next Exit MENU 50 50 50 0 H pos V pos Use the button to highlight Press the button to automatically adjust the d...

Страница 26: ...Change Password System Lock US Canada Reset RRT RRT Setting Select Exit MENU On Move Press the button to highlight Enter your 4 digit code factory default code is 0000 unless previously changed ENTER PASSWORD To change the password press the button to display a screen to enter your new password then confirm again Setup Parental 12 6 Time Picture Audio TV Change Password System Lock US Canada Reset...

Страница 27: ...D Highlight then press the button to enter the menu to select your preference TV TV Ratings Setup Parental 12 6 Time Picture Audio TV TV MPAA Move Exit MENU N A Select Setup Parental 12 6 Time Picture Audio TV TV MPAA Move Exit MENU N A Next To set parental controls for television programming or DVD movies press the buttons to highlight Navigate using the buttons to highlight menu US TV MPAA How t...

Страница 28: ... Parental G G Children Recommended for children age 8 and older GENERAL AUDIENCES Suitable for all ages Description C G PG 14 Rating PARENTAL GUIDANCE SUGGESTED Some material may not be suitable for children Viewers 14 years and older Exempt E C8 18 Adult Programming Navigate using the button to highlight then press the button repeatedly to select your ratings preference CANADA FRENCH Setup TV Can...

Страница 29: ...te Prev Next 66 0 ATSC 1 ATSC 2 ATSC 3 KOCE HD KOCE SD KOCE LB 2 0 14 1 14 2 14 3 50 1 50 2 50 3 Highlight to add channels to your Favorites List Navigate using the buttons to select channels to be added or deleted from your list Press the button to add or delete a channel A checkmark indicates a channel has been added You may also display your list from the remote control by pressing FAV FAVORITE...

Страница 30: ...s With Black Bars Stretches certain 4 3 content and may reduce the black bars 3 ZOOM Stretches the image both vertically and horizontally to fill the screen when viewing widescreen content The zoom effect will crop images somewhat 4 CINEMA When viewing 4 3 content Cinema mode will fill the entire screen eliminating the side black bars It may also eliminate or reduce black bars on certain widescree...

Страница 31: ...ode not listed above In order to achieve the best display effect please select the above listed 12 display modes input signal Because of the difference of display drivers output signal especially non standard signal output the display image may appear little disturbance which can be adjusted through AUTO button on the menu To prolong this unit s service life please set your computer to power manag...

Страница 32: ...his unit with others please read all instructions carefully and make sure all necessary cables are connected This unit may be incompatible with some other formats which are not meet the above conditions NOTE 28 1920 1080 28 125 50 1080 i HDMI INPUT MODE Horizontal Scanning Frequency Resolution KHz Vertical Scanning Frequency Hz Format 720 480 720 480 1280 720 1280 720 1920 1080 1920 1080 31 47 15 ...

Страница 33: ... Power Requirement Power Consumption W 250 Standby Consumption 3W Dimension with stand Approx 1050 L 330 W 770 H mm Weight Supplied Accessory Others Input Output Jacks Systems Power Sound System M Audio System BTSC L R Speaker 8W 8W Composite Video Input Component Y Pb Pr Input Sound Input Audio jack 1 For CVBS Audio input Audio jack 3 For PC RGB Audio input 500mV rms Impedance 20k ohms SPDIF Outp...

Страница 34: ...uct may malfunction and require user to power reset Unplug and re plug the AC power cord Check to make sure the program you are watching is broadcast in Color and not Black White Check whether the mute function has been activated on the Remote Control The display monitor s panel goes hot LCD TV takes inside lighten phosphor It may increase the temperature of the screen in some occasions It s not a...

Страница 35: ...me older television receivers if they rely on a TV antenna will need a TV Converter to receive over the air digital programming but should continue to work as before for other purposes e g for watching low power TV stations still broadcasting in analog watching pre recorded movies or playing video games For more information see http www DTV gov or call 1 888 CALL FCC For converter box information ...

Отзывы: