Troubleshooting
No power
• Insert the AC power plug securely into the power outlet.
No power after battery recharged
• Battery recharge circuit operate in Power OFF. Switch off the unit for battery recharge.
Play fails to start even when PLAY is pressed. Play starts but then stops immediately.
• Condensation has formed: wait about 1 to 2 hours to allow the player to dry out.
• This player cannot play a disc other than DVD, MP3 and CD.
• The disc may be dirty and may require cleaning.
• Ensure that the disc is installed with the label side up.
No sound or No picture.
• May the battery power is exhausted, connected with the power converter again.
• May the unit is in STANDBY mode, press PLAY(
X
)/ENTER button once, the unit will reactive
again and back to Disney open screen.
Picture is distorted during rapid advance or rapid reverse.
• The picture will be somewhat distorted at times: this is normal.
No rapid advance (or rapid reverse play).
• Some discs may have sections which prohibit rapid advance (or rapid reverse.)
No 4:3 (16:9) picture.
• Choose the correct setup “TV SCREEN” item which matches the TV set used.
No key operation is effective.
• Slide the POWER knob to OFF mode, and then back to ON.
(The player may not be operating properly due to lightning, static electricity or some other
external factor.)
Play does not start even when title is selected.
• Confirm the RATING LEVEL setting.
Audio soundtrack and/or subtitle language is not the disc, the initial settings.
• If the audio soundtrack and/or subtitle language does not exist on the language selected at
the initial settings will not be seen/heard.
No subtitles.
• Subtitles appear only with discs which contain them.
• Subtitles are cleared from the TV monitor, Perform the steps on portion SUBTITLE to display
the subtitles.
Alternative audio soundtrack (or subtitle) language fail to be selected.
• An alternative language is not selected with discs which do not contain more than one
language.
The password for rating level has been forgotten.
• Please contact your local sales dealer.
When AC-DC adaptor plug-in a while, FULL and CHARGE indicators blink, then CHARGE
indicator light on RED, but rechargeable battery is released.
• It is a system test for recharge circuit, and then the circuit is powered ON, which is not a
malfunction.
MP3 FAQs (Frequently Asked Questions)
Please read before playing an MP3 CD.
What is an MP3 file?
An MP3 file is a computer format that makes a usually large music file into a smaller one
which is more convenient to download and share.
Can I record my own MP3 CDs?
Yes, But you need a CD recorder, which is available from you local computer store.
Where can I find MP3 files?
MP3 files are available all over the internet.
Can this unit read regular music CDs?
Yes it can. However, you cannot mix MP3s and WAV files on the same CD. If you do this, the
CD Player will play only the MP3 files.
Can I use the MP3 extension for non-audio data files?
No, this may result in serious malfunction and harmful noise interference.
Can I mix MP3 files with other file types on the CDR?
Yes, but your CD player will ignore those files and read only the MP3 files on the CDR.
Does this unit support subdirectories (subfolders)?
Yes, it can read MP3 files from subfolders.
Initial Setting
General Setup
The setting structure is as follows:
TV DISPLAY
1. Normal/PS
Note: “PS” stand for “Pan Scan” This is selected when the unit is connected with a normal
TV.
Wide-Screen images are shown on the screen, but with some parts cut automatically.
2. Normal/LB
Note: “LB” stand for “Letter Box ”
This is selected when the unit is connected with a normal TV.
Wide-screen images are shown on the screen, with black belt on the top and bottom.
3. Wide
This is selected when the unit is connected with a wide - screen TV.
ANGLE MARK
This only works when there is an angle mark on the disc.
•
Select “ON” the screen shows the angle mark when playing a DVD.
•
Select “OFF” the angle mark is not shown.
OSD LANG
To change language of setup menu, choose the language using (
,
) buttons and press
ENTER
to confirm.
•
English / Spanish / German / French
Screen Saver
Start the screen saver, the screen saver image appears
when the unit stops or the image is motionless for approximately 1 minute. This saver can
keep the screen from being damaged.
•
ON: Start the screen saver.
•
OFF: Remove the screen saver.
Speaker Setup Page
Select Audio setup in the Setup Menu and then Select the Speaker Setup Menu using the
(
,
) buttons to navigate through the menus/screens and press the Enter buton to confirm.
LT/RT:
The front speakers are in theatrical LT/RT downmix mode.
Stereo: The front speakers are in Stereo Downmix mode.
Video Setup Page
•
Brightness –
To adjust more shining or darken picture.
•
Contrast
–
To adjust increase or decrease picture contrast.
•
Colour
–
To adjust increase or decrease colour intensity.
Press the (
or
) button to move the cursor to increase or decrease the level. Press
ENTER
to confirm.
Preference Setup Page
•
Audio
–
To change the dialogue language, choose the language using the (
,
)
buttons and press
ENTER
to confirm.
•
Subtitle
–
To change the subtitle language, choose the language using the (
,
)
buttons and press
ENTER
to confirm.
•
Disc menu –
To change the language of menu, choose the language using the (
,
)
buttons and press
ENTER
to confirm.
•
Parental
–
You can control access to the player and the type of discs your family can
watch with the rating function. There are eight levels of parental conrol.
Rating Level: 1 KID SAF
2 G
3 PG
4 PG 13
5 PGR
6 R
7 NC-17
8 Adult
1. Press the (
)button and then select the rating level using the (
,
) buttons.
2. Press ENTER to enter the Password Verify menu.
3. Enter your four-digit password and press
ENTER
, if you have not chosen one yet, the
factory preset password is 1234.
•
Password change –
This option allows you to set or change the password.
1. Press the (
)button and then press
ENTER
to enter the Password Change menu.
2. To change the password, enter the current four-digit password in the “Old Password”
column. Then enter the new password in the “New Password” column. You are then
prompted to enter it again in the “Confirmed Password” column to confirm and press
ENTER
.
Specifications
Power requirements:
DC IN 9V (Center Positive), 1.5A
Battery pack:
Ni-MH DC 3.6V x 2
Power consumption:
12W
Signal system:
NTSC / PAL
Weight:
LB (main unit + battery packs)
Dimensions:
8.4 (W) x 5.3 (H) x 2 (D) inches
Operating temperature range:
+5
°
C to +35
°
C
Operating humidity range:
5 to 90% (no condensation)
Battery charging time:
Approximately 3-4 hours
Battery life(Fully charge):
Approximately 2.5 hours
Discs played:
(1) DVD-VIDEO disc
12cm single-sided, single-layer
12cm single-sided, dual-layer
12cm double-sided, single-layer
8 cm single-sided, single-layer
8 cm single-sided, dual-layer
8 cm double-sided, single-layer
(2) Compact disc
12cm disc
8 cm disc
Video output level
:
1 Vp-p
Audio output level:
1 Vrms (1 KHz, 0dB)
Audio signal output characteristics:
Frequency responses:
•DVD (linear audio):
125Hz - 18Hz
•CD audio:
125Hz - 18Hz
S/N ratio:
70dB
Wow and flutter: below measurable level
Pickup:
Wave length:
655nm
Laser power:
CLASS 1
Specifications are subject to change without notice. Weight and dimensions are approximate.
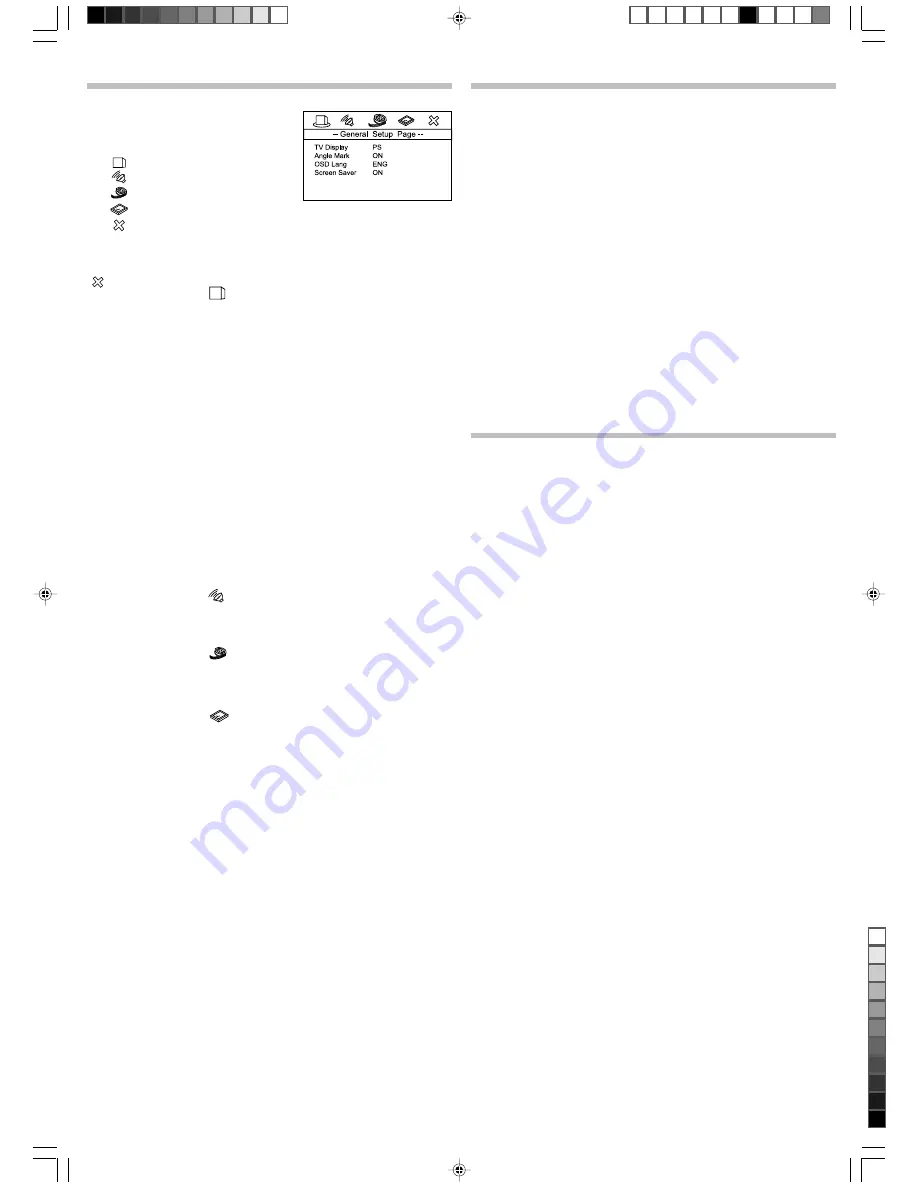
1. Press the Setup button to display the Setup Menu.
The screen shown right:
2. Press the “
” or “
” Navigation buttons to move
the Yellow Disc symbol underneath the icons on
top of the TV screen to your desired icon page.
The following icons represent 5 Setup Page:
— General Setup Page
— Speaker Setup Page
— Video Setup page
— Preference Page
— Exit Setup Page
Select a menu icon using the (
,
) buttons. Then Select one of the avaliable options using
the (
,
) buttons. Press the (
) button to access the submenu and use the (
,
) buttons
to select an option. Then press ENTER to confirm your selection. Return to a previous menu
using the (
) button. To exit from the menus, press the
SETUP
button again or select the
(
xxxx
) icon and press
ENTER
.
CUSTIS_530_IB_a4sp_size.p65
8/30/2005, 12:09 PM
4
Black


