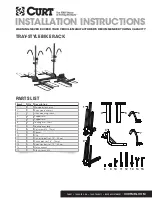


Step 3
Slide on two of each support arm (4,5) onto the main body
rack (1) arms, making sure the tightening knob is facing
upward. See Figure 3. Tighten the knobs as shown in Figure 4,
Detail F. After the supports are tightened, insert set screw (8)
into the end of each arm as shown in Figure 4, Detail G.
Step 1
Remove security pins from shank (3). Insert spacers (9) into
the inside of hitch mounting shank (3) as shown in Figure 1,
Detail A. After spacers are inserted, place the main body
rack (1) into shank (3) and secure with the two security pins
(previously removed) and shank bolt (12) as shown in Detail B.
Tighten bolt using wrenches provided (14,15). See Detail C.
Step 2
Remove the outer arm pins & clips from main body rack (1).
See Figure 2, Detail D. Drop the side arms down to until they
lay flat, see Figure 2. Re-insert the pins & clips to secure in
place, see Detail E.
ASSEMBLY
Detail A
Detail B
Detail C
Detail F
Detail G
Detail D
Detail E
Figure 1
Figure 2
Figure 3
Figure 4
CURTMFG.COM •
NEED ASSISTANCE? • 1.800.798.0813 • 18086-INS-RA • PAGE 2


