


HAVING INSTALLATION QUESTIONS? CALL TECHNICAL SUPPORT AT
1-800-798-0813
INSTALLATION STEPS
PERIODICALLY CHECK THIS RECEIVER HITCH TO ENSURE THAT ALL FASTENERS
ARE TIGHT AND THAT ALL STRUCTURAL COMPONENTS ARE SOUND.
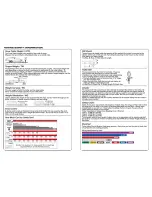
CURT Manufacturing LLC., warrants this product to be free of defects in material and/or workmanship at the time of retail purchase by the original purchaser. If the product is found to be defective, CURT
Manufacturing LLC., may repair or replace the product, at their option, when the product is returned, prepaid, with proof of purchase. Alteration to, misuse of, or improper installation of this product voids the
warranty. CURT Manufacturing LLC.'s liability is limited to repair or replacement of products found to be defective, and specifically excludes liability for incidental or consequential loss or damage.
This product complies with safety specifications and requirements for connecting devices and towing systems of the state of New York, V.E.S.C.Regulation V-5 and SAE J684.
CHEVROLET SPARK
3/25/2016
11433
PAGE 2 of 2
TRIM
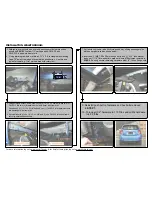
1. Remove two (2) push button fasteners and two (2) hex bolts from vehicle fascia using a 7mm
socket. Save and set aside for reinstall later.
2. Remove one (1) M8 bolt on passenger side frame rail using a 13mm socket. Pull plastic away
from frame rail to allow hitch side plate to slide into place.
3. Enlarge rear-most hole on driver and passneger side frame rail to allow 1/2" carriage bolts,
CM-SP6, and CM-SP12 to pass into frame rails.
4. Using trim diagram, mark a 4.75" x 2.0" rectangle with masking tape .75" away from edge of
driver's side push button. Use this as a guide for trimming.
5. Using enlarged access holes, fishwire two (2) 1/2"-13 x
1 1/4"
bolts and two (2) CM-SP12 into
two (2) forward-most holes in driver side frame rail. Fishwire one (1) 1/2"-13 x 1 1/4" bolt and
one (1) CM-SP12 into forward-most hole in passenger side frame rail.
6. Reverse fishwire one (1) 1/2"-13 x 1 1/2" and one (1) CM-SP6 in each frame rail using enlarged
access hole.
7. Pull fascia down and raise hitch into postition by sliding passenger side plate under plastic tab.
8. Insert one (1) M8-1.25 x 30mm hex bolt with one (1) 5/16" lock washer and one (1) 1/4" flat
washer into weld nut where M8 bolt was removed in STEP 2. Loosely secure remaining
hardware with 1/2"-13 hex flange nuts.
9. Reinstall push button fasteners and hex bolts removed in STEP 1.
10. Torque all 1/2" hardware to 110 ft-lbs and all M8 hardware to 22.9 ft-lbs.
.75 in
4.75 in
2.00 in
Содержание 11433
Страница 4: ......


