curt 11376 Скачать руководство пользователя страница 6

INSTALLATION WALKTHROUGH:

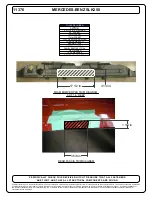
15. Reverse fishwire 1/2" carriage bolts and CM-SP19

spacers into the enlarged holes. Fishwires should
remain attached to preven loss of hardware.
(See Reverse Fishwire Diagram)

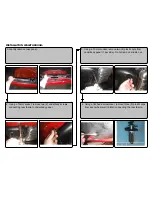
16. Thread fishwires through hitch mounting holes and raise
       hitch into position and loosely install 1/2" hex flange 
       nuts onto the carriage bolts.

17. Place CM-11376-SP spacers between forward mounting

   plate and underbody supports. Loosely install M10 hex 

       bolts and 3/8" conical toothed washers into the existing 

   vehicle weldnuts.

18. Using a 3/4" socket, torque 1/2" hardware to 110 lb-ft. Using

a 17mm socket, torque M10-1.50 hardware to 56 lb-ft.

Содержание 11376

Страница 1: ...REPRESENTATIVE PHOTO TRAILER HITCH ILLUSTRATION MAKE SURE YOUR HITCH MATCHES LEVEL OF DIFFICULTY CHALLENGING EASY MODERATE CHALLENGING 1 BEFORE YOU BEGIN INSTALLATION READ ALL INSTRUCTIONS THOROUGHLY...

Страница 2: ...4 CONICAL TOOTHED WASHER 3 8 2 5 250 x 1 25 x 3 00 SQUARE HOLE SPACER CM SP19 2 6 1 2 FISHWIRE 1_2 FISHWIRE 2 7 1 Remove trunk contents including the spare tire cover spare tire and spare tire tool ki...

Страница 3: ...2 underbody screws connecting rear fascia to underbody panel 5 Using a 10 mm socket remove two 2 plastic nuts from underbody panel 1 per side Do not remove middle nut 6 Using a flat head screwdriver...

Страница 4: ...ers of rear fascia loose Using a panel removal tool gently detach clips 5 per side located below tail lights 8 Using a 10mm socket remove center nut from inside of trunk 9 Gently remove rear fascia 10...

Страница 5: ...ove two 2 M10 screws connecting underbody supports to trunk pan 13 Remove two 2 plastic plugs from rear body panel 14 Using a die grinder enlarge two 2 holes where plastic plugs were removed Enlarge h...

Страница 6: ...through hitch mounting holes and raise hitch into position and loosely install 1 2 hex flange nuts onto the carriage bolts 17 Place CM 11376 SP spacers between forward mounting plate and underbody su...

Страница 7: ...m Diagram 20 Mark with masking tape and trim with die grinder the rear fascia See Rear Fascia Trim Diagram 21 Reassemble rear fascia with foam bumper pad and reattach electrical connections 22 Reattac...

Страница 8: ...INSTALLATION WALKTHROUGH 24 Reattach interior panel in reverse order of removal 25 Reinstall spare tire kit spare tire and spare tire cover 26 Install complete...

Страница 9: ...eir option when the product is returned prepaid with proof of purchase Alteration to misuse of or improper installation of this product voids the warranty Curt Manufacturing LLC s liability is limited...

Страница 10: ...with proof of purchase Alteration to misuse of or improper installation of this product voids the warranty Curt Manufacturing LLC s liability is limited to repair or replacement of products found to b...

Страница 11: ...s 8 Using a 10mm socket remove center nut from inside of trunk 9 Gently remove rear fascia 10 Detach foam bumper pad from rear of fascia 11 Detach electrical connections 4 connectors and 1 clip from r...

Отзывы: