background image

INSTALLATION

6

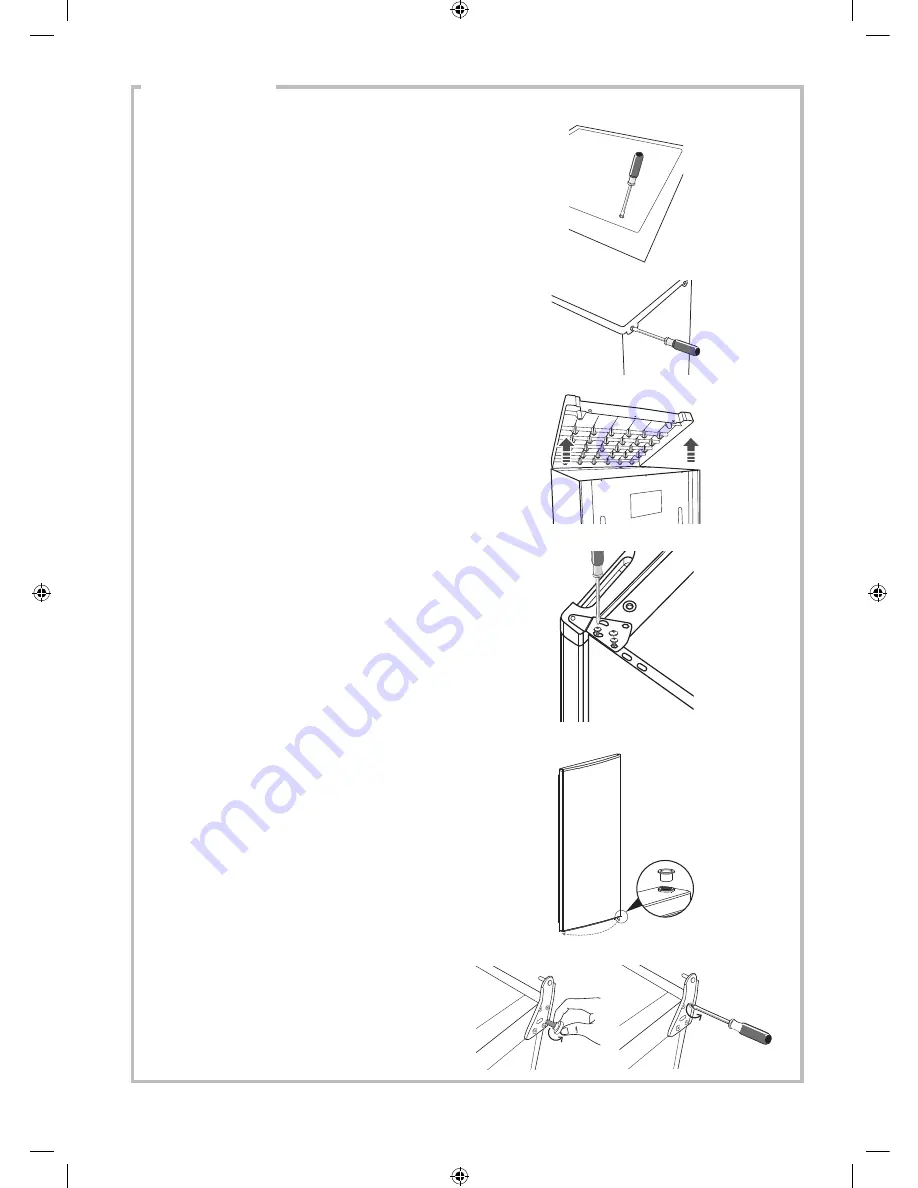
2.  Remove the 2 screw covers first, then 

undo the screws underneath.

unscrew

unscrew

3.  Remove the 2 screws on the back.

4.  Lift the top cover away from the fridge.

5.  Remove the screws, then remove the 

upper hinge that hold the door in place. 

Lift the door and place it on a padded 

surface to prevent it from scratching.

6.  Swap the bottom bushing and bottom 

bushing cap of the upper door. The 

bottom bushing key must be in the 

correct position to allow it to be inserted 

correctly. 

7.  Remove the lower screws, hinge bracket 

and adjustable feet from the unit bottom.

CUR55W12_IB_121121_RC_Pauline.indd   6

21/11/2012   11:29 AM

Содержание CUR55W12

Страница 1: ...UNDERCOUNTER FRIDGE INSTRUCTION MANUAL CUR55W12 CUR55W12_IB_121121_RC_Pauline indd 1 21 11 2012 11 29 AM ...

Страница 2: ...CUR55W12_IB_121121_RC_Pauline indd 2 21 11 2012 11 29 AM ...

Страница 3: ...g for Chilled Foods 11 Tips for Keeping Food in the Unit 11 Shopping for Frozen Foods 11 Preparations for Freezing 12 Defrosting Frozen Food 12 Cleaning 13 Defrosting 13 Cleaning the Interior and the Exterior of the Unit 13 Cleaning Tips 13 Maintenance 14 Changing the Internal Light 14 Care When Handling Moving Your Unit 14 Servicing 14 Switching Off for Long Periods of Time 14 Disposal 14 Specifi...

Страница 4: ...3040015 Upper Door Shelf x 2 P N 501113040097 Instruction Manual P N CUR55W12 002 Thank youfor purchasing your new Currys Essentials Undercounter Fridge We recommend that you spend some time reading this instruction manual in order that you fully understand all the operational features it offers Read all the safety instructions carefully before use and keep this instruction manual for future refer...

Страница 5: ...or use in a garage or outdoor installation Do not drape the unit with any covering When installing the unit ensure that 40 mm of free space is left at both sides 15 mm at the rear and 40 mm at the top of the unit The door can be opened to the right or the left depending on what better suits the location Please ensure there is adequate space for the door to fully open Reversing the Door Swing Tools...

Страница 6: ...pper hinge that hold the door in place Lift the door and place it on a padded surface to prevent it from scratching 6 Swap the bottom bushing and bottom bushing cap of the upper door The bottom bushing key must be in the correct position to allow it to be inserted correctly 7 Remove the lower screws hinge bracket and adjustable feet from the unit bottom CUR55W12_IB_121121_RC_Pauline indd 6 21 11 2...

Страница 7: ...the fridge door is aligned horizontally and vertically so that the seals are closed on all sides before finally tightening the top hinge Insert the hinge bracket and screw it to the top of the unit 11 Use a spanner to tighten it if necessary 12 Put the top cover back and fix it in place with the screws 13 With the door closed check that the door is aligned horizontally and vertically and that the ...

Страница 8: ...nd keep it in this position To do this pull the storage shelf forward until it can be swivelled upwards or downwards and removed Please do the same in reverse to insert the shelf at a different height Cleaning Before Use Wipe the inside of the unit with a weak solution of bicarbonate soda Then rinse with warm water using a wrung out sponge or cloth Wash the shelves and salad bin in warm soapy wate...

Страница 9: ... Tray Egg Tray Adjustable Glass Shelf Internal Light and Thermostat Control Dial Glass Shelf Salad Bin Freezer Compartment Lower Door Shelf Levelling Feet Door Shelves CUR55W12_IB_121121_RC_Pauline indd 9 21 11 2012 11 29 AM ...

Страница 10: ...r thermometer These are available from most supermarkets and hardware shops Place the thermometer in the centre of the unit where it can be read easily Leave overnight the temperature in the fridge compartment should be an average of 5 C while the freezer compartment should be 18 C or lower Adjusting the Temperature The internal temperature of the unit is controlled by a thermostat The recommended...

Страница 11: ...our food to allow air to circulate inside the compartments Ensure all parts of the unit are kept cool To prevent transfer of flavours and drying out pack or cover the food separately Fruit and vegetables do not need to be wrapped Always let pre cooked food cool down before you put in the unit This will help to maintain the internal temperature of the unit To prevent cold air escaping from the unit...

Страница 12: ...eezer tapes labels and pens with different colours This allows you to easily organise and to effectively use the freezer Write the contents and date otherwise the frozen food might exceed the storage time and this could cause food poisoning Please refer to your food packaging for the recommended storage time You may also add the weight and cooking notes e g defrost first cook from frozen and keep ...

Страница 13: ...t can be speeded up by placing a bowl of hot water inside the freezer compartment cabinet and closing the door As the solid frost loosens scrape it away with the plastic scraper and remove 3 When defrosting is complete clean your unit s interior and exterior Cleaning the Interior and the Exterior of the Unit Remove all the shelves and the salad bin To remove the salad bin first remove the lower do...

Страница 14: ...ied out by inexperienced persons may cause injury or serious malfunction Contact a qualified technician Switching Off for Long Periods of Time When the unit is not in use for a long period of time disconnect it from the mains supply empty all food and clean the appliance leaving the door ajar to prevent unpleasant smells Disposal Old units still have some residual value An environmentally friendly...

Страница 15: ... it is located Household Appliances Category Category 7 Refrigerator Freezer Energy Grading A EU Ecolabel N A Defrosting Type Manual Defrost Climate Class N ST This appliance is intended to be used at an ambient temperature between 16 C and 38 C Airborne Acoustical Noise 42 dB Temperature Rise Time 15 hours Freezing Capacity 2kg 24hr Rated Voltage 220 240V Rated Current 0 57 A Overall Dimension W ...

Страница 16: ...e supervised to ensure that they do not play with the unit Do not damage the refrigerant circuit applicable only for appliances with refrigeration circuits which are accessible to the user The unit must be maneuvered by a minimum of 2 persons This unit is not intended for use by persons including children with reduced sensory or mental capabilities or lack of experience and knowledge unless they h...

Страница 17: ... Frequent opening of the doors for long periods will cause a loss of coldness Store food in an organised way If food is not stored in an organised way searching for an item will mean the door is open for longer Allow hot food and drinks to cool down before placing them in the unit Placing hot food in the unit will cause the compressor to run for a long time as the unit will have to work harder to ...

Страница 18: ...CUR55W12_IB_121121_RC_Pauline indd 18 21 11 2012 11 29 AM ...

Страница 19: ...CUR55W12_IB_121121_RC_Pauline indd 19 21 11 2012 11 29 AM ...

Страница 20: ...nstructions means that your electrical and electronic equipment should be disposed at the end of its life separately from your household waste There are separate collection systems for recycling in the EU For more information please contact the local authority or your retailer where you purchased the product Visit Partmaster co uk today for the easiest way to buy electrical spares and accessories ...

Отзывы: