Cuisinart Grind & Brew DGB-300 Скачать руководство пользователя страница 14

14

CLEANING AND 
MAINTENANCE

COMPLETELY CLEAN AND DRY 
ALL PARTS AFTER EVERY USE.

Always turn coffeemaker OFF and remove 
the plug from the electrical outlet before cleaning.

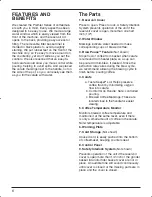
Press and lift to open the reservoir lid. Remove
the grinder basket lid by using the recessed
area on each side of the lid. Remove the filter
basket cover. Remove the permanent or paper
filter. Clean permanent filter, or discard the
paper filter. Remove the grinder/filter basket,
using the finger grips and handle. The
grinder/filter basket, grinder basket lid, and 
filter basket cover can be washed in warm
soapy water and rinsed thoroughly, or cleaned
in the upper rack of the dishwasher. Dry all
parts after every use.

Do not put any water in the unit once the
grinder/filter basket has been removed.
Wipe the area under the grinder/filter 
basket with a damp cloth. If water gets 
into the grinder motor, the motor may
become damaged.

Once clean, reverse the above steps.

Periodically, remove the steam collector 
by lifting it up and out. Run it under warm
soapy water. Rinse thoroughly. Replace the
steam collector by placing the hooks on the
locating notches.

Remove the carafe from the warming plate.
Discard any remaining coffee. The carafe and
lid can be washed in warm soapy water and
rinsed thoroughly, or placed in a dishwasher.
The carafe and carafe lid should be placed on
the upper rack only.

Do not use scouring agents or harsh cleansers
on any part of the coffeemaker.

Never immerse base unit in water or other 
liquid. To clean base, simply wipe with a clean,
damp cloth and dry before storing. Wipe warm-
ing plate with a clean, damp cloth. Never use
rough, abrasive materials or cleansers to clean
the warming plate. Do not dry the inside of the
water reservoir with a cloth, as lint may remain.

DECALCIFICATION

Decalcification refers to removing the calcium
deposits which form over time on the metal
parts of the coffeemaker.

For best performance from your Coffee Bar™
Coffeemaker, decalcify the base unit from 
time to time. The frequency depends upon 
the hardness of your tap water and how often
you use the coffeemaker. The flashing self-
clean light will indicate when you should clean
your coffeemaker.  

SELF CLEANING

If the self-clean light begins to flash when the
coffeemaker is turned on, it is telling you that
the calcium buildup is interfering with the func-
tioning of your coffeemaker and the flavor of
your coffee. To clean, fill the water reservoir to
capacity with a mixture of 1/3 white vinegar
and 2/3 water. Turn the coffeemaker ON and
press the “Self-Clean” button. The self-clean 
light will shine steadily. The coffeemaker is
now in Self-Clean mode. One cycle should be
sufficient to adequately clean the coffeemaker.
When the cycle is completed and the five
beeps sound, the coffeemaker will shut off.
Turn the coffeemaker ON to see if the 
self-clean light continues to flash. If it does,
turn it OFF and then repeat the cleaning 
procedure with a fresh solution of vinegar 
and water. 

If the self-clean light no longer flashes, turn the
coffeemaker to OFF and then run one cycle of
fresh cold water through the unit before using
the unit again to brew coffee.

Note on the Self- 
Clean Function:

Pressing the “Self-Clean” button cancels all
other settings. If it is pressed accidentally,
press it again to return the coffeemaker to 
all its previous settings. Pressing On/Off will
also exit the Self-Clean mode and turn the 
coffeemaker OFF.

02CU13488 DGB300 IB  6/23/03  2:31 PM  Page 14

Содержание Grind & Brew DGB-300

Страница 1: ...Automatic Grind BrewTM Coffeemaker DGB 300 For your safety and continued enjoyment of this product always read the instruction book carefully before using ...

Страница 2: ... or electric burner or in a heated oven 11 Always fill water reservoir first then plug cord into the wall outlet To disconnect push the button to Off then remove plug from wall outlet 12 Do not use appliance for other than intended use 13 Snap lid securely onto carafe before serving any beverages 14 Scalding may occur if the lid is removed during the brewing cycle 15 The glass carafe is designed f...

Страница 3: ...at surface 2 Slide the packaged unit out of the box 3 Remove the foam insert and the cardboard insert Now remove the carafe from the coffeemaker 4 Carefully lift the coffeemaker from the remaining inserts 5 Remove the plastic bag from the coffeemaker 6 We suggest you save all packing materials in the event that future shipping of the machine is needed Keep all plastic bags away from children WARNI...

Страница 4: ...rich coffee taste without extracting any bitterness We know the Cuisinart Automatic Grind BrewTM will bring you years of pleasure Nothing is more satisfying than a rich cup of your favorite brew THE COFFEE BAR FLAVOR SYSTEM All coffee has the rich aromatic flavors we associate with a great cup of coffee as well as the acidic bitter flavors we associate with a bad cup Commercial brewers have discov...

Страница 5: ...led container at room temperature since damaging condensation occurs every time the beans are removed from the freezer or refrigerator Note that some cof fee experts advise against freezing dark roast beans because freezing can cause the oils to coagulate Other experts disagree We suggest you experiment and decide for yourself Element 3 Grind The grind is critical for proper flavor extraction If t...

Страница 6: ...eded to make corresponding cups of brewed coffee 3 Brew PauseTM Feature Not shown Stops flow of coffee from basket when carafe is removed from heater plate so a cup can be poured in mid brew if desired Since the extraction rate varies during the brew cycle we recommend allowing the brewing cycle to finish before pouring coffee 4 Carafe a Taste Keeper Lid Helps preserve coffee flavor by minimizing ...

Страница 7: ...7 1 4a 4c 6 5 8 4b 2 ...

Страница 8: ...O OPERATE A note about filters When using a permanent filter like the Cuisinart gold tone filter be sure that the handle is positioned away from the grinder basket If not the handle may interfere with the flow of coffee into the filter basket Also note using a permanent or gold tone filter will allow some fine coffee grounds to fall into the coffee carafe This will appear as sediment in the carafe...

Страница 9: ...tes Set Temperature Increase Press and hold either 4 or 5 for approximately 2 seconds to enter Time Set Mode 6 Temperature Set Use to enter Temperature Set mode Temperature is adjusted with Hours and Minutes buttons 7 Carafe Temperature Display Displays keep warm temperature range relative to average setting Temperature can be increased or decreased 8 Clock Display Displays time of day program set...

Страница 10: ... Entering Set Program Time Mode Press and hold the Program Set button about 2 seconds until the green light begins to flash This signals that you have entered the Set Program Time mode The desired time can be set by pressing the Hours and Minutes buttons to scroll forward through the digits Pressing and holding either button will allow you to scroll continuously slowly at first and then to acceler...

Страница 11: ...ote that the heater plate on the coffeemaker is not powerful enough to raise the temperature of the coffee in the pot once coffee has been brewed This feature is designed as a preset and will affect the cof fee during the brewing cycle If the coffee is too hot the temperature can be lowered but since we do not recommend leaving the coffee on direct heat for more than twenty minutes the simplest wa...

Страница 12: ...recess on either side Fill the basket with the desired quantity of beans Lift the filter basket cover filter holder See parts list for best location to grasp Place a 4 cone filter or a permanent filter in the basket Note When using a permanent filter be sure that the filter handle is facing away from the grinder basket If you do not do so the handle may interfere with the flow of ground coffee int...

Страница 13: ...m the heater during mid brew The brewing process does not stop during this period only the flow of coffee from the basket stops Do not remove the carafe for longer than 30 seconds or the coffee may overflow the basket While we offer this feature we do not recommend that you pour coffee before the cycle has reached completion since the coffee brewed at the beginning of the cycle has a fla vor profi...

Страница 14: ...loth Never use rough abrasive materials or cleansers to clean the warming plate Do not dry the inside of the water reservoir with a cloth as lint may remain DECALCIFICATION Decalcification refers to removing the calcium deposits which form over time on the metal parts of the coffeemaker For best performance from your Coffee Bar Coffeemaker decalcify the base unit from time to time The frequency de...

Страница 15: ... than those that have been authorized by Cuisinart These warranties do not cover any damage caused by accident misuse shipment or other than ordinary household use These warranties exclude all incidental or consequential damages Some states do not allow the exclusion of or limitation of incidental or consequential damages so the foregoing limita tion or exclusion may not apply to you CALIFORNIA RE...

Страница 16: ...ina 02CU13488 IB 2697E Discover the complete line of Cuisinart brand premier kitchen appliances including food processors mini food processors hand mixers blenders toasters coffeemakers cookware ice cream makers and toaster ovens at www cuisinart com Coffeemakers Food Processors Toaster Ovens Blenders Cookware Ice Cream Makers ...

Отзывы: