background image

36

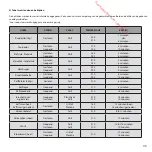
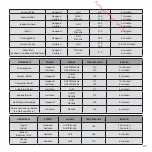
Peterfi sch, Filet

Geöff net

Grill

210

6 Minuten

Seeteufel, Filet

Geöff net 

Geschlossen

Grill oder 

Plancha

250
210

7 Minuten
5 Minuten

Jakobsmuschel

Geöff net 

Geschlossen

Grill

250
250

4 Minuten
2 Minuten

Kalmar, weiß

Geöff net

Grill

Plancha

210

6 Minuten

Gambas, dick

Geöff net

Grill

Plancha

250

6 Minuten

Ganzer Fisch (450g)

Geschlossen

Grill

210 
180

15 bis 20 Minuten

Weißfi schfi let 

(Barsch/Zander/ Dorsch)

Geöff net 

Geschlossen

Plancha

Grill

210

6 Minuten
8 Minuten

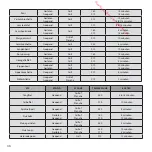
GEMÜSE

POSITION

PLATTE

TEMPERATUR

GARZEIT

Zucht-Champignon

Geöff net 

Geschlossen

Grill oder  Plancha
Grill oder  Plancha

210
210

10 Minuten

5 Minuten

 Tomate  (halbiert)

Geöff net

Grill oder  

Plancha

180

8 Minuten

Zucchini (halbiert)

Geöff net 

Geschlossen

Grill oder  Plancha
Grill oder  Plancha

210
180

10 Minuten

6 Minuten

 Aubergine (halbiert)

Geschlossen

Grill

210

5 Minuten

 Paprika  (halbiert)

Geschlossen

Grill oder 

Plancha

210

8 Minuten

Spargel, blanchiert

Geöff net

Grill

Plancha

180

8 Minuten

Fein geschnittenes Rohgemüse

(Artischocken, Fenchel, usw.)

Geschlossen

Plancha

180

6 Minuten

FRUITS

POSITION

PLATTE

TEMPERATUR

GARZEIT

 Apfel 

(halbiert)

Geöff net 

Geschlossen

Grill/Plancha
Grill/Plancha

180

20 Minuten
10 Minuten

 Banane 

(ganz mit Schale)

Geschlossen

Grill

180

6 Minuten

 Ananas 

(Scheibe)

Geschlossen

Grill

210

6 Minuten

Downloaded from www.vandenborre.be

Содержание GRIDDLER PRO GR50E

Страница 1: ...Instructions Hinweise Instructies Istruzioni Instrucciones GR50E GRIDDLER PRO D o w n l o a d e d f r o m w w w v a n d e n b o r r e b e ...

Страница 2: ...mps de cuisson 12 4 L avis des chefs 15 5 Nettoyage et rangement 15 6 Question Réponses 16 CONTENTS Safety cautions 17 1 Introduction 19 2 Product features 19 3 Use 20 A Before the first use 20 B Installing the cooking plates 20 C Advice for use 20 D Installing the drip tray 21 E Cooking modes 21 F Booster feature 22 G Turning the appliance OFF 22 H Table of cooking modes and times 23 4 Advice from...

Страница 3: ...und Garzeiten 34 4 Ratschläge der chefs 37 5 Reinigung und Verstauen 37 6 Fragen antworten 38 INHOUD Veiligheidsinstructies 39 1 Inleiding 41 2 Productkenmerken 41 3 Gebruik 42 A Voor het eerste gebruik 42 B Installatie van de bakplaten 42 C Gebruikstips 42 D Het installeren van het opvangbakje 43 E Bakmogelijkheden 43 F Booster functie 44 G De grill uitzetten 44 H Tabel met standen en baktijden 4...

Страница 4: ... 4 Il parere degli chef 59 5 Pulizia e manutenzione 59 6 Domande risposte 60 CONTENIDO Consignas de seguridad 61 1 Introducción 63 2 Características del producto 63 3 Uso 64 A Antes del primer uso 64 B Instalacion de las placas de cocción 64 C Consejos de uso 64 D Instalacion del recipiente para jugos de cocción 65 E Posiciones de cocción 65 F Funcion Booster 66 G Apagar el aparato 66 H Tabla de s...

Страница 5: ...ans l eau ou tout autre liquide Toujours débrancher l appareil après utilisation et avant de le nettoyer Ne jamais laisser l appareil branché sans surveillance Pour débrancher tirer sur la fiche et jamais sur le cordon L appareil n est pas destiné à être mis en fonctionnement au moyen d une minuterie extérieure ou par un système de commande à distance séparé Ne pas utiliser l appareil s il est tomb...

Страница 6: ...sins les bureaux et autres environnements de travail dans les fermes par les clients dans les hôtels motels et autres environnements de type résidentiel dans les bed and breakfast Déchets des équipements électriques et électroniques en fin de vie Dans l intérêt de tous et pour participer activement à l effort collectif de protection de l environnement Ne jetez pas vos produits avec les déchets ménag...

Страница 7: ...b 1 plaque Plancha 3c 2 plaques Gaufres vendues séparément 4 Panneau de commande 5 Bac récupérateur de jus de cuisson 6 Spatule de nettoyage spéciale grill 7 Système de verrouillage déverrouillage des plaques 8 Système d ouverture à 180 9 Charnière ajustable sur 6 positions 10 Range cordon Panneau de commandes Booster Booster 9 0 1 2 0 150 180 2 1 0 2 5 0 9 0 1 2 0 150 180 2 1 0 2 5 0 M in M a x 0...

Страница 8: ...ainsi la surface de cuisson disponible Le couvercle peut également être réglé sur différentes hauteurs afin de cuire des pièces jusqu à 8 cm d épaisseur ou de réaliser une cuisson indirecte Avant de débuter votre cuisson choisir la fonction la plus adaptée à votre recette Important lafindupréchauffageduGriddlerProestsignaléelorsque les témoins lumineux cessent de clignoter et restent fixes Pour obtenir...

Страница 9: ...e grill Remarque Ne jamais placer de nourriture sur les plaques pendant le préchauffage quel que soit le mode Manuel Minimum ou Maximum choisi MODE MANUEL M Ce mode active les 2 thermostats Il permet ainsi de sélectionner librement la température pour chacune des plaques afin de l adapter au plus juste au type d aliments à cuire Il est aussi idéal pour la cuisson en position ouverte car il permet de...

Страница 10: ...u bas durant 2 minutes Elle est idéale pour saisir rapidement un aliment en début de cuisson Après avoir installé les plaques tourner le bouton central sur la position de votre choix M ou Max Refermer le couvercle pour laisser préchauffer Appuyer sur le s bouton s Booster correspondant à la plaque du haut et ou du bas Leur contour clignote en rouge Note Durant le cycle Booster les deux thermostats ...

Страница 11: ...ochette de boeuf Fermé Ouvert Grill 210 250 6 minutes 15 minutes Côte de veau 250g Fermé Grill 210 6 minutes Escalope de veau Ouvert Grill 210 8 minutes Brochette de veau Ouvert Grill 210 15 minutes Brochette d abats Ouvert Fermé Plancha ou Grill 210 210 16 minutes 10 minutes Rognon de veau entier Rognon de veau morceau Fermé Grill ou Plancha 180 210 12 minutes entier 15 minutes morceau Côte de po...

Страница 12: ...ncha 210 2 minutes POISSONS POSITION PLAQUE TEMPÉRATURE TEMPS DE CUISSON Filet de sole Ouvert Grill ou Plancha 250 5 à 6 minutes Filet de turbot Ouvert Grill ou Plancha 210 10 minutes Sardine entière Ouvert Grill ou Plancha 250 6 minutes Pavé de saumon Fermé Ouvert Grill ou Plancha 180 210 6 minutes 12 minutes Petites crevettes Ouvert Grill ou Plancha 250 5 minutes Tranche de thon Ouvert Fermé Gri...

Страница 13: ...vert Grill ou Plancha 180 8 minutes Courgette demi Ouvert Fermé Grill ou Plancha Grill ou Plancha 210 180 10 minutes 6 minutes Aubergine demi Fermé Grill 210 5 minutes Poivron demi Fermé Grill ou Plancha 210 8 minutes Asperge blanchie Ouvert Grill Plancha 180 8 minutes Légumes émincés cru artichaut fenouil etc Fermé Plancha 180 6 minutes FRUITS POSITION PLAQUE TEMPÉRATURE TEMPS DE CUISSON Pomme de...

Страница 14: ...ron 5 NETTOYAGE ET RANGEMENT Après utilisation tourner le bouton central sur la positon O et débrancher le Griddler Pro et le laisser refroidir complètement minimum 1 2 heure avant de le nettoyer Utiliser la raclette de nettoyage pour enlever les résidus d aliments restés sur les plaques de cuisson Vider le bac récupérateur de jus Retirez les plaques de l appareil en enfonçant les boutons d éjecti...

Страница 15: ... prise est bien branchée et que la sélection du mode de cuisson a été faite Assurez vous également de respecter un temps de préchauffage avant de placer les aliments sur les plaques Utilisez la fonction Booster de l appareil afin d augmenter la température de cuisson sur les plaques de votre choix durant 2 minutes Les grillades ne sont pas saisies la cuisson se fait difficilement Vérifiez que la tempér...

Страница 16: ...lways unplug the appliance after use and before cleaning Never leave the appliance unattended when plugged in Pull on the plug to unplug never on the cord The grill should not be used with an external timer or with a separate remote control system Do not use the appliance if it has fallen or if it appears damaged Stop using the machine immediately if the cord is damaged Ifthesupplycordisdamaged it...

Страница 17: ...s in hotels motels and other residential type environments bed and breakfast type environments Discarding electrical and electronic equipment at the end of life In everybody s interest and to participate actively in protecting the environment Do not discard these products with your household waste Use return and collection systems available in your country Some materials can in this way be recycle...

Страница 18: ...Waffle plates sold separately 4 Control panel 5 Drip tray 6 Special grill cleaning scraping tool 7 System to lock unlock the plates 8 Hinge release to open grill to flat position 9 Hinge adjustable to 6 positions 10 Cable storage Control panel Booster Booster 9 0 1 2 0 150 180 2 1 0 2 5 0 9 0 1 2 0 150 180 2 1 0 2 5 0 M in M a x 0 M b c a d e a Temperature control for lower plate b Booster button bri...

Страница 19: ...this way doubling the available heating surface The lid can also be adjusted to different heights to cook food up to a thickness of 8 cm or to perform indirect cooking Before you start to cook select the configuration that is best adapted to your recipe Important The end of the Griddler Pro s pre heating period is indicated by the lights stopping flashing and remaining lit To get the best cooking per...

Страница 20: ...ood on the plates while the appliance is preheating whatever the chosen mode Manual Minimum or Maximum MANUAL MODE M This mode activates the 2 temperature controls It lets you choose the temperatures for each of the plates to adjust as accurately as possible to the type of food being cooked It s also ideal for cooking in the flat position because it lets you cook different kinds of food on each plat...

Страница 21: ... Once the plates are in place plug the appliance into an electrical outlet then turn the middle control to the position of your choice Manual or Max as explained in the preceding section Close the lid of the grill to allow the appliance to preheat Press the Booster button s that correspond to the upper and or lower plate s A circle of red light around the selected button s will start to flash Note ...

Страница 22: ...0 250 3 minutes 6 minutes Beef brochette Close Open Grill 210 250 6 minutes 15 minutes Veal chop 450g Close Grill 210 6 minutes Veal escalope Open Grill 210 8 minutes Veal brochette Open Grill 210 15 minutes Brochette of offal Open Close Griddle or Grill 210 210 16 minutes 10 minutes Veal kidney whole Veal kidney sliced Open Grill or Griddle 180 210 12 minutes whole 15 minutes sliced Pork chop Clos...

Страница 23: ... 15 minutes Chicken brochette Open Grill 210 6 minutes Bacon rashers Open Open Grill or Griddle 210 2 minutes FISH POSITION PLATE TEMPERATURE COOKING TIME Filet of sole Open Grill or Griddle 250 5 to 6 minutes Filet of turbot Open Grill or Griddle 210 10 minutes Whole sardine Open Grill or Griddle 250 6 minutes Thickly cut salmon steak Close Open Grill or Griddle 180 210 6 minutes 12 minutes Small...

Страница 24: ...ill or Griddle 210 210 10 minutes 5 minutes Tomato half Open Grill or Griddle 180 8 minutes Courgette half Open Close Grill or Griddle Grill or Griddle 210 180 10 minutes 6 minutes Aubergine demi Close Grill 210 5 minutes Pepper half Close Grill or Griddle 210 8 minutes Blanched asparagus Open Grill Griddle 180 8 minutes Raw chopped vegetables artichoke fennel etc Close Griddle 180 6 minutes FRUIT...

Страница 25: ...e 5 CLEANING AND STORAGE When you have finished cooking turn the button to the O position and unplug the appliance Allow the grill to cool completely at least 30 minutes before cleaning Use the cleaning scraping tool to remove any food residue that remains on the cooking plates Empty the drip try after use Press the plate release buttons to remove the plates from the appliance The cleaning scraping...

Страница 26: ...oes not cook Check the plug is firmly in the outlet and that the cooking mode has been selected Also make sure you allow the appliance to heat up before placing food on the plates Use the appliance s Booster feature to increase the cooking temperature on the selected plates for 2 minutes The barbecued food does not sear it is difficult to cook Check that the selected temperature or the cooking mode a...

Страница 27: ...en Sie das Netzkabel nicht über den Rand der Arbeitsplatte hängen und bringen Sie es nie in Berührung mit heißen Oberflächen Nicht in Wasser oder andere Flüssigkeiten tauchen Den Netzstecker nach jedem Gebrauch und vor dem Reinigen ziehen Das Gerät nie unbeaufsichtigt lassen wenn es an den Netzstrom angeschlossen ist Um den Netzstecker zu entfernen immer am Stecker ziehen und nicht am Kabel Der Mul...

Страница 28: ...die Hinweise in dieser Anleitung Nicht im Freien verwenden Dieses Gerät ist bestimmt für den Betrieb im Haushalt oder Ähnlichem wie z B in Küchen für Mitarbeiter in Geschäften Büros und anderen Arbeitsumgebungen in landwirtschaftlichen Betrieben für Gäste in Hotels Motels und anderen residentiellen Einrichtungen in Bed und Breakfasts Elektronische Altgeräte Im allgemeinen Interesse und als aktive ...

Страница 29: ...schichtete Kochplatten 3 a 2 Grillplatten 3 b 1 Plancha Grillplatte 3 c 2 Waffelplatten separat erhältlich 4 Reglerfeld 5 Auffangschale für die Garflüssigkeit 6 Spezieller Grillspatel 7 Ver Entriegelungssystem für die Platten 8 Öffnungssystem auf 180 9 Scharnier auf 6 Positionen einstellbar 10 Kabelhalter Reglerfeld a Temperaturregler für die untere Platte b Taste Booster BringtdieTemperaturderunteren...

Страница 30: ...ffneter Position zubereiten wobei die verfügbare Heizfläche verdoppelt wird Die Abdeckung kann ebenfalls auf unterschiedliche Höhen eingestellt werden um es Ihnen zu ermöglichen Stücke mit einer Höhe von bis zu 8 cm zu garen oder indirekt zu garen Wählen Sie zu Beginn die Konfiguration aus die für Ihr Rezept am besten geeignet ist Wichtig Das Vorheizen von Griddler Pro ist abgeschlossen wenn die Leuc...

Страница 31: ...ählen Diese Gareinstellungen können mit dem Knopf in der Mitte Ihres Grills angewählt werden Anmerkung Legen Sie während desVorheizens niemals Lebensmittel auf die Platten egal welcher Modus Manuell Min oder Max ausgewählt wurde MANUELLER MODUS M In diesem Modus werden die beiden Temperaturregler aktiviert So können Sie selbst die Temperatur für jede der Platten einzeln wählen um sie so gut wie mö...

Страница 32: ...en Platte für 2 Minuten eine Temperatur von 270 C erreicht werden Sie eignet sich ideal um Nahrungsmittel zu Beginn des Garens scharf anzubraten Schließen Sie das Gerät nach dem Einsetzen der Platten an den Netzstrom an und drehen Sie den mittleren Reglerknopf auf die Position Ihrer Wahl M oden Max so wie im vorhergehenden Abschnitt erklärt Schließen Sie die Abdeckung des Grills um ihn aufzuheizen...

Страница 33: ...lossen Geöffnet Grill 250 250 3 Minuten 6 Minuten Rinderspieß Geschlossen Geöffnet Grill 210 250 6 Minuten 15 Minuten Kalbskotelett 250g Geschlossen Grill 210 6 Minuten Kalbsschnitzel Geöffnet Grill 210 8 Minuten Kalbsspieß Geöffnet Grill 210 15 Minuten Spieß von Innereien Geöffnet Fermé Plancha oder Grill 210 210 16 Minuten 10 Minuten Kalbsniere ganz Kalbsniere zerkleinert Geschlossen Grill oder Planc...

Страница 34: ...nchenkeule Geöffnet Geschlossen Grill Grill 210 210 20 Minuten 15 Minuten Hühnerspieß Geöffnet Grill 210 6 Minuten Froschschenkel Geöffnet Geöffnet Grill oder Plancha 210 2 Minuten FISCH POSITION PLATTE TEMPERATUR GARZEIT Seezunge Filet Geöffnet Grill oder Plancha 250 5 bis 6 Minuten Steinbutt Filet Geöffnet Grill oder Plancha 210 10 Minuten Sardine ganz Geöffnet Grill oder Plancha 250 6 Minuten Lachs di...

Страница 35: ... oder Plancha 210 210 10 Minuten 5 Minuten Tomate halbiert Geöffnet Grill oder Plancha 180 8 Minuten Zucchini halbiert Geöffnet Geschlossen Grill oder Plancha Grill oder Plancha 210 180 10 Minuten 6 Minuten Aubergine halbiert Geschlossen Grill 210 5 Minuten Paprika halbiert Geschlossen Grill oder Plancha 210 8 Minuten Spargel blanchiert Geöffnet Grill Plancha 180 8 Minuten Fein geschnittenes Rohgemüs...

Страница 36: ...Nach Beendigung des Garvorgangs den mittleren Knopf auf O drehen und den Netzstecker ziehen Den Grill vor dem Reinigen vollständig abkühlen lassen mindestens 1 2 Stunde Den Reinigungsspatel verwenden um Reste von Nahrungsmitteln zu entfernen die an den Grillplatten haften Leeren Sie die Auffangschale für die Garflüssigkeit Die Auswurfknöpfe betätigen um die Platten aus dem Gerät zu entfernen Spatel ...

Страница 37: ... wieder in Betrieb Sie können nun weiter Kochen Die Nahrungsmittel nicht garen Vergewissern Sie sich dass der Stecker korrekt an eine Steckdose angeschlossen ist und dass ein Garmodus angewählt wurde Achten Sie ebenfalls darauf die Vorwärmzeit einzuhalten bevor Sie Nahrungsmittel auf die Platten legen Verwenden Sie die Funktion Booster des Geräts um die Gartemperatur der jeweils benötigten Platten...

Страница 38: ...en met warme oppervlakken Het apparaat niet onderdompelen in water of een andere vloeistof Na gebruik en voor het schoonmaken altijd de stekker uit het stopcontact halen Laat het apparaat nooit zonder toezicht achter met de stekker nog in het stopcontact Om de stekker uit het stopcontact te halen altijd aan de stekker zelf trekken en nooit aan het snoer De multifunctionele grill is niet bedoeld om...

Страница 39: ...pparaat niet buiten gebruiken Dit apparaat is bedoeld voor huishoudelijk gebruik thuis of in vergelijkbare omgevingen zoals personeelskeukens van winkels kantoren en dergelijke boerderijen gastenverblijven zoals hotels motels etc bed breakfasts Elektrische en elektronische apparaten aan het eind van hun levensduur In ieders belang en om actief bij te dragen aan de gezamenlijke bescherming van het ...

Страница 40: ...verkocht 4 Bedieningspaneel 5 Opvangbakje voor braadvocht 6 Speciaal grillspateltje 7 Vergrendelings ontgrendelingssysteem voor de platen 8 Mogelijkheid om 180 te openen 9 6 standen scharnier 10 Snoeropberger Bedieningspaneel a Temperatuurkeuzeknop voor de onderplaat b Booster knop Brengt de temperatuur van de onderplaat 2 minuten lang naar 270 C c Keuzeknop voor de bakmethode Stand O zet het appa...

Страница 41: ...loten stand of volledig geopend waardoor het bakoppervlak wordt verdubbeld Het deksel kan ook op verschillende hoogtes worden ingesteld zodat u indirect kunt bakken Voordat u begint te bakken kiest u de functie die het best past bij uw recept Belangrijk wanneer de Griddler Pro klaar is met voorverwarmen stoppen de verklikkerlampjes met knipperen en blijven ze continu branden Om betere culinaire pr...

Страница 42: ...e platen wanneer deze worden voorverwarmd ongeacht de gekozen modus handmatig minimum of maximum HANDMATIGE METHODE M Deze modus activeert de 2 temperatuurkeuzes Daarmee kunt u zelf de gewenste temperaturen kiezen voor elke afzonderlijke plaat zodat deze exact is aangepast aan de etenswaren die u wilt bakken Ook ideaal voor het bakken in de geopende stand omdat zo verschillende soorten etenswaren ...

Страница 43: ... etenswaren in het begin snel dicht te schroeien Plaats de platen steek de stekker in het stopcontact en draai de middelste knop in de gewenste stand Handmatig of Max zoals hiervoor is uitgelegd Sluit het deksel van de grill om hem te laten voorverwarmen Druk op de Booster knop pen van de bijbehorende boven en of onderplaat De contour van de gekozen Boost knop pen gaat rood knipperen Opmerking Tij...

Страница 44: ...rger Gesloten Geopend Grill 250 250 3 minuten 6 minuten Rundsbrochette Gesloten Geopend Grill 210 250 6 minuten 15 minuten Kalfkotelet 450g Gesloten Grill 210 6 minuten Kalfslapje Geopend Grill 210 8 minuten Kalfsbrochette Geopend Grill 210 15 minuten Brochette van orgaanvless Geopend Gesloten Plancha of Grill 210 210 16 minuten 10 minuten Kalfsnier heel Kalfsnier gesneden Gesloten Grill of Planch...

Страница 45: ...ten 5 minuten Kippenbout Geopend Gesloten Grill Grill 210 210 20 minuten 15 minuten Kippenbrochette Geopend Grill 210 6 minuten Kikkerbilletje Geopend Geopend Grill of Plancha 210 2 minuten VIS STAND PLAQUE TEMPERATUUR BAKTIJD Tongfilet Geopend Grill of Plancha 250 5 tot 6 minuten Tarbofilet Geopend Grill of Plancha 210 10 minuten Sardine heel Geopend Grill of Plancha 250 6 minuten Stuk zalm Geslote...

Страница 46: ... Plancha Grill of Plancha 210 210 10 minuten 5 minuten Tomaat halve Geopend Grill of Plancha 180 8 minuten Courgette halve Geopend Gesloten Grill of Plancha Grill of Plancha 210 180 10 minuten 6 minuten Aubergine halve Gesloten Grill 210 5 minuten Paprika halve Gesloten Grill of Plancha 210 8 minuten Geblancheerd asperge Geopend Grill Plancha 180 8 minuten Rauwe gesneden groenten artisjok venkel e...

Страница 47: ...de platen met een doekje met citroensap schoonmaken 5 REINIGEN EN OPBERGEN Als u klaar bent met bakken draait u de middelste knop in de O stand en haalt u de stekker uit het stopcontact Laat de grill volledig afkoelen minimaal een half uur alvorens hem schoon te maken Gebruik het schrapertje om voedselrestjes te verwijderen van de bakplaten Leeg na gebruik het opvangbakje Verwijderdebakplatenuithe...

Страница 48: ...er met koken De etenswaren bakken niet Controleer of de stekker goed in het stopcontact zit en de bakmethode is gekozen Geef het apparaat ook te tijd om voor te verwarmen voordat u de etenswaren op de platen legt Gebruik de Booster functie van het apparaat om 2 minuten lang de baktemperatuur van de gewenste plaat platen te verhogen De vlees schroeit niet dicht het bakken gaat moeizaam Controleer o...

Страница 49: ...alimentazione superi il bordo del piano di lavoro né metterlo a contatto con superfici calde Non immergere in acqua o altro liquido Staccare sempre l apparecchio dalla corrente dopo averlo utilizzato e prima di pulirlo Non lasciare mai l apparecchio attaccato alla corrente e incustodito Per staccare dalla corrente tirare sempre la spina Non tirare mai il cavo Il grill multifunzione non è destinato ...

Страница 50: ...è destinato ad essere utilizzato per applicazioni domestiche o simili ad esempio nelle cucine del personale di negozi uffici e altri ambienti di lavoro nelle fattorie dai clienti in alberghi motel e altri ambienti di tipo residenziale nei bed e breakfast Rifiuti delle apparecchiature elettriche ed elettroniche a fine vita Nell interesse generale e al fine di partecipare attivamente allo sforzo colletti...

Страница 51: ...el vendute separatamente 4 Pannello di comando 5 Contenitore di raccolta del liquido di cottura 6 Spatola speciale grill 7 Sistema per bloccare sbloccare le piastre 8 Sistema di apertura a 180 9 Cerniera regolabile su 6 posizioni 10 Avvolgicavo Pannello di comando a Selettore di temperatura per la piastra inferiore b Pulsante Booster porta la temperatura della piastra in basso fino a 270 C per 2 mi...

Страница 52: ...180 raddoppiando così la superficie di calore disponibile Anche il coperchio può essere regolato su varie altezze per consentire di realizzare delle cotture indirette Prima di iniziare a cuocere scegliere la funzione più adatta alla preparazione scelta Attenzione quandoilGriddlerProterminalafasedipreriscaldamento le spie luminose smettono di lampeggiare e diventano fisse Per ottenere i migliori risu...

Страница 53: ...modalità di cottura sono selezionabili tramite il pulsante centrale del vostro grill Nota Non poggiare mai il cibo sulle piastre durante la fase di preriscaldamento indipendentemente dalla modalità Manuale Minima o Massima scelta Modalità manuale M Questa modalità attiva i 2 selettori di temperatura Vi permette così di selezionare liberamente le temperature da voi prescelte per ciascuna delle plac...

Страница 54: ...izio cottura Dopo aver installato le piastre attaccate l apparecchio a una presa di corrente elettrica quindi girate il pulsante centrale sulla posizione prescelta Manuale o Max come illustrato nella sezione precedente Richiudere il coperchio del grill per farlo preriscaldare Premere il i pulsante i Booster corrispondente alla piastra in alto e o in basso Il contorno del dei pulsante pulsanti Boos...

Страница 55: ... minuti Spiedino di manzo Chiusa Aperta Grill 210 250 6 minuti 15 minuti Braciola di vitello 250g Chiusa Grill 210 6 minuti Scaloppa di vitello Aperta Grill 210 8 minuti Spiedino di vitello Aperta Grill 210 15 minuti Spiedino di interiora Aperta Chiusa Plancha o Grill 210 210 16 minuti 10 minuti Rognone di vitello intero Rognone di vitello in pezzi Chiusa Grill o Plancha 180 210 12 minuti intero 1...

Страница 56: ...perta Grill 210 6 minuti Cosce di rana Aperta Aperta Grill o Plancha 210 2 minuti PESCE POSIZIONE PIASTRA TEMPERATURA TEMPO DE COTTURA Filetto di sogliata Aperta Grill o Plancha 250 5 6 minuti Filetto di rombo Aperta Grill o Plancha 210 10 minuti Sardine intere Aperta Grill o Plancha 250 6 minuti Trancio di salmone Chiusa Aperta Grill o Plancha 180 210 6 minuti 12 minuti Gamberetti Aperta Grill o ...

Страница 57: ...minuti Pomodoro metà Aperta Grill ou Plancha 180 8 minuti Zucchina metà Aperta Chiusa Grill o Plancha Grill o Plancha 210 180 10 minuti 6 minuti Melanzana metà Chiusa Grill 210 5 minuti Peperone metà Chiusa Grill o Plancha 210 8 minuti Asparagi sbollentati Aperta Grill Plancha 180 8 minuti Verdure affettate crude carciofo finocchio ecc Chiusa Plancha 180 6 minuti FRUTTA POSIZIONE PIASTRA TEMPERATURA...

Страница 58: ...ta terminata la cottura girare il pulsante centrale su O e staccare l apparecchio dalla presa elettrica Lasciare raffreddare completamente il grill almeno mezz ora prima di pulirlo Utilizzare l apposito raschietto per eliminare i residui di cibo dalle piastre di cottura Svuotare il contenitore di raccolta del liquido Rimuovere le piastre dall apparecchio premendo sui pulsanti di sblocco Il raschiet...

Страница 59: ...e la spina della corrente sia attaccata correttamente e che la modalità di cottura sia stata selezionata Aver cura di rispettare anche il tempo di preriscaldamento prima di mettere gli alimenti sulle piastre Utilizzare la funzione Booster dell apparecchio per aumentare la temperatura di cottura sulle piastre prescelte per 2 minuti Le grigliate non si rosolano la cottura si fa difficile Controllare c...

Страница 60: ...uperficies calientes No lo sumerja en agua o en cualquier otro líquido Desenchufe el grill después de utilizarlo y antes de limpiarlo No deje nunca el aparato encendido sin vigilancia Para desenchufarlo tire de la clavija no del cable El grill multifunción no está preparado para funcionar con un temporizador externo o con un sistema de mando a distancia No utilice el electrodoméstico si ha recibido...

Страница 61: ... ejemplo cocinas del personal en tiendas oficinas y otros entornos de trabajo granjas o casas rurales hoteles moteles y otros entornos de tipo residencial para uso de los clientes pensiones hostales alquiler de habitaciones y otros establecimientos similares Residuos de equipos eléctricos y electrónicos al final de su vida Eninterésdetodosyparaparticiparactivamenteenlosesfuerzoscolectivosdeprotecció...

Страница 62: ...ancha 3c 2 cara gofres se vende por separado 4 Panel de control 5 Recipiente para el jugo de cocción 6 Espátula especial parrilla 7 Sistema de bloqueo desbloqueo de las placas 8 Sistema de apertura a 180º 9 Bisagra ajustable con 6 posiciones 10 Alojamiento para el cable Panel de control a Selector de temperatura para la placa inferior b Botón Booster Ajusta la temperatura de la placa inferior a 27...

Страница 63: ...de cocción disponible La tapa también se puede ajustar a diferentes alturas para realizar cocciones indirectas Antes de empezar la cocción elija la función más apropiada para su receta Importante la fase de precalentamiento de Griddler Pro finaliza cuando las señales luminosas dejan de parpadear y permanecen fijas Para conseguir los mejores resultados culinarios le aconsejamos que deje calentar Grid...

Страница 64: ...seleccionar estas dos modalidades a partir del botón central del grill Atención No colocar nunca alimentos sobre las placas durante el precalentamiento con independencia del modo escogido manual mínimo o máximo MODO MANUAL M Este modo activa los 2 selectores de temperatura De esta forma puede seleccionar personalmente las temperaturas de su elección paracadaunadelasplacas conelfindeadaptarlascontod...

Страница 65: ...aber instalado las placas enchufe el aparato a la red eléctrica y coloque el botón central en posición de su elección Manual o Max tal y como se indica en la sección anterior Cierre la tapa del grill para que pueda precalentarse Pulse los botones Booster correspondientes a la placa superior y o inferior El contorno de los botones Booster seleccionados parpadeará en rojo Nota Durante el ciclo Boost...

Страница 66: ...heta de buey Cerrado Abierto Parrilla 210 250 6 minutos 15 minutos Chuleta de ternera 250g Cerrado Parrilla 210 6 minutos Escalope de ternera Abierto Parrilla 210 8 minutos Brocheta de ternera Abierto Parrilla 210 15 minutos Brocheta de hígado Abierto Cerrado Plancha o Parrilla 210 210 16 minutos 10 minutos Riñón de ternera entero Riñón de ternera trozo Cerrado Parrilla o Plancha 180 210 12 minuto...

Страница 67: ...rrilla 210 6 minutos Ancas de rana Abierto Abierto Parrilla o Plancha 210 2 minutos PESCADO PESCADO POSICIÓN PLACA TEMPERATURA TIEMPO DE COCCIÓN Filete de lenguado Abierto Parrilla o Plancha 250 5 a 6 minutos Filete de rodaballo Abierto Parrilla o Plancha 210 10 minutos Sardinas interas Abierto Parrilla o Plancha 250 6 minutos Lomo de salmón Cerrado Abierto Parrilla o Plancha 180 210 6 minutos 12 ...

Страница 68: ...Abierto Parrilla o Plancha 180 8 minutos Calabacín mediano Abierto Cerrado Parrilla o Plancha Parrilla o Plancha 210 180 10 minutos 6 minutos Berenjena mediana Cerrado Parrilla 210 5 minutos Pimiento mediano Cerrado Parrilla o Plancha 210 8 minutos Espárragos blancos Abierto Parrilla Plancha 180 8 minutos Verduras crudas cortadas en rodajas alcachofas hinojo etc Cerrado Plancha 180 6 minutos FRUTA...

Страница 69: ...DAR Cuando haya terminado de cocinar coloque el interruptor central en posición 0 y desenchufe el aparato Deje que el grill se enfríe completamente mínimo hora antes de limpiarlo Utilice el rascador incluido para retirar los residuos de alimentos que puedan haber quedado sobre las placas de cocción Vacíe el recipiente para los jugos de cocción Retire las placas del aparato pulsando los botones de ...

Страница 70: ... que el aparato está enchufado y que ha seleccionado el modo de cocción adecuado Compruebe también que se ha respetado el tiempo de precalentamiento antes de colocar los alimentos sobre las placas Utilice la función Booster del aparato con el fin de aumentar la temperatura de cocción sobre las placas de su elección durante 2 minutos Las parrilladas no quedan bien cuesta cocinar los alimentos Compru...

Страница 71: ...IB 14 282 BABYLISS SARL 99 Avenue Aristide Briand 92120 Montrouge France D o w n l o a d e d f r o m w w w v a n d e n b o r r e b e ...

Отзывы: