background image

7

PROGRAMMING YOUR 
COFFEEMAKER

SETTING THE CLOCK

When the coffeemaker is plugged in, 12:00 
will appear until you set the time.

Entering Time Set Mode 

Hold down the Hour or Minute button 
until the clock begins flashing. Press 
either button to select the desired 
time. Hold buttons down to scroll 
through the digits, or press and 
release to advance one digit at a time. 
When scrolling, the numbers will 
advance slowly and then speed up.

When the number displayed approaches 
the desired time, press and release to 
advance one digit at a time. Be sure the 
PM indicator is on if a PM time is desired.

Exiting Time Set Mode
 

a.  Press any function button besides Hour 

or Minute to exit mode.

 b. 


If you do nothing for a period of five 

seconds the mode will be exited.

SETTING THE PROGRAM TIME

When you press the Program set button,  
it displays a previously selected auto-on 
time, or the default time (12:00pm).

Entering Set Program Time Mode 

Press and hold the Program set 
button until the green light and LCD 
display begin to flash. You are now in 
Set Program Time mode. Set the time 
you want coffee to begin brewing by 
following the instructions in “Entering 
Time Set Mode.”

The coffeemaker will start to brew at the 
programmed time. The Program mode 
cannot be entered if the coffeemaker 
is in its brew cycle.

Exiting Set Program Time Mode

    a. Press and release Program button.

    b.  Press any function button besides 

Hour or Minute to exit mode and 
activate the selected function.

    c.  If you do nothing for a period of five 

seconds the mode will be exited.

MAKING COFFEE WITH
WHOLE BEANS

Follow instructions in “Before Brewing Your 
First Pot of Coffee” above. 

   1.  Insert Charcoal Water Filter 

Follow directions for the preparation and 
insertion of the charcoal water filter on 
page 9.

   2.  Fill the Water Reservoir 

Open the reservoir cover and pour in 
water, using the water level window 
indicator to measure the number of 
cups desired. 

NOTE:

 Do not exceed 

the 10-cup line. Doing so could cause 
carafe to overflow.

   3.  Add Beans 

Lift the grinder basket lid, using the 
recess on either side. Fill the basket 
with the desired quantity of beans. 

NOTE: 

Use 1 level scoop of whole 

beans per cup. For 1 to 4 cups, use 1½  
level scoops per cup. Do not add over 
14 scoops. This could cause the grinder 
to malfunction and/or the coffeemaker 
to overflow.


4.  Insert Coffee Filter  

Press the filter basket door release 
button to open door. 

r1BQFS'JMUFSmQMBDFBCBTLFU

paper filter in the basket, making 
sure the filter is completely open and 
touching the side walls and bottom of 
basket.

BEFORE BREWING YOUR  

FIRST POT OF COFFEE

We recommend flushing out the system 
before brewing your first pot of coffee. 
Simply follow “Making Coffee with Pre-
Ground Beans,” page 9. Skip step #1 and 
be sure to use only water and a paper 
filter…no coffee!

Once you’ve done that, brew a pot of real 
coffee and get ready to enjoy Cuisinart at 
its best!

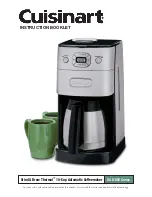
Содержание DGB-650BC - Grind-and-Brew Thermal Automatic Coffeemaker

Страница 1: ...For your safety and continued enjoyment of this product always read the instruction book carefully before using Grind Brew Thermal 10 Cup Automatic Coffeemaker DGB 650 Series INSTRUCTION BOOKLET ...

Страница 2: ...n plug cord into the wall outlet To disconnect push the Off button then remove plug from wall outlet 12 Do not use appliance for other than intended use 13 Lock lid securely onto carafe before serving any beverages 14 Scalding may occur if the lid is removed during the brewing cycle 15 The thermal carafe is designed for use with this appliance only It must never be used on the range top 16 Do not ...

Страница 3: ...has a polarized plug one blade is wider than the other To reduce the risk of electric shock this plug will fit into a polarized outlet only one way If the plug does not fit fully into the outlet reverse the plug If it still does not fit contact a qualified electrician Do not modify the plug in any way OPERATING NOTICE Clogging and backing up of water and or coffee in the filter basket can occur un...

Страница 4: ...T CUP OF COFFEE Element 1 Water Coffee is 98 water The quality of that water is as important as the quality of your coffee If water doesn t taste good from the tap it won t taste good in your coffee Cuisinart includes a charcoal water filter to remove chlorine bad tastes and odors for the purest coffee flavor every time you brew Element 2 Coffee While coffee is 98 water all of the flavor comes fro...

Страница 5: ...low of coffee from basket when carafe is removed from resting plate so a cup can be poured in mid brew if desired 8 Resting Plate Scratch resistant with nonstick coating 9 Thermal Carafe with Hands Free Lid An easy pour dripless double wall insulated 10 cup thermal carafe with ergonomic handle Coffee brews through and pours through a unique lid that seals out air to preserve fresh brewed flavor No...

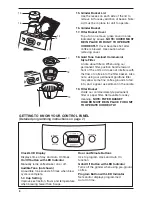
Страница 6: ...e grounds to fall into and appear as sediment in the carafe 19 Filter Basket Holds our commercial style permanent filter or paper filter Removable for easy cleaning NOTE FILTER BASKET HOLDER MUST BE IN PLACE FOR UNIT TO OPERATE CORRECTLY 18 17 19 GETTING TO KNOW YOUR CONTROL PANEL Detailed programming instructions on page 7 Clock LCD Display Displays time of day and Auto On times On Off button wit...

Страница 7: ...elease Program button b Press any function button besides Hour or Minute to exit mode and activate the selected function c If you do nothing for a period of five seconds the mode will be exited MAKING COFFEE WITH WHOLE BEANS Follow instructions in Before Brewing Your First Pot of Coffee above 1 Insert Charcoal Water Filter Follow directions for the preparation and insertion of the charcoal water f...

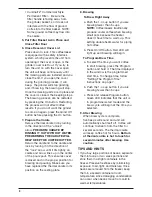
Страница 8: ...s cover is closed and in the proper position for brewing and pouring Make sure you have replaced the thermal carafe in its position on the resting plate 8 Brewing To Brew Right Away a Push the 1 4 cup button if you are brewing fewer than 5 cups NOTE Coffeemakers traditionally produce cooler coffee when brewing small pots because the heater doesn t have time to warm up This setting double heats wat...

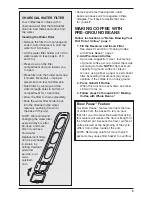
Страница 9: ...BOE soak it fully immersed in cold tap water for 15 minutes r JGU UIF XBUFS GJMUFS IPMEFS PVU PG UIF water reservoir see page 6 13 and 14 r 1SFTT EPXO PO UIF GJMUFS compartment and pull toward you to open r 1MBDF GJMUFS JOUP UIF IPMEFS BOE TOBQ JU DMPTFE F DBSFGVM m JNQSPQFS placement can tear the filter skin r MVTI GJMUFS CZ SVOOJOH DPME UBQ water through holes in bottom of compartment for 10 sec...

Страница 10: ...e carafe and carafe lid should be placed on the upper rack only Do not use scouring agents or harsh cleansers on any part of the coffeemaker Never immerse base unit in water or other liquid To clean base simply wipe with a clean damp cloth and dry before storing Wipe resting plate with a clean damp cloth Never use rough abrasive materials or cleansers to clean the resting plate Do not dry the insi...

Страница 11: ...tomatic Coffeemaker has been manufactured to the strictest specifications and has been designed for use with the authorized accessories and replacement parts This warranty expressly excludes any defects or damages caused by accessories replacement parts or repair service other than those that have been authorized by Cuisinart This warranty does not cover any damage caused by accident misuse shipme...

Страница 12: ... Good Life www cuisinart com 2010 Conair Corporation Cuisinart is a registered trademark of Conair Corporation Any trademarks or service marks of third parties used herein are the trademarks or service marks of their respective owners 150 Milford Road East Windsor NJ 08520 Printed in China 09CE17183 IB 8336A Coffeemakers Food Processors Toasters Blenders Cookware Ice Cream Makers ...

Отзывы: