background image

3. UTILIZACIÓN

A. MONTAJE

Antes de la primera utilización o después de mucho tiempo sin
usar la cafetera, conviene llenar el depósito de agua fría hasta
el tope (sin café ni filtro). Colocar la jarra en su sitio, poner en
marcha (       +

O/1

) y dejar correr el agua.

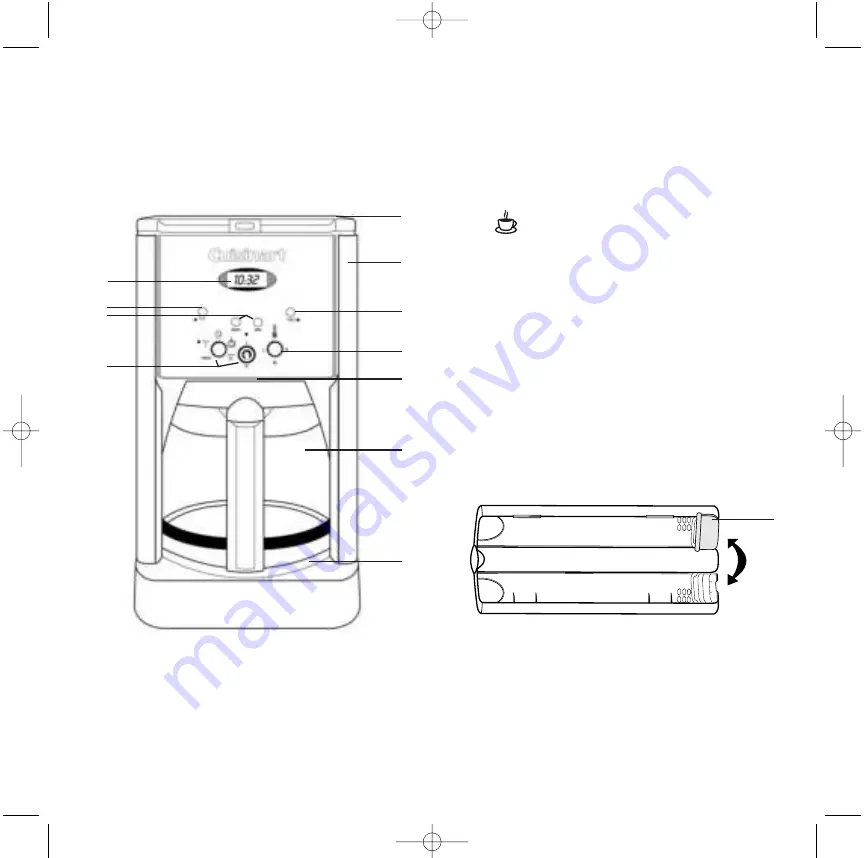
1. Colocar el filtro de agua

a.

Quite el envoltorio de plástico del filtro y déjelo 
humedecerse 15 minutos en agua fría.

b.

El compartimiento del filtro está metido dentro del 
depósito de agua, a la izquierda. Quite la tapa de la
máquina de café y saque el compartimiento del filtro. Para
sacarlo ponga los pulgares bajo las flechas y levante.

c.

Meta el filtro en el fondo del compartimiento del filtro tal
como se indica en el dibujo (Es muy importante que el
filtro se coloque en el sitio que le corresponde en el 
compartimiento del filtro, es decir, a la derecha del 
compartimiento cuando éste esté como se indica en el
dibujo).

d.

Cierre el compartimiento del filtro.

e.

Meta el compartimiento del filtro hasta el fondo en el 
depósito de agua (La parte en que se encuentra el filtro debe
estar abajo).

Le recomendamos que cambie el filtro cada 60 
utilizaciones más o menos.

2. Llenar el depósito de agua

Se debe llenar con agua fría y en función del número de

Filtro

35

1

2

5

6

7

12

13

10

11

8

9

DCC1200WE-DCC1200E IB  30/11/04  9:49  Page 36

Содержание DCC1200E

Страница 1: ...M a c h i n e à c a f é C o f f e e m a k e r Instructions Hinweise Instructies Istruzioni Instrucciones DCC1200E DCC1200WE DCC1200WE DCC1200E IB 30 11 04 9 49 Page 2 ...

Страница 2: ...e of the appliance 11 A Assembly 11 B Operating the appliance The control panel Programming 12 4 Chefs tips and hints 14 5 Questions Answers 14 6 Cleaning and storage 14 7 Safety cautions 15 INHALTSVERZEICHNIS 1 Einleitung 16 2 Beschreibung 16 3 Gebrauch 17 A Zusammensetzen 17 B Gebrauchshinweise Die Bedienungstasten Das Programmieren 18 4 Die Ratschläge der Chefs 20 5 Fragen Antworten 21 6 Reinig...

Страница 3: ... 29 A Montaggio 29 B Utilizzo Il pannello digitale La programmazione 30 4 Il parere dei Chef 32 5 Domande Risposte 32 6 Pulizia e manutenzione 32 7 Istruzioni di sicurezza 33 CONTENIDO 1 Introducción 34 2 Características del producto 34 3 Utilización 35 A Montaje 35 B Consejos de utilización Las teclas de mando La programación 36 4 Sugerencias de los Chefs 38 5 Preguntas y Respuestas 38 6 Limpiar ...

Страница 4: ...e et un détecteur électronique de tartre avec voyant lumineux pour vous avertir de la nécessité de nettoyer l appareil grâce à la touche de détartrage 2 CARACTERISTIQUES PRODUIT 1 Couvercle 2 Réservoir d eau capacité maximale 1 8 L 3 Filtre à charbon non illustré il filtre l eau pour éliminer les impuretés et les odeurs S insère dans le compartiment à filtre voir A ASSEMBLAGE 1 Placer le filtre à ...

Страница 5: ...voir d eau Ouvrir le couvercle de la machine et prendre le compartiment à filtre Pour ouvrir le compartiment à filtre placer vos pouces sous les flèches et tirer c Placer le filtre dans le fond du compartiment comme indiqué sur le schéma veiller à placer le filtre du bon côté du compartiment c est à dire du côté droit du compartiment lorsque celui ci est positionné comme sur le schéma d Refermer l...

Страница 6: ...ge ou d arrêt automatique 2a PROG pour régler l heure désirée de démarrage automatique fonction AUTO 1 2b AUTO 1 fonction de démarrage automatique à une heure choisie Avec témoin lumineux vert 2c AUTO 0 fonction d arrêt automatique de 0 à 4 heures après la préparation du café 2d pour régler l heure en cours 2e pour amorcer directement le cycle de préparation du café 3 Interrupteur 0 1 s utilise av...

Страница 7: ...i le cycle de passage du café est commencé s éteint 4 AUTO 0 arrêt automatique Tourner le sélecteur de fonction sur AUTO 0 Les chiffres clignotent Appuyer sur HRES et MIN pour enregistrer la durée après laquelle vous souhaitez que l appareil s arrête de 0 à 4 heures Les chiffres clignotent 5 fois puis s arrêtent 5 Détartrage automatique Au fur et à mesure des utilisations des dépôts de calcaire se...

Страница 8: ...eiller à bien respecter les doses de café préconisées dans le livre de recettes Cuisinart 5 QUESTIONS REPONSES 6 NETTOYAGE ET RANGEMENT Lorsque le voyant CALC s allume détartrer la machine à café avec un produit prévu à cet effet et suivre la notice explicative de celui ci Il est également possible d utiliser du vinaigre blanc pour détartrer la machine à café en mélangeant 30cl d eau pour 30cl de ...

Страница 9: ... du bord du plan de travail Le cordon ne doit jamais se trouver en contact avec la plaque chauffante ou des surfaces chaudes Ne jamais placer l appareil sur ou à proximité d une source de chaleur Débrancher l appareil après utilisation et avant de le nettoyer Ne jamais laisser l appareil branché sans surveillance Pour débrancher tirer sur la fiche et jamais sur le cordon Se montrer particulièremen...

Страница 10: ...ogrammable auto off audible beep at the end of cycle and time to descale electronic indicator with flashing light with descaling button 2 DESCRIPTION 1 Lid 2 Water reservoir maximum capacity 1 8 L 3 Charcoal water filter not illustrated filters water to eliminate impurities and odours Goes into the water filter holder see ASSEMBLY 1 Insert the water filter 4 Filter holder not illustrated for 4 pap...

Страница 11: ...lifting it out To open the water filter holder place thumbs in slots directly under the arrows and pull open in opposite directions c Place the filter at the bottom of the water filter holder as indicated on the diagram Filter will only fit correctly in one end of the holder that is the right side of the holder when positioned as on the diagram d Close the water filter holder e Re place the water ...

Страница 12: ...on or off time 2a PROG to set the desired auto on time AUTO 1 function 2b AUTO 1 auto on feature to program the starting time of the brew cycle With green indicator light 2c AUTO 0 auto off feature from 0 to 4 hours after coffeemaking start 2d to set the time of the day 2e to start the brew cycle directly 3 O I switch works in tandem with the function knob to start or stop a function 4 Central red...

Страница 13: ...blink 5 times then stop 5 Automatic descaling Use after use scaling builds up Scaling interfers with fine mechanics and gives coffee a hard and bitter taste That is why the appliance should be regularly descaled to ensure good quality coffee The descaling frequency depends upon the hardness of your tap water and how often you use the coffemaker When the coffeemaker needs descaling the descaling in...

Страница 14: ...start the brewing cycle Halfway through the cycle turn the machine off let it sit for one hour then restart the cycle Run two cycles of water alone through the machine to rinse it Let the appliance cool down completely and switch it off before cleaning To clean the outside of the coffeemaker wipe clean with a sponge using a mild detergent then dry carefully The filter holder measuring scoop coffee...

Страница 15: ...t it pull the plug and not the cord Increased supervision is necessary when this appliance is used near children The coffeemaker should not be used by children Store out of children s reach Do not use the appliance if it has fallen or if it shows noticeable signs of damage Stop using the appliance immediately if the cord is damaged If the power supply cord is damaged it should be replaced by the m...

Страница 16: ...rammierbare Abschaltautomatik Geräuschsignal am Ende der Zubereitungszeit und elektronischer Kalksensor mit Leuchtanzeige um Sie dank der Entkalkertaste darauf hinzuweisen dass die Kaffeemaschine entkalkt werden sollte 2 BESCHREIBUNG 1 Deckel 2 Wasserreservoir Inhalt maximal 1 8 l 3 Kohlefilter nicht abgebildet filtert das Wasser eliminiert Unreinheiten und Gerüche Wird in das Filterfach eingelegt...

Страница 17: ...Teil des Wasserreservoirs Den Deckel der Maschine öffnen und das Filterfach herausnehmen Zum Öffnen des Filterfachs mit den Daumen auf die Pfeile drücken und ziehen c Den Filter so wie in der Abbildung angezeigt auf dem Boden des Fachs einlegen Es ist wichtig dass der Filter auf der richtigen Seite des Fachs eingelegt wird d h auf der rechten Seite des Fachs wenn dieses so gehalten wird wie auf de...

Страница 18: ...uck auf die Lasche wieder schließen 5 Überprüfen dass die Kanne auf die Warmhalteplatte gestellt wurde bevor das Gerät eingeschaltet wird 6 Das Gerät einschalten B GEBRAUCHSHINWEISE DIE BEDIENUNGSTASTEN 1 Uhr Anzeige der Uhrzeit und der programmierten Zeit mit den Funktionen AUTO 1 und AUTO 0 Einschalt und Abschaltautomatik 2 Funktionswahl zum Einstellen der Uhrzeit und zum Programmieren der Einsc...

Страница 19: ...wenn Sie die Zahl 12 überschreiten erscheinen die Buchstaben PM um die Zeit zwischen 12 Uhr und Mitternacht anzuzeigen Wenn keine Buchstaben angezeigt sind bedeutet das dass die Vormittagszeit zwischen Mitternacht 0 Uhr und 12 Uhr Mittags angezeigt wird Achten Sie immer darauf dass die Uhrzeit auf die jeweilige Tageshälfte eingestellt ist damit die Funktionen für die Einschalt und Abschaltautomati...

Страница 20: ... durchgeführt wird das Reservoir bis zur Maximalhöhe mit kaltem Wasser füllen ohne Kaffee und Filter Einschalten Schalter 0 1 und das Wasser durchlaufen lassen Anm der Druck auf die Entkalkertaste annulliert alle anderen Funktionen Wenn Sie sie aus Versehen drücken drücken Sie noch einmal um den Entkalkungsvorgang wieder abzubrechen und die vorherigen Einstellungen erneut zu aktivieren 6 Taste 1 4...

Страница 21: ...e in Berührung mit der Heizplatte geraten Nicht in Wasser oder andere Flüssigkeiten tauchen Das Gerät nicht in der Nähe eines beheizten Geräts aufstellen Nach dem Gebrauch und vor der Reinigung immer den Netzstecker ziehen Das Gerät nie unbeaufsichtigt lassen wenn es an den Netzstrom angeschlossen ist Zum Ziehen des Netzsteckers am Stecker ziehen nie am Kabel Besondere Vorsicht ist geboten wenn da...

Страница 22: ...ssignaal op het einde van de cyclus en een elektronische kalkaanslagsensor met controlelampje om u te verwittigen als het toestel moet worden schoongemaakt met behulp van de ontkalkingstoets 2 ONDERDELEN 1 Deksel 2 Waterreservoir maximale inhoud 1 8 L 3 Koolfilter niet afgebeeld het filtert het water om vuildeeltjes en reukjes te verwijderen Wordt in het filtervak aangebracht zie MONTEREN 1 Het wa...

Страница 23: ...achine en neem het filtervak Om het filtervak te openen plaatst u uw duimen onder de pijltjes en trekt c Breng het filter op de bodem van het vak zoals aangeduid op het schema het is belangrijk dat het filter aan de goede kant van het vak wordt geplaatst d w z aan de rechterkant van het vak als dat zich in dezelfde stand bevindt als op het schema d Sluit het vak e Plaats het vak opnieuw in het wat...

Страница 24: ...ammeren 2a PROG om het gewenste uur voor de automatische start te regelen functie AUTO 1 2b AUTO 1 automatische startfunctie op een gekozen uur Met groen controlelampje 2c AUTO 0 automatische stopfunctie na een periode van 0 tot 4 uur 2d om het lopende uur te regelen 2e om de bereidingscyclus van de koffie onmiddellijk te starten 3 Schakelaar 0 1 wordt samen met de functiekeuzeknop gebruikt om een...

Страница 25: ...t apparaat stilvalt van 0 tot 4 uur De cijfers knipperen 5 keer en vallen dan stil 5 Automatische ontkalking Naarmate u het apparaat meer gebruikt vormt zich kalkaanslag Kalkaanslag is schadelijk voor fijne mechanismen en geeft aan de koffie een harde en bittere smaak Om steeds lekkere koffie te krijgen moet het apparaat dus regelmatig worden ontkalkt De frequentie van het ontkalken hangt af van d...

Страница 26: ...uct volgen Voor een reiniging met witte azijn 30cl azijn 30cl water gebruiken Dit mengsel in het reservoir gieten en een koffiezetcyclus starten Als het water voor de helft is doorgelopen 1 uur laten rusten en dan de cyclus hervatten 2 nieuwe cycli uitvoeren en daarbij uitsluitend water gebruiken om het apparaat uit te spoelen Laat het apparaat volledig afkoelen en neem de stekker uit het stopcont...

Страница 27: ... voordat u het apparaat schoonmaakt Laat de stekker nooit in het stopcontact zonder toezicht Om de stekker uit het stopcontact te halen trekt u aan de stekker en nooit aan het snoer Wees bijzonder waakzaam als het apparaat wordt gebruikt in de nabijheid van kinderen Berg het apparaat op buiten het bereik van kinderen Laat kinderen de koffiemachine niet gebruiken Gebruik het apparaat niet als het g...

Страница 28: ...iclo e rilevatore elettronico di incrostazioni con spia luminosa per indicare la necessità di procedere alla disincrostazione selezionando l apposito tasto 2 CARATTERISTICHE 1 Coperchio 2 Serbatoio capacità massima 1 8 l 3 Filtro al carbone non raffigurato filtra l acqua per eliminare impurità e odori Viene inserito nell apposito vano vedi MONTAGGIO 1 Inserimento del filtro 4 Portafiltro non raffi...

Страница 29: ... vano del filtro Per aprire il vano del filtro spingere con i pollici sotto le frecce e tirare c Inserire il filtro in fondo all apposito vano come indicato dallo schema Il filtro si inserisce correttamente solo in una delle estremità del vano ossia a destra dello stesso come indicato nello schema d Richiudere il vano del filtro e Rimettere il vano nel serbatoio dell acqua spingendo fino in fondo ...

Страница 30: ... di accensione automatica funzione AUTO 1 2b AUTO 1 accensione automatica a un orario programmato Con spia luminosa verde 2c AUTO 0 spegnimento automatico dopo un periodo da 0 a 4 ore dopo la preparazione del caffé 2d per regolare l ora 2e per avviare direttamente il ciclo di preparazione del caffè 3 Interruttore 0 1 si utilizza con il selettore di funzione per avviare o arrestare un operazione 4 ...

Страница 31: ...TO 0 arresto automatico Posizionare il selettore di funzione su AUTO 0 Le cifre lampeggiano Premere HRES e MIN per programmare lo spegnimento dell apparecchio da 0 a 4 ore Le cifre lampeggiano 5 volte e prima di stabilizzarsi 5 Disincrostazione automatica Usando l apparecchio con il tempo si formano incrostazioni di calcare Il calcare danneggia i meccanismi dell apparecchio e conferisce al caffè u...

Страница 32: ...rodotto seguendo le indicazioni di utilizzo dello stesso È possibile utilizzare dell aceto bianco per pulire l apparecchio Unire 30cl di aceto a 30cl d acqua Versare la soluzione nel serbatoio e avviare l apparecchio Dopo aver fatto scorrere metà del contenuto lasciare riposare 1 ora e poi riaccendere l apparecchio Per sciacquare riavviare l apparecchio altre due volte utilizzando solo acqua Lasci...

Страница 33: ...anda di tirare la spina non il cavo Prestare la massima attenzione se l apparecchio viene utilizzata vicino a dei bambini Riporre l apparecchio fuori della portata dei bambini La macchina da caffè non deve essere utilizzato da dei bambini Non utilizzare l apparecchio se caduto o se presenta danni evidenti Interrompere immediatamente l utilizzo dell apparecchio se il cavo fosse danneggiato In quest...

Страница 34: ...a llegado el momento de proceder a la descalcificación con la tecla correspondiente 2 CARACTERÍSTICAS DEL PRODUCTO 1 Tapa 2 Depósito de agua capacidad máxima 1 8 litros 3 Filtro de carbono no aparece en la ilustración filtra el agua para eliminar las impurezas y los malos olores Se mete en el departamento del filtro ver A MONTAJE 1 colocar el filtro del agua 4 Portafiltros no aparece en la ilustra...

Страница 35: ...rlo ponga los pulgares bajo las flechas y levante c Meta el filtro en el fondo del compartimiento del filtro tal como se indica en el dibujo Es muy importante que el filtro se coloque en el sitio que le corresponde en el compartimiento del filtro es decir a la derecha del compartimiento cuando éste esté como se indica en el dibujo d Cierre el compartimiento del filtro e Meta el compartimiento del ...

Страница 36: ...ted Con indicador luminoso verde 2c AUTO 0 paro automático de 0 hasta 4 horas después de la preparación del café 2d para poner la hora del reloj 2e para empezar directamente el ciclo de preparación del café 3 Interruptor 0 1 se utiliza junto con el selector de función para poner en marcha o detener una operación 4 Indicador luminoso rojo central funciona con el interruptor 0 1 5 Control de tempera...

Страница 37: ...ere usted que el aparato se pare de 0 a 4 horas Las cifras parpadean 5 veces y después se paran 5 Descalcificación automática Con el uso se acumulan parches de cal o sarro lo que no es bueno para la refinada mecánica de este aparato y mucho menos para el café que adquiere un sabor duro y amargo Por ello hay que descalcificar regularmente única garantía de un café de calidad La frecuencia de la des...

Страница 38: ... indicaciones que aparezcan en el mismo Para limpiar con vinagre blanco utilice 30 cl de vinagre para 30 cl de agua Vierta la mezcla en el depósito y ponga la cafetera en marcha Cuando haya caído la mitad del líquido apague espere una hora y vuelva a poner en marcha la cafetera Realice dos ciclos completos más utilizando únicamente agua para aclarar Antes de limpiar el aparato déjelo enfriarse com...

Страница 39: ...s del uso y antes de limpiarlo No deje nunca enchufado el aparato si nadie lo vigila Para desenchufar tire de la clavija y no del cable flexible Sea especialmente prudente cuando utilice el electrodoméstico con niños cerca Guárdelo fuera del alcance de los niños No utilice nunca el aparato si se ha caído o si presenta señales aparentes de deterioro Deje inmediatamente de utilizar el electrodomésti...

Отзывы: