background image


LIT 233 

CUDA

®

 Surgical

                                                                                                        Rev. -


(Italiano)


Data di Revision:01/26/18 

                                                                                                                                                  Pagina 22 di 31


1. 

USO PREVISTO 


Il caricatore di batteria a vano singolo LLS-3736 è destinato a caricare una batteria 
doppia agli ioni di litio, modello 2054 fornita da 

ST Technologies

®


2. 

AVVERTENZE 


  Alla prima apertura della confezione e al primo utilizzo, controllare la batteria e il caricatore 

per  verificare  che  non  presentino  guasti.  Non  cercare  di  ricaricare  batterie  danneggiate. 

Non mettere in funzione il caricatore se il cavo e/o la spina sono danneggiati, ad esempio 

se presentano tagli, spine piegate o contatti e/o ammaccature. 

  Non esporre il caricatore a calore, fuoco o urti forti. 

  Mettere il caricatore in un luogo fresco, lontano da qualsiasi fonte di calore. 

  Non  usare  questa  attrezzature  in  presenza  di  una  miscela  contenente  anestetico 

infiammabile e/o aria o ossigeno o ossido nitroso. 

  Non  sterilizzare,  immergere  o  esporre  il  caricatore  o  alimentatore  a  acqua,  solventi, 

lubrificanti  o  altre  sostanze  chimiche  per  pulire  il  caricatore  a  meno  che  non  si  abbiano 

altre indicazioni. Far attenzione a non far entrare acqua nei vani o sopra al caricatore. Far 

attenzione a non far entrare acqua nella connessione di alimentazione presente sul retro 

del caricatore. Tenerlo pulito e asciutto. 

  Non cortocircuitare, sottoporre a urti, aprire, danneggiare, bruciare o smontare il caricatore 

o l’alimentatore. 

  Il  caricatore  non  presenta  parti  che  necessitano  manutenzione.  Contattare 

ST 

Technologies

®

 per le istruzioni di sostituzione. 

  Non modificare o cambiare il cavo di alimentazione. Il cavo di alimentazione deve essere 

collegato in una presa di grado medico. 

  Non  piegare  il  cavo  di  alimentazione  con  forza  e  non  poggiarvi  nulla  sopra.  Questo  può 

danneggiare il cavo e causare incendio o scosse elettriche. 

  Usare il caricatore e gli accessori del caricatore come previsto. 

  Non  utilizzare  il  caricatore  ad  una  tensione  diversa  rispetto  a  quella  indicata  sull’unità  e 

nelle istruzioni d’uso. 

  Scollegare  l’alimentatore  dalla  presa  a  parete  durante  lunghi  periodi  di  non  utilizzo. 

Scollegare la presa tirando dalla spina e non dal cavo. 

  Se  il  caricatore  o  la  batteria  producono  eccessivo  calore,  si  scoloriscono,  emettono  un 

odore o perdono liquido scollegare immediatamente l’alimentatore dalla presa di corrente. 

  Non  inserire  ripetutamente  una  batteria  completamente  carica  nel  caricatore.  A  seguito 

dell’elevato  carico  iniziale,  la  batteria  potrebbe  essere  sovraccaricata  e  questo  potrebbe 

danneggiare la batteria e/o caricatore. 

  Questo caricatore della batteria potrebbe non essere situato in prossimità di un paziente. 

Ai sensi di EN60601-1-1 la distanza orizzontale deve essere almeno 1,5m (4,9ft.).

Содержание LLS-3736

Страница 1: ... of 31 LLS 3736 Single Bay Battery Charger Operator Manual ST Technologies 6018 Bowdendale Avenue Jacksonville FL 32216 USA Customer Service 904 208 2290 Toll Free 877 814 2237 EC REP RMS UK Ltd 28 Trinity Road Nailsea Somerset BS48 4NU United Kingdom TEL 01275 858891 ...

Страница 2: ...ion 01 26 18 Page 2 of 31 TABLE OF CONTENTS 1 INTENDED USE INDICATIONS FOR USE 2 GENERAL WARNINGS 3 TECHNICAL SPECIFICATIONS 4 BATTERY CHARGING INSTRUCTIONS 5 CLEANING INSTRUCTIONS 6 DISPOSAL RECYCLE 7 TROUBLESHOOTING 8 LIMITED WARRANTY 9 SYMBOLOGY ...

Страница 3: ...Do not short circuit crush open shred incinerate or dismantle the charger or the power supply brick The charger does not have serviceable parts Contact ST Technologies for replacement instructions Do not modify or change the power cord The power cord should be plugged into a hospital grade outlet Do not bend the power cord forcibly or place a heavy object on it This will damage the cord and may ca...

Страница 4: ...ls UL listed and CE Water Resistant Not Protected Equipment IPX0 4 BATTERY CHARGING INSTRUCTIONS Place the charger on a stable surface Plug the output connector of the external AC DC power supply into the DC input located on the rear of the charging station Then plug the external AC DC power supply into an AC outlet The charge process will start after inserting a battery pack into the slot after a...

Страница 5: ...nnot be recharged Table 1 LED Indicator Legend Refer to Figure 1 for location of indicator NOTE The unit will become warm during normal operation This does not indicate a malfunction Prevent metallic objects from coming into contact with the metal parts of the DC plug of the power supply If this happens a short may occur and the unit may be damaged Ensure the battery has proper orientation before ...

Страница 6: ... 8 LIMITED WARRANTY Your Single bay battery charger carries a 3 years warranty from the date of shipment on workmanship and all defects of material except batteries Should your product prove to have such defects within three years from the date of shipment ST Technologies will repair or replace the product or component part without charge Should your Single bay battery charger need servicing under...

Страница 7: ...ESCRIPTION Indicates suitability for direct current only Caution consult accompanying documents Certifies that the electromagnetic interference from the device is under limits approved by the Federal Communications Commission Consult Instructions for Use CE mark Not for disposal in general waste ...

Страница 8: ...S 3736 Manuel opérateur du chargeur de batterie à baie unique ST Technologies 6018 Bowdendale Avenue Jacksonville FL 32216 USA Service Clients 904 208 2290 Numéro non surtaxé 877 814 2237 RMS UK Ltd 28 Trinity Road Nailsea Somerset BS48 4NU United Kingdom Tél 01275 858891 EC REP ...

Страница 9: ...sur 31 TABLE DES MATIÈRES 1 UTILISATION PRÉVUES INDICATIONS D UTILISATION 2 AVERTISSEMENTS GÉNÉRAUX 3 SPÉCIFICATIONS TECHNIQUES 4 INSTRUCTIONS POUR LE CHARGEMENT DE BATTERIE 5 INSTRUCTIONS DE NETTOYAGE 6 DESTRUCTION RECYCLAGE 7 DÉPANNAGE 8 GARANTIE LIMITÉE 9 SYMBOLOGIE ...

Страница 10: ...ec Ne pas court circuiter écraser ouvrir déchiqueter incinérer ou démonter le chargeur ou le bloc d alimentation Le chargeur ne possède pas de pièces de rechange Contactez ST Technologies pour obtenir des instructions de remplacement Ne modifiez pas ou ne changez pas le cordon d alimentation Le cordon d alimentation doit être branché dans une prise de qualité hospitalière Ne repliez pas le cordon ...

Страница 11: ...té UL et CE Résistant à l eau Équipement non protégé IPX0 4 INSTRUCTIONS POUR LE CHARGEMENT DE BATTERIE Placez le chargeur sur une surface stable Branchez le connecteur de sortie de l alimentation AC DC externe dans l entrée DC située à l arrière de la station de charge Branchez ensuite l alimentation AC DC externe dans une prise secteur Le processus de charge commence lors l insertion d une batte...

Страница 12: ... rouge Soit La batterie est gravement endommagée et doit être remplacée ou C est une batterie conventionnelle qui ne peut pas être rechargée Tableau 1 La légende des voyants LED Se reporter à la figure 1 pour l emplacement de l indicateur REMARQUE L unité devient chaude pendant un fonctionnement normal Cela n indique pas un dysfonctionnement Empêchez les objets métalliques d entrer en contact avec...

Страница 13: ...ntation et ou le bloc d alimentation L indicateur LED du chargeur ne fonctionne pas Assurez vous que le cordon d alimentation du chargeur soit branché à la prise d alimentation secteur Assurez vous que la batterie soit correctement installée dans la baie du chargeur Le chargeur peut avoir un cordon d alimentation défectueux et ou un bloc d alimentation Remplacez le cordon d alimentation et ou le b...

Страница 14: ...e paiement doit être reçu avant que les réparations ne soient accomplies Aux U S A appelez le 877 814 2237 non surtaxé Service client 904 208 2290 9 SYMBOLOGIE GRAPHIQUE DESCRIPTION Indique une compatibilité avec le courant continu uniquement Attention consultez les documents joints Certifie que les interférences électromagnétiques de l appareil sont sous les limites approuvées par la FCC Federal ...

Страница 15: ... 31 LLS 3736 Bedienungsanleitung für Akkuladegerät mit 1 Ladebucht ST Technologies 6018 Bowdendale Avenue Jacksonville FL 32216 USA Kundendienst 904 208 2290 Gebührenfrei 877 814 2237 RMS UK Ltd 28 Trinity Road Nailsea Somerset BS48 4NU United Kingdom TEL 012 7585 8891 EC REP ...

Страница 16: ...er Revision 01 26 18 Saite 15 von 31 INHALTSANGABE 1 VERWENDUNGSZWECK 2 ALLGEMEINE WARNUNGEN 3 TECHNISCHE ANGABEN 4 ANLEITUNG ZUM LADEN VON AKKUS 5 REINIGUNGSANWEISUNGEN 6 ENTSORGUNG RECYCLING 7 FEHLERBEHEBUNG 8 BESCHRÄNKTE GARANTIE 9 SYBOLIK ...

Страница 17: ...ite des Ladegeräts eintreten Sauber und trocken halten Ladegerät oder Netzteil nicht kurzschließen zerquetschen öffnen zerschnitzeln oder demontieren Das Ladegerät hat keine wartbaren Teile Kontaktieren Sie ST Technologies für Anweisungen zum Austausch Das Kabel darf nicht modifiziert oder verändert werden Das Stromkabel muss in eine Schutzkontaktsteckdose eingesteckt werden Stromkabel nicht gewal...

Страница 18: ...t und CE Wasserfest Ungeschützte Anlage IPX0 4 ANLEITUNG ZUM LADEN VON AKKUS Stellen Sie den Akku auf eine stabile Oberfläche Stecken Sie den Ausgangsstecker des externen AC DC Netzteils in den DC Eingang an der Rückseite der Ladestation Dann stecken Sie das externe AC DC Netzteil in eine AC Steckdose Wenn Sie einen Akku in die Ladebucht einlegen beginnt der Ladevorgang beginnt nachdem eine Akkuer...

Страница 19: ...en werden Tabelle 1 Legende für LED Anzeige siehe Abb 1 für Position der Anzeige HINWEIS Das Gerät wird beim normalen Betrieb warm Dies ist keine Fehlfunktion Vermeiden Sie dass Metallobjekte mit den Metallteilen am DC Stecker des Netzteils in Kontakt kommen Sollte dies vorkommen kann ein Kurzschluss auftreten und das Gerät wird beschädigt Stellen Sie sicher dass der Akku vor dem Einstecken richti...

Страница 20: ...dose eingesteckt ist Stellen Sie sicher dass der Akku richtig in die Ladebucht eingelegt ist Das Kabel und oder Netzteil des Ladegeräts kann defekt sein Ersetzen Sie das Stromkabel und oder Netzteil 8 BESCHRÄNKTE GARANTIE Ihr Akkuladegerät mit einer Ladebucht verfügt über eine 3 Jahre Garantie ab Versanddatum für Verarbeitungs und Materialschäden außer für den Akku Sollte Ihr Produkt innerhalb von...

Страница 21: ... Die Bezahlung muss vor Abschluss der Reparatur erfolgen Rufnummer in den USA 877 814 2237 gebührenfrei Kundendienst 904 208 2290 9 SYBOLIK GRAFIK BESCHREIBUNG Gibt nur Eignung für Gleichstrom DC an Achtung Lesen Sie sich die Begleitdokumente sorgfältig durch Zertifiziert dass elektromagnetische Störungen vom Gerät den Grenzwerten der FCC Federal Communications Commission USA entsprechen Ziehen Si...

Страница 22: ... LLS 3736 Manuale d uso del caricatore di batteria a vano singolo ST Technologies 6018 Bowdendale Avenue Jacksonville FL 32216 USA Assistenza clienti 904 208 2290 Numero verde 877 814 2237 RMS UK Ltd 28 Trinity Road Nailsea Somerset BS48 4NU Regno Unito TEL 01275 858891 EC REP ...

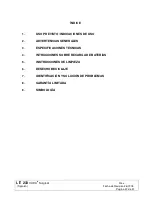
Страница 23: ...agina 21 di 31 INDICE 1 USO CONSENTITO INDICAZIONI PER L USO 2 AVVERTENZE GENERALI 3 CARATTERISTICHE TECNICHE 4 ISTRUZIONI RELATIVE AL CARICAMENTO 5 ISTRUZIONI RELATIVE ALLA PULIZIA 6 SMALTIMENTO RICICLAGGIO 7 RISOLUZIONE DI GUASTI 8 GARANZIA LIMITATA 9 SIMBOLOGIA ...

Страница 24: ...icatore Tenerlo pulito e asciutto Non cortocircuitare sottoporre a urti aprire danneggiare bruciare o smontare il caricatore o l alimentatore Il caricatore non presenta parti che necessitano manutenzione Contattare ST Technologies per le istruzioni di sostituzione Non modificare o cambiare il cavo di alimentazione Il cavo di alimentazione deve essere collegato in una presa di grado medico Non pieg...

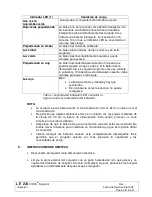
Страница 25: ...sistente ad acqua dispositivo non protetto IPX0 4 ISTRUZIONI RELATIVE AL CARICAMENTO Posizionare il caricatore su una superficie stabile Inserire il connettore dell alimentatore esterno AC DC nella presa DC presente sul retro della base di caricamento Quindi inserire l alimentatore esterno AC DC in una presa AC Il processo di caricamento inizierà dopo aver inserito una batteria nella fessura dopo ...

Страница 26: ... Luce rossa Quindi La batteria è fortemente danneggiata e deve essere sostituita oppure È una batteria convenzionale che non può essere ricaricata Tabella 1 Per la leggenda degli indicatori LED far riferimento alla Fig 1 per la posizione degli indicatori NOTA L unità si riscalderà durante il funzionamento normale Ciò non indica un malfunzionamento Far attenzione a non mettere oggetti metallici a c...

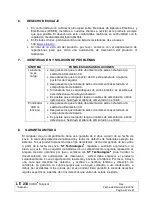
Страница 27: ...tuire il cavo di alimentazione e o alimentatore L indicatore LED del caricatore non funziona Verificare che il cavo del caricatore sia inserito nella presa di corrente AC Verificare che la batteria sia correttamente in sede nel vano del caricatore Il caricatore potrebbe avere un cavo di alimentazione e o alimentatore difettoso Sostituire il cavo di alimentazione e o alimentatore 8 GARANZIA LIMITAT...

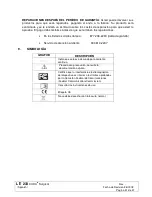
Страница 28: ... per approvazione Il pagamento deve essere ricevuto prima del completamente delle riparazioni Chiamate negli USA 877 814 2237 numero gratuito Assistenza clienti 904 208 2290 9 SIMBOLOGIA GRAFICA DESCRIZIONE Indica l adattabilità solo per corrente diretta Attenzione consultare la documentazione allegata Certifica che l interferenza elettromagnetica dal dispositivo è entro i limiti approvati dalla C...

Страница 29: ...ual de usuario del cargador de batería de un compartimento ST Technologies 6018 Bowdendale Avenue Jacksonville FL 32216 USA Servicio de atención al cliente 904 208 2290 Llamada gratuita 877 814 2237 RMS UK Ltd 28 Trinity Road Nailsea Somerset BS48 4NU United Kingdom TEL 01275 858891 EC REP ...

Страница 30: ...a 27 de 31 ÍNDICE 1 USO PREVISTO INDICACIONES DE USO 2 ADVERTENCIAS GENERALES 3 ESPECIFICACIONES TÉCNICAS 4 INTRUCCIONES SOBRE RECARGA DE BATERÍAS 5 INSTRUCCIONES DE LIMPIEZA 6 DESECHO RECICLAJE 7 IDENTIFICACIÓN Y SOLUCIÓN DE PROBLEMAS 8 GARANTÍA LIMITADA 9 SIMBOLOGÍA ...

Страница 31: ...téngalo limpio y seco No ponga en corto circuito aplaste abra destroce ni desensamble el cargador El cargador no tiene piezas reparables Comuníquese con ST Technologies para recibir instrucciones sobre sustituciones No modifique ni cambie el cable de alimentación El cable de alimentación se debe enchufar en una toma con calidad de hospital No tuerza el cable de alimentación forzosamente ni ponga o...

Страница 32: ...on homologación UL y CE Resistente al agua Equipo no protegido IPX0 4 INTRUCCIONES SOBRE RECARGA DE BATERÍAS Coloque el cargador sobre una superficie estable Enchufe el conector de salida de la fuente de alimentación CA CC externa en la entrada de CC de la parte posterior de la estación de carga Luego enchufe la fuente de alimentación CA CC en una toma CA El proceso de carga comenzará después de q...

Страница 33: ...efresque Luz roja Bien La batería está muy dañada y hay que sustituirla o Es una batería convencional que no puede recargarse Tabla 1 Leyenda del indicador LED consultar la figura 1 para ver la ubicación del indicador NOTA La unidad se pone tibia durante el funcionamiento normal Esto no indica un mal funcionamiento No permita que objetos metálicos entren en contacto con las piezas metálicas de la ...

Страница 34: ... el cable de alimentación o el brick El indicador LED no funciona Asegúrese de que el cable de alimentación esté enchufado a la salida de alimentación CA Asegúrese de que la batería esté correctamente asentada en el compartimento de batería Es posible que el cargador tenga un cables de alimentación o brick defectuosos Sustituya el cable de alimentación o el brick 8 GARANTÍA LIMITADA El cargador de...

Страница 35: ...tes de que se terminen las reparaciones En los Estados Unidos llame a 877 208 2290 llamada gratuita Servicio de atención al cliente 904 814 2237 9 SIMBOLOGÍA GRÁFICO DESCRIPCIÓN Indica que solo es adecuado para corriente continua Proceda con precaución consulte la documentación adjunta Certifica que la interferencia electromagnética del dispositivo es inferior a los límites aprobados por la Comisi...

Отзывы: