background image

English


Table of contents 

1. Sensor AID Introduction


2. Diagnosing a Sensor /


Results 

Description


3. New Sensor


3.1 Auto Duplicate 

3.2 Manual Duplicate 

3.3 Program Blank Sensor 

4. Copy and modify the Uni-Sensor 

4.1 Sensor ID Copy 

4.2. Manual ID Modify 

4.3. Manual R/L Modify 

5. ID to PC 

6. OBDII   

7. Sensor AID Settings 

8. Software Update 

9. Warranty 

1. 

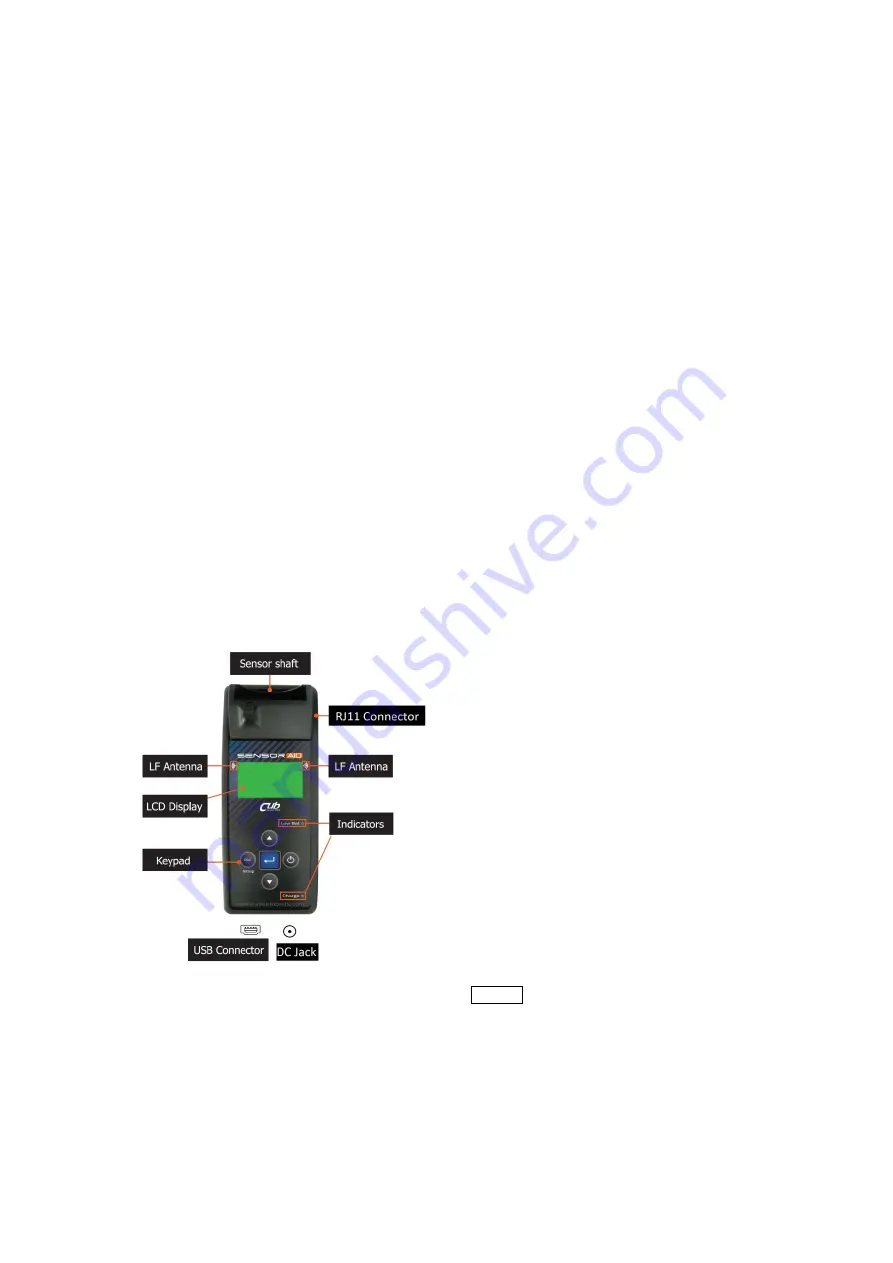
Sensor AID Introduction


Sensor 

AID 

is 

designed  to 

diagnose  and  interacts  with  tire 

pressure  sensor  through  wireless 

(radio  frequency)  communication 

to: 

• 

Retrieve 

data 

from 

tire 

pressure sensor 

•  Verify the  identity of  each tire 

pressure sensor mounted on the 

wheels. 

• 

Assist 

technicians 

in 

servicing  CUB  TPMS  during 

relearning procedures. 


NOTE 

Sensor shall  be diagnosed close to  left or 

right  antenna within  degrees. 

01


Содержание SENSOR AID

Страница 1: ... PC 6 OBDII 7 Sensor AID Settings 8 Software Update 9 Warranty 1 Sensor AID Introduction Sensor AID is designed to diagnose and interacts with tire pressure sensor through wireless radio frequency communication to Retrieve data from tire pressure sensor Verify the identity of each tire pressure sensor mountedon the wheels Assist technicians in servicing CUB TPMS during relearning procedures NOTE S...

Страница 2: ...e via CUB software Indicator will turn red when battery is low Indicator will turn orange when charging Esc key press to return to the previous menu without parameter validation Press and hold the power key to power on the device During power on The device display the CUB logo and district You can switch USA EUR region in the setting page Software revision number follows after the CUB logo Now the...

Страница 3: ...ect Year selection Use the arrow key to select year and press the Enter key to select Function selection Use the arrow key to select DIAGNOSE SENSOR and press the Enter key to diagnose English 2 Diagnosing a sensor Diagnose Sensor 03 Use arrow key to scroll up and down between maker Diagnosing Sensor Sensor AID will now activate the sensor Sensor respond time may vary depending on sensor type and ...

Страница 4: ...o select Diagnosing a Sensor Results Description The picture below is an example of sensor data communication result NOTE The Sensor AID will identify the sensor informationthat is transmitted Not all sensors transmit every piece of information shown 3 New Sensor Duplicate an O E sensor This function is designed for you to bypass OBDII and automatically duplicate an O E sensor NOTE Duplicate and P...

Страница 5: ...Once you get the sensor ID press Enter key directly to program the new sensor If you press ESC key the sensor ID will be erased you need to diagnose again English This function is designed for you to bypass OBDII and automatically duplicate an O E sensor NOTE Duplicate and Program function will only work with CUB s Sensor AID and Uni sensor 3 1 Auto Duplicate Auto Duplicate an O E sensor This func...

Страница 6: ...ated Some manufacturer may have more than one type of sensors Use the arrow key to browse to get back by press the ESC key Input Sensor ID Use the arrow key to browse Press the Enter key to enter the ID Please check if O E sensor ID is Hexadecimal 0 9 A F or Decimal 0 9 to select correct mode in Manual Duplicate 3 2 Manual Duplicate ManualDuplicate an O E sensor This function is designed for you t...

Страница 7: ... to select Maker selection Use the arrow key to browse through automakers and press the Enter key to select Model selection Use the arrow key to browse models and press the Enter key to select English 3 3 Program Blank Sensor Programming a blank sensor This function is designed for you to program a blank sensor to O E format for vehicle with auto relearn function NOTE Duplicate and Program functio...

Страница 8: ...ess the Enter key to copy this ID into the target sensor Note The target sensor should have the same protocol with O E sensor Once you get the sensor ID press Enter key directly to copy the target sensor If you press ESC key the sensor ID will be erased you need to diagnose again This function is designed for you to bypass OBDII and automatically Copy an O E Sensor NOTE Duplicate and Program funct...

Страница 9: ... correct what you want to modify Function selection Use the arrow key to select MANUAL ID MODIFY and press the Enter key to select English 4 2 Manual ID Modify Manual Modify a Target sensor This function is designed for you to bypass OBDII and wireless modify an target Sensor NOTE Duplicate and Program function will only work with CUB s Sensor AID and Uni sensor NOTE Duplicate and Program function...

Страница 10: ... R L MODIFY and press the Enter key to select R L wheel selection Use the arrow key to select R L press the Enter key to modify 4 3 Manual R L Modify Manual Modify a Target sensor This function is designed for you to wireless modify the wheel right left position on the target sensor NOTE Duplicate and Program function will only work with CUB s Sensor AID and Uni sensor NOTE Duplicate and Program f...

Страница 11: ...d press the Enter key to diagnose Ready to Connect PC When complete 4 wheels ID scanning then ready to connect to PC for saving the data Connect to PC Executing the TPMS ID to PC APP V1 0 in your PC and then connect the Tool to your PC via USB cable Save the ID data After 1 second the 4 ID data will be uploaded to this APP And then you can save this data by clicking the icon in the left upper corn...

Страница 12: ...he Enter key to select Data selection This screen will pop up only if tool has stored previous TPMS data Press the Enter key to delete previous stored TPMS data Press the ESC key to keep previous stored TPMS data Scan sensor ID Start diagnose sensor starting from LF RF RR and LR Press the Enter key to start diagnose The flashing tire indicator is the tire position Obtain 4 sensor ID Now you will o...

Страница 13: ...elect WRITE CAR ID and press the Enter key to select Write car ID process CUB OBDII module will write the sensor IDs to ECU The respond time from the vehicle may vary depending on MMY Sensor AID will beep after receiving sensor information Write car ID complete After sensor AID successfully over write the sensor ID to the ECU you will hear 2 short beeps English OBDII Wheels ID Read Write by OBDII ...

Страница 14: ...l communicate with the vehicle to recognize the sensor ID The respond time from the vehicle may vary depending on MMY Sensor AID will beep after receiving sensor information READ car ID complete After sensor AID successfully extract the IDs from the ECU you will hear 2 short beeps OBDII Wheels ID Read Write by OBDII module 14 ...

Страница 15: ...age Use the Enter key to choose the language you prefer Pressure Use the Enter key to choose between PSI and kPa Temperature Use the Enter key to choose between Fahrenheit and Celsius Wheel number Only scan one sensor please select 1 Scan 4 wheels sensors please select 4 Note The ID to PC function is available for wheel 4 only English 7 Sensor AID Settings Device Setting Press ESC to go in to sett...

Страница 16: ... highlight and use the arrows to adjust between 01 to 30 Auto off User can adjust how quickly the tool will turn off after a period of non use This feature can also be disabled Press the Enter key to select desired auto off time ID Format Change the ID format between decimal and hexadecimal with the Enter key Note The present setting is AUTO that automatically change format based on input Press ES...

Страница 17: ...fully and select I accept the terms in the license agreement and click Next to complete the software installation English 8 Software Update Software Installation 1 Insert the CD supplied with instrument into the PC drive and click on the CUB icon to start the installation 2 The following screen will appear Click Install 3 The following window will appear Please click Next 17 ...

Страница 18: ...t update file you download from the web or the newest CD you obtain 3 Click program after the file is selected to start the update process NOTE Every device has it s unique license number the software must match the license number to update 4 The update process should look like the followingwindow the update status light will flash yellow light during the update 5 When update is complete the updat...

Страница 19: ...contact local distributor Proof of purchase and date of purchase is required to validate the warranty claim CUB autoparts is not liable for any direct or consequential loss or property damage arising from use of product NOTE Warranty does not cover tire valves or screws for tire valves The tire valves and screws need to be replaced when rotating tires changing tires or changing the TPMS sensors If...

Страница 20: ...ly approved enhancementsand batteries Do not connect incompatible products The battery needs to be charged to full for the first usage SWITCH OFF WHEN REFUELLING Do not use the device at a refueling point Do not use near fuel or chemicals INTERFERENCE All wireless devices may be susceptible to interference which could affect performance CONNECTING TO OTHER DEVICES When connecting to any other devi...

Страница 21: ...nsult the dealer or an experienced radio TV technician for help IC Statement The requirement is specified in RSS GEN Section 5 3 This device complies with Industry Canada license exempt RSS standard s Operation is subject to the following two conditions 1 this device may not cause interference and 2 this device must accept any interference including interference that may cause undesired operation ...

Отзывы: