background image

11

Operate this unit only in a well-ventilated outdoor
area. Carbon monoxide exhaust fumes can be
lethal in a confined area.

Avoid accidental starting. Make sure you are in the
starting position when pulling the starter rope
(Fig. 13). To avoid serious injury, the operator and
unit must be in a stable position while starting.

Operation

Section 5 

12A

13

14

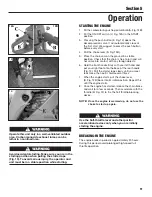
STARTING THE ENGINE

1. Fill the carburetor by pushing primer bulb (A, Fig. 12B). 

2. Put the ON/OFF switch (C, Fig. 12A) in the START

position. 

3. Pressing the push button (E, Fig. 14) opens the

decompression valve. It will automatically close at
the first start. We suggest to press the push button
before every start. 

4. Pull the choke lever (D, Fig. 12B). 

5. Place the chain saw on the ground in a stable

position. Check that the chain is free to turn and will
not come into contact with any foreign objects. 

6. Hold the front handle firmly with your left hand and

put your right foot onto the base of the rear handle
(Fig. 13). Pull the starter rope slowly until you meet
resistance, then pull it hard several times

7. When the engine starts, put the choke lever

(D, Fig. 12B) back into its initial position. Repeat this
until the engine starts. 

8. Once the engine has started, release the chain brake

and wait for a few seconds. Then accelerate with the
throttle (B, Fig. 12) to fire the half throttle-blocking
device.

NOTE: Once the engine is warmed up, do not use the

choke to start up again.

Use the half-throttle lever and other partial
acceleration devices only when you are initially
starting the engine.

BREAKING-IN THE ENGINE

The engine break-in period is approximately 20 hours.

During this period, avoid prolonged high-speed full
throttle operation.

12B

Содержание CS5018

Страница 1: ...Professional Landscaping Tools CS5018 CS5220 18 or 20 CHAIN SAW IMPORTANT READ SAFETY RULES AND INSTRUCTIONS CAREFULLY DO NOT THROW AWAY ...

Страница 2: ...ntacting the service department Calling Customer Support If you have difficulty assembling this product or have any questions regarding the controls operation or maintenance of this unit please call the Customer Support Department Call 1 877 282 8684 to reach a Customer Support representative Please have your unit s model number and serial number ready when you call See the previous section to loc...

Страница 3: ...cates danger warning or caution Attention is required in order to avoid serious personal injury May be used in conjunction with other symbols or pictographs The purpose of safety symbols is to attract your attention to possible dangers The safety symbols and their explanations deserve your careful attention and understanding The safety warnings do not by themselves eliminate any danger The instruc...

Страница 4: ...othing protective gloves and eye hearing and head protection devices Avoid accidental starting Be in the starting position whenever pulling the starter rope The operator and unit must be in a stable position while starting See Starting Stopping Instructions Before you start the engine make sure that the saw s chain is not contacting anything Do not cut near electrical cables or power lines Keep al...

Страница 5: ...ow the engine to cool before storing or transporting the chain saw over long distances For example let the engine cool before placing the chain saw in an automobile Also be sure to secure the unit while transporting Store the unit in a dry area locked up located up high and located out of the reach of children to prevent unauthorized use or damage Never douse or squirt the unit with water or any o...

Страница 6: ...operator s manual for the proper type of oil Safety and International Symbols This operator s manual describes safety and international symbols and pictographs that may appear on this product Read the operator s manual for complete safety assembly operating and maintenance and repair information SYMBOL MEANING ON OFF STOP CONTROL ON START RUN ON OFF STOP CONTROL OFF OR STOP HOT SURFACE WARNING Do ...

Страница 7: ...kout 4 Carburetor adjustment screws 5 Inertial brake lever 6 Exhaust muffler 7 Chain 8 Guide bar 9 Air filter cover 10 On off switch 11 Fuel tank cap 12 Starter handle 13 Oil tank cap 14 Primer bulb 15 Decompression valve 16 Lateral chain tensioner screw Know Your Unit Section 2 ...

Страница 8: ...ndle to check that the chain brake is not on Remove the bar nuts A and the chain cover B Fig 2 Remove and discard the plastic shim from the bar studs C Fig 3 Take the chain tightener pawl D Fig 3 to the limit stop by unscrewing all the chain tightener screw L Place the bar F Fig 3 onto the studs N Fit the chain H Fig 4 inside the sprocket E and the bar groove M NOTE Pay attention to the direction ...

Страница 9: ...ig 3 of the bar Fit the chain cover and the relative nuts without tightening them Tension the chain by means of the tensioning screw L Fig 5 Hold the tip of the guide bar up and tighten the chain cover nuts securely Fig 7 The chain should be taut but turn freely by hand Fig 8 The chain is tensioned correctly when it can be pulled upwards a few millimeters Fig 8 Fitting the Bar Chain continued ...

Страница 10: ...f and far away from an open flame Before unscrewing the fuel tank cap position the chain saw on a flat solid surface to prevent fuel spills Only prepare the quantity of mixture for each job do not leave the mixture in the fuel tank or in a fuel canister for prolonged periods CHAIN LUBRICATING OIL Proper chain lubrication during the cutting phase will reduces wear to a minimum between the chain and...

Страница 11: ... position Check that the chain is free to turn and will not come into contact with any foreign objects 6 Hold the front handle firmly with your left hand and put your right foot onto the base of the rear handle Fig 13 Pull the starter rope slowly until you meet resistance then pull it hard several times 7 When the engine starts put the choke lever D Fig 12B back into its initial position Repeat th...

Страница 12: ... when the chain is cool 1 Turn the chain and lubricate it with additional oil Fig 16 2 Start the saw and allow it to run at moderate speed Check to make sure that the oil pump is working properly Fig 17 3 Stop the engine and adjust the chain tension 4 Start the saw again and make a few cuts in the trunk of a tree to heat up the chain 5 Stop the engine and allow the chain to cool and adjust again 6...

Страница 13: ...g and clutch engagement Screw L must be adjusted so that the engine promptly responds to sharp accelerations and gives good idle operation Screw H must be adjusted so that the engine gives maximum power during the cutting phase Weather conditions and altitude may affect carburetor performance Do not allow anyone to stay close to the chain saw while working or while adjusting the carburetor COLD WE...

Страница 14: ...t hand on the rear handle and the left hand on the front handle with your thumbs and fingers encircling the chain saw handles A firm grip together with a stiff left arm will help you reduce kickback and maintain control of the saw Make sure that the area in which you are cutting is free from obstructions Do not let the nose of the guide bar contact a log branch fence or any other obstruction that ...

Страница 15: ...erating condition of the brake following the steps 1 Start the engine and grasp the handle securely with both hands 2 Pull the throttle lever to maintain the chain operation push the brake lever down toward the front using the back of your left hand Fig 25 3 When the brake operates and the chain is stopped release the throttle lever 4 Release the brake Fig 27 BRAKE MAINTENANCE Always keep the chai...

Страница 16: ... with the saw regardless of the size of the timber Never push down on the saw when cutting The weight of the saw alone enables it to cut properly with minimum effort Never cut in high wind bad weather when visibility is poor or in very high or low temperatures Always check the tree for dead branches which could fall during the felling operation TREE FELLING Study the tree and surrounding area befo...

Страница 17: ... branches are under tension find a safe position to protect yourself in case the branches whip back Always start the cut from the opposite side to the bend When cross cutting do not use the upper edge of the guide bar tip use the middle portion of the bar Using the tip when cross cutting may lead to kickback Wear eye protection during maintenance Cutting Techniques continued 34 33 36 BUCKING When ...

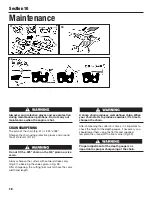
Страница 18: ...en the cutters with outward strokes only Fig 37 observing the values given in Fig 38 After sharpening the cutting links must all have the same width and length A sharp chain produces well defined chips When your chain starts to produce sawdust it is time to sharpen the chain After sharpening the cutters 3 4 times it is important to check the height of the depth gauges If necessary you should lower...

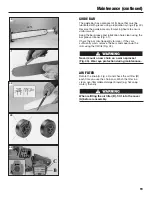
Страница 19: ...leaner Fig 41 Check the bar rails frequently for wear If they are sufficiently worn remove the burs and square up the rails using the flat file Fig 42 Never mount a new chain on a worn sprocket Fig 43 Wear eye protection during maintenance AIR FILTER Rotate the knob A Fig 44 and check the air filter B each time you use the chain saw Wash the filter in a clean non flammable detergent liquid e g hot...

Страница 20: ...ARTER ASSEMBLY VENT CLEANING Use a brush or compressed air to keep the cooling louvers of the starter assembly free and clean Fig 47 ENGINE DECOMPRESSION VALVE Periodically clean the cylinder fins Fig 48 with compressed air or a brush Dangerous overheating of the engine may occur due to impurities on the cylinder Check the base of the decompression valve clean away any residues which could cause t...

Страница 21: ...repair to an authorized servicing dealer GUIDE BAR Turn the guide bar and check that the lubrication holes are free from impurities Fig 51 SPARK ARRESTOR The chain saw is provided with a Spark Arrester System part number em 50070133 Fig 52 complying with the requirements of SAE J335 standard For compliance with the standard two spiked bumpers part number em 50070033 C Fig 67 and part number em 500...

Страница 22: ... no load RPM with bar and chain 2700 200 min 1 Maximum RPM no load RPM with bar and chain 12500 13000 min 1 Ignition Type Electronic Ignition Switch Rocker Switch Spark Plug Gap 0 02 in 0 5 mm Lubrication Fuel Oil Mixture Fuel Oil Ratio 50 1 Carburetor Diaphragm All Position Number of Pinion Teeth 7 Approximate Unit Weight without bar and chain 5 Kg Anti vibration System Yes Inertial Chain Brake Y...

Страница 23: ...Manufacturer s Warranty Coverage The warranty period begins on the date the engine or equipment is delivered to the retail purchaser The manufacturer warrants to the initial owner and each subsequent purchaser that the engine is free from defects in material and workmanship which cause the failure of a warranted part for a period of two years Repair or replacement of warranted part will be perform...

Страница 24: ...anty set forth below is given by Cub Cadet Commercial LLC with respect to new merchandise purchased and used in the United States its possessions and territories Cub Cadet Commercial LLC warrants this product against defects in material and workmanship for a period of two 2 years commencing on the date of original purchase and will at its option repair or replace free of charge any part found to b...

Отзывы: