background image

7

SECTION 3:  KNOW YOUR LOG SPLITTER

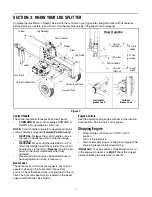
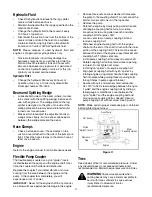
Compare the illustration in Figure 7 below with the controls on your log splitter, and get familiar with its features 
before starting to operate. Know how to stop the machine quickly in the event of an emergency.

Figure 7

Control Handle

The control handle has three positions. See Figure 7.   

FORWARD:

 Move control handle FORWARD or 

DOWN to move wedge to split wood.

NOTE:

 Control handle will return to neutral position as 

soon as handle is released.(

Forward Position only

)

NEUTRAL:

 Release the control handle or move 

the lever to neutral position to stop the wedge 
movement.

REVERSE:

 Move control handle BACK or UP to 

return the wedge toward the cylinder. The control 
handle stays in the return (

Reverse

) position and 

returns to neutral automatically when fully 
retracted.

Reverse position may also be operated back to 
neutral position manually, if necessary.

Beam Locks

These two locks, as their name suggests, are used to 
secure the beam in the horizontal or the vertical 
position. The vertical beam lock is located next to the oil 
filter. The horizontal beam lock is located on the beam 
support latch bracket. See Figure 7.

Engine Controls

See the accompanying engine manual for the location 
and function of the controls on the engine.

Stopping Engine

Move throttle control lever to STOP or OFF 
position.

Turn off the fuel valve.

Disconnect spark plug wire and ground against the 
engine to prevent unintended starting.

IMPORTANT: 

Your log splitter is shipped with motor oil 

in the engine. However, you 

MUST 

check the oil level 

before operating. Be careful not to overfill.

Horizontal 

Control Handle

Reservoir Tank

Vertical Beam Lock

Jack Stand

Beam

Wedge 

Cylinder

Log Cradle

Beam Lock

Vertical 

Beam Lock

Tongue 

Horizontal Beam Lock

How it works

Log Dislodger

Control Handle

To stop

Forward

Neutral

Reverse

(Automatic)

(Manual)

wood

To split 

To return

wedge

wedge

Содержание 24AF572B710

Страница 1: ...r state laws if any If a spark arrester is used it should be maintained in effective working order by the operator In the State of California the above is required by law Section 4442 of the California Public Resources Code Other states may have similar laws Federal laws apply on federal lands A spark arrester for the muffler is available through your nearest engine authorized service dealer or co...

Страница 2: ... explained below For future reference please copy the model number and the serial number of the equipment in the space below Engine Information The engine manufacturer is responsible for all engine related issues with regards to performance power rating specifications warranty and service Please refer to the engine manufacturer s Owner s Manual packed separately with your log spiltter for more inf...

Страница 3: ...ake appropriate firefighting equipment with you 9 This machine should be used for splitting wood only do not use it for any other purpose 10 Follow the instructions in the manual s provided with any attachment s for this machine Preparation 1 Always wear safety shoes or heavy boots 2 Always wear safety glasses or safety goggles during operating this machine 3 Never wear jewelry or loose clothing t...

Страница 4: ...remove split wood around the machine so you do not stumble over it 14 Never move this machine while the engine is running 15 This machine should not be towed on any street highway or public road without checking the existing federal state or local vehicle requirements Any licensing or modifications such as taillights etc needed to comply is the sole responsibility of the purchaser If a Statement o...

Страница 5: ...ing clip See Figure 1 Figure 1 Attaching the Tongue With the log splitter still standing upright remove two hex bolts lock washers and hex nuts from the end of the tongue See Figure 1 Align the holes in the tongue with the holes in the tank bracket and secure with hardware just removed See Figure 1 NOTE High pressure hose must be above the tongue assembly Connecting Cylinder to Beam The log splitt...

Страница 6: ...acity of 3 5 gallons Check fluid level using the dipstick See Figure 6 Do not overfill Replace vented dipstick securely tightening it until the top of the threads are flush with top of the pipe Figure 6 Make sure the spark plug wire is disconnected Then prime the pump by pulling the recoil starter as far as it will go Repeat approximately 10 times Reconnect the spark plug wire and start engine fol...

Страница 7: ...ck to neutral position manually if necessary Beam Locks These two locks as their name suggests are used to secure the beam in the horizontal or the vertical position The vertical beam lock is located next to the oil filter The horizontal beam lock is located on the beam support latch bracket See Figure 7 Engine Controls See the accompanying engine manual for the location and function of the contro...

Страница 8: ...ug Using the Log Splitter Place the log splitter on level dry ground Place the beam in either the horizontal or vertical position and lock in place with the appropriate locking rod Block the front and back of both wheels Place the log against the end plate and only split wood in the direction of the grain To stabilize the log place your hand only on sides of log Never place hand on the end between...

Страница 9: ...ith air in hydraulic system 6 Use teflon tape on hydraulic fittings 7 Attempt to cut wood across the grain 8 Attempt to remove partially split wood from the wedge with your hands Fully retract wedge to dislodge wood with log dislodger Raising and Lowering Beam Use control handle to run wedge up and down beam 6 to 8 times to circulate the hydraulic fluid which will warm and thin the fluid Place log...

Страница 10: ... void warranty 1 Failure to maintain proper fluid level in reservoir 2 Changing the relief valve setting or pressure adjustment of control valve without proper knowledge and instruction from the factory 3 Disassembling the pump 4 Use of incorrect hydraulic fluid 5 Allowing the flexible pump coupler to deteriorate without proper and regular inspection 6 Lack of lubrication or improper lubrication o...

Страница 11: ...m the area between the engine and the pump If the coupler fails completely you will experience a loss of power IMPORTANT Never hit the engine shaft in any manner as a blow will cause permanent damage to the engine Remove three nuts and lock washers that secure the pump to the coupling shield Two nuts are at the bottom corners and one is in the top center Remove the pump Rotate the engine by slowly...

Страница 12: ...t by coating with a light oil or silicone SECTION 8 TROUBLESHOOTING NOTE For repairs beyond those listed above contact your nearest authorized service center WARNING Never store machine with fuel in the fuel tank inside of building where fumes may reach an open flame or spark or where ignition sources are present such as hot water and space heaters furnaces clothes dryers stoves electric motors et...

Страница 13: ...rized service dealer Leaking cylinder 1 Broken seals 2 Scored cylinder 1 See authorized service dealer 2 See authorized service dealer Engine runs but wood will not split or wood splits too slowly 1 Small gear section damaged 2 Pump check valve leaking 3 Excessive pump inlet vacuum 4 Incorrect oil level 5 Contaminated oil 6 Directional valve leaking internally 7 Overloaded cylinder 8 Internally da...

Страница 14: ... 16 17 9 18 15 41 43 72 42 39 37 23 12 44 71 70 68 72 42 48 81 79 82 48 80 81 61 79 75 76 77 79 78 48 74 75 22 67 25 26 33 27 46 47 38 48 50 49 32 58 59 57 30 62 66 65 64 26 63 56 55 54 30 42 53 73 5 69 28 45 20 30 60 29 31 24 86 40 84 35 83 84 85 36 85 83 84 85 ...

Страница 15: ...x 93 OD 39 714 0470 Cotter Pin 40 731 2498A Fender Yellow 41 710 3097 Carriage Bolt 3 8 16 x 1 0 42 712 04065 Hex Lock Nut 3 8 16 Nylon 43 781 0682 Log Tray 44 781 0686 Log Tray Bracket 45 681 04040 Frame Assembly 46 726 0214 Push Cap 47 732 0583 Compression Spring 48 710 3130 Hex Bolt 3 8 16 x 3 25 49 781 0690 Lock Rod 50 737 0348A Vented Dipstick 51 710 1338 Hex Screw 5 16 24 x 3 25 53 634 0186 ...

Страница 16: ...ustments and normal deterioration of the exterior finish due to use or exposure d Service completed by someone other than an authorized service dealer e Cub Cadet does not extend any warranty for products sold or exported outside of the United States its possessions and territories except those sold through Cub Cadet s authorized channels of export distribution f Replacement parts that are not gen...

Отзывы: