background image

User's Manual

HS-1500

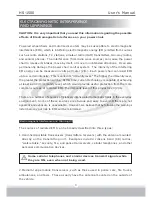
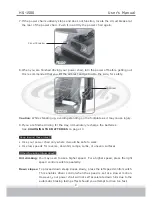
Figure 4

Figure 4

Charging Socket

6

Joystick

Speed Control Switch 

    By pressing the right switch, you can increase the speed. Pressing the left switch will
    decrease the speed. 
 

Power Reserve Indicator

    There are LED Power Reserve lights on the joystick. When all LED lights are on, the
    batteries are fully charged. When a few of the lights are lit, the batteries need to be
    recharged. 

    These lights also act as Self Diagnostic Warning Lights. When they flash, there is a
    problem with the power chair. See page 16 for more information.

Joystick Length Extension Knob

    Loosen the knob to adjust the joystick length.

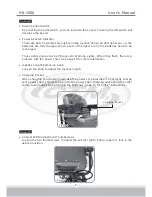
Charging Socket

   When charging your power chair, use the power cord provided. To correctly charge
   your power chair, connect one end to the power chair charging socket and the other
   end to a wall outlet. See Charging the Batteries, page 13 for further instructions.

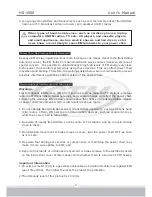
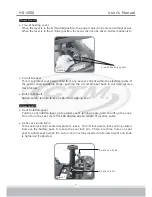
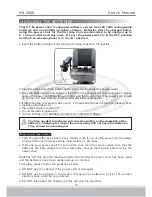
Armrest

Armrest Width Adjustment Thumbscrews 

   Loosen the two thumbscrews to adjust the armrest width; tighten again to lock in the
   desired position.

Figure 5

Figure 5

Содержание Power Chair HS-1500

Страница 1: ...C T M PowerChair C T M PowerChair C T M PowerChair HS 1500 User s Manual ...

Страница 2: ...nt Precautions Electromagnetic Interference and Warnings Identification of Parts Operating Your Power Chair Disassembling Re assembling Your Power Chair Charging the Batteries Care and Maintenance Troubleshooting Technical Specifications 1 2 3 5 8 11 13 14 16 18 ...

Страница 3: ...sing your new C T M Power Chair It is designed to provide you with transportation indoors and outdoors Chien Ti Enterprise Co Ltd is the manufacturer for the C T M mobility power chair We pride ourselves on providing safe and comfortable products Our goal is to ensure your complete satisfaction with our product We are certain that you will enjoy your C T M power chair Please read and observe all w...

Страница 4: ...ys use pedestrian crossings where possible Take extreme care crossing roads Do not drive on slopes exceeding 6 degrees and take extreme care when turning on slopes Do not use full power when turning sharp corners Take great care and use low speeds for backing up riding downhill over uneven surfaces and curb climbing The power chair may not operate well in high humidity Never put your power chair i...

Страница 5: ...is capable of achieving at least a 20 V m immunity level which would provide useful protection from the more common sources of radiated EMI The immunity level of this product is 20 V m There are a number of sources of relatively intense electromagnetic fields in the everyday environment Some of these sources are obvious and easy to avoid Others are not apparent and exposure is unavoidable However ...

Страница 6: ...rces such as radio and TV stations amateur radio HAM transmitters two way radios and cellular phones can affect the power chair Following the warnings listed below should reduce the chance of unintended brake release or power chair movement which could result in serious injury 1 Do not operate hand held transceivers transmitters receivers such as citizens band CB radios or turn ON personal communi...

Страница 7: ...View Figure 2 HS 1500 Joystick Figure 3 HS 1500 Power Chair Rear View IDENTIFICATION OF PARTS 5 Before attempting to drive this power chair on your own it is important that you familiarize yourself with the controls and how they operate Super Responsive Digital Joystick Controller Flip Up Armrest Swivel Seat Low Profile Cast Aluminum Wheels with Multi Terrain Tires One Piece Battery Pack Adjustabl...

Страница 8: ...s Self Diagnostic Warning Lights When they flash there is a problem with the power chair See page 16 for more information Joystick Length Extension Knob Loosen the knob to adjust the joystick length Charging Socket When charging your power chair use the power cord provided To correctly charge your power chair connect one end to the power chair charging socket and the other end to a wall outlet See...

Страница 9: ...Turn seat lock knob counterclockwise to loose Turn it clockwise to lock seat in position Remove the battery pack to locate the seat lock pin There are three holes on seat post to adjust seat height Be sure lock pin is fully inserted at its new height and knob is tightened if adjusted Figure 6 Figure 6 Figure 7 Figure 7 7 Circuit Breaker This is to protect your power chair from any excess current w...

Страница 10: ...ts should not be flashing 4 While resting your arms on the armrests the joystick should be within reach By pushing the joystick slightly forward the power chair will move forward slowly Pushing the joystick fully forward it will move at normal speed Adjusting the speed control switch will also decrease and increase the speed Also with the joystick you are able to turn the chair 360 o When the joys...

Страница 11: ...If you are finished riding for the day immediately recharge the batteries See CHARGING THE BATTERIES on page 13 Use your power chair only where it would be safe to walk Use low speeds for reverse downhill ramps curbs or uneven surfaces Other Operating Information Hill climbing You may need to use a higher speed For a higher speed press the right speed control switch repeatedly Down slopes To proce...

Страница 12: ...9 curb If the Self Diagnostic Warning Lights start to flash identify the problem from the chart on page 16 and take action If the power chair breaks down and must be moved aside please follow these directions 1 Get off the power chair 2 Push the free wheeling lever to N 3 Move the power chair slowly to a safe location 4 Put the free wheeling lever back to D ...

Страница 13: ...emove the Battery Pack E by holding the Battery Pack with one hand and the other hand pushing the Release Lever F to the rear of the chair See Fig 14 Taking apart your power chair enables you to save space when keeping it in storage or to carry it along in your vehicle when going away from home Having the power chair disassembled is easier than ever since no tools are required To ensure your safet...

Страница 14: ...ever to the rear of the chair Lift the seat post to separate the Front Frame Assembly H from the Rear Frame Assembly I See Fig 15 Once all the parts have been disassembled you are now able to put the pieces in storage or in a vehicle for transportation See Fig 16 Re assemble To re assemble your power chair you can repeat the disassembly directions in reverse G I H ...

Страница 15: ...power cord should be stored in a safe and dry location until it will be used again 4 If after charging your power chair over 8 14 hours and it does not function please check fuse is not burned out the power chair is turned off circuit breaker is pushed in if none of these is a problem contact your authorized dealer Keep in mind these rules Fully charge batteries at least once a month more if you u...

Страница 16: ...pholstery greatly Please note that using the power chair outdoors can lead to sun damage of the upholstery material Since this is a normal wear and tear condition it is not covered under the warranty SEAT BELT A damp cloth with mild soapsuds should only be used to clean the seat belts Wipe the seat belts gently removing any debris on it Do not use any chemical products to clean the seat belts as t...

Страница 17: ...equently for any signs of damage unusual wear and sufficient tread depth Thread depth should not be allowed to drop below 1 mm ELECTRICAL CONNECTIONS Verify the battery terminals and all plug connectors are secured and firmly attached If the battery terminals are corroded please contact your dealer for replacement HARDWARE Check that all hardware exist and are securely fastened Replace any missing...

Страница 18: ...t motor connections and cabling Check the left park brake motor connections and cabling Check the right park brake motor connections and cabling Consult a service agent Display PCB Fault Consult a service agent Consult a service agent Here are some suggestions about solving problems you may have with your power chair There are 10 LED Self Diagnostic Warning Lights on the Control Panel To check the...

Страница 19: ...ions to be sure they are tight 4 Verify the batteries are connected correctly 5 If none of these suggestions correct the problem contact your authorized dealer If charging your power chair over 14 hours and the light on the charger does not change to green then contact your authorized dealer Please note that your power chair is equipped with a controller that constantly checks the drive system for...

Страница 20: ...eat Width Drive Train Battery Pack Weight Motor Size Travel Range Battery Charger Electronics Seat Type 810 mm 31 9 600 mm 23 6 935 mm 36 8 130 mm 5 N A 200 mm 8 47 8 kg 105 4 lbs 6 5 kmph 4 mph 115 kg 250 lbs 40 mm 1 6 6 degree 23 mm 0 9 695 mm 27 4 Electro Mechanical 470 mm 18 5 2 Motor Rear Wheel Drive 10 4 kg 22 9 lbs DC24V 150W 2800r p m 8 4 km 5 2 mile 14 Ah x 2 2A DA50 Light Weight Foldable...

Отзывы: