Ctl 7cln Скачать руководство пользователя страница 8

9

8

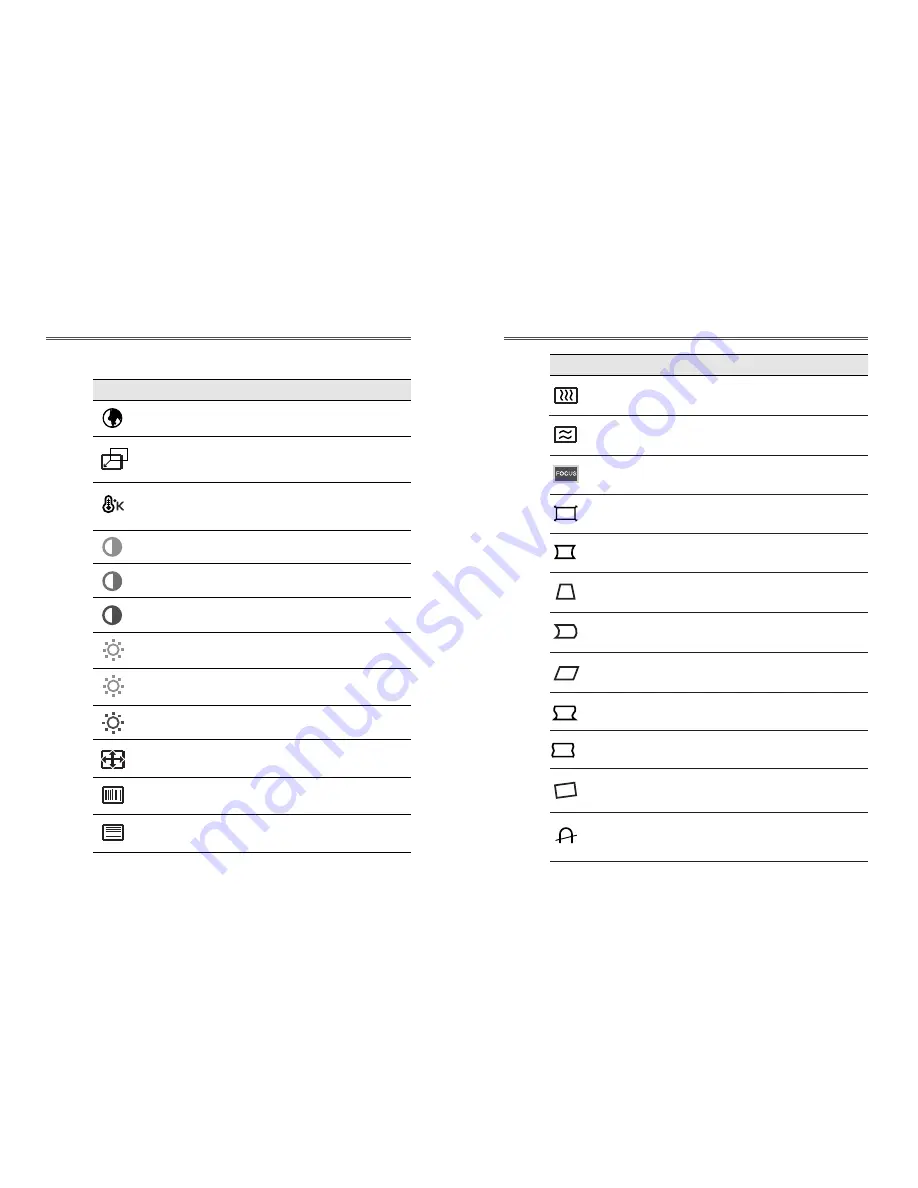
Adjust the vertical picture moire
cancellation.

V. MOIRE

Adjust the focus image.

FOCUS

ZOOM

Adjust the display width & height at the
same time.

Adjust the left and right margins for more
convex or more concave margins.

Adjust the trapezoid of the screen by
moving the lines inward or outward.

Adjust the side balance when the sides of
the screen are bowed towards left or right.

Adjust the parallelogram when the screen
is leaning left or right.

Adjust the rotation when the screen is
tilted left or right.

Adjust the pin S control when the sides of
the screen are in a S shape.

PINCUSHION

TRAPEZOID

PIN BALANCE

ROTATION

PIN S Control

PARALLELOGRAM

Adjust the pin W control when the sides
of the screen are in a W shape.

PIN W Control

Degaussing keeps the monitor free from
unwanted magnetism that can result in
color impurity.

DEGAUSS

Adjust the width (horizontal size) and the
height (vertical size) of the display.

H. SIZE &    

V. SIZE 

Adjust the horizontal picture moire
cancellation.

H. MOIRE

H. LINEARITY

V. LINEARITY

Adjust the horizontal linearity.

Adjust the vertical linearity.

Select language for OSD (5 languages).

LANGUAGE

Adjust the position of the display
horizontally(left or right) and vertically
(up or down)

H. CENTER &    

V. CENTER

Choose different preset color
temperatures or set your own customized
color parameters.

Adjust the red gain.

Adjust the green gain.

Adjust the blue gain.

COLOR TEMP

RED GAIN

GREEN GAIN

BLUE GAIN

Adjust the red bias.

Adjust the green bias.

Adjust the blue bias.

RED BIAS

GREEN BIAS

BLUE BIAS

ICON      CONTROL                     FUNCTIONS

OSD Functions

ICON      CONTROL                     FUNCTIONS

Содержание 7cln

Страница 1: ...S N 9978626503 Model No 7cln COLOR MONITOR USER S GUIDE C T L...

Страница 2: ...nditions a When the power cord or plug is damaged or frayed b If liquid has been spilled into the monitor c If the monitor has been exposed to rain or water d If the monitor does not operate normally...

Страница 3: ...nnect the power cord before servicing The outlet must be installed near the monitor and must be easily accessible As an ENERGY STAR Partner Computer Technology Link Inc has determined that this produc...

Страница 4: ...stall operate and get the best performance from your monitor Please read this user s guide carefully before installing your monitor then keep it near your monitor for quick reference First please chec...

Страница 5: ...ving a signal or is receiving a signal that is out of scanning range Activate the higher refresh rates of the monitor to stabilize the screen and eliminate the annoying flicker that contributes to eye...

Страница 6: ...SPLAY DATA CHANNEL FOR PLUG AND PLAY If you use the monitor with a computer that complies with DDC1 2B CI of VESA the host video card automatically configures itself without your intervention in a way...

Страница 7: ...w on the OSD window Increase the value of any selected function Move cursor to the left window on the OSD window Decrease the value of any selected function Launch OSD On Screen Display MENU window Mo...

Страница 8: ...des of the screen are in a W shape PIN W Control Degaussing keeps the monitor free from unwanted magnetism that can result in color impurity DEGAUSS Adjust the width horizontal size and the height ver...

Страница 9: ...SAVER YES VESA DPMS operation NO NO DPMS operation ICON CONTROL FUNCTIONS CDT Size 17 inch Diagonal visible image area 16 inch Dot Pitch 0 25 mm Synchronization Horizontal 30 95 KHz Vertical 50 160 Hz...

Страница 10: ...ode Check if power switch is in the on position Check if the power cord is correctly connected Check if the signal cable is suitable to the video card Adjust H V Size or H V Position to get the proper...

Отзывы: