


nVision
Operation Manual
•
Page 29
The following steps must be performed sequentially to properly complete the module change:
1
Before removing or replacing any modules, ensure that all recorded data has
been archived properly through the use of
Export Data
in
CrystalControl.
2
Place nVision on clean stable work surface.
Clean exterior of the product, if necessary, to ensure
no moisture or foreign matter will enter the enclosure when disassembled.
Use of proper ESD
grounding techniques is highly encouraged to prevent damage to the exposed module.
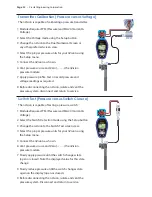
3
nVision Reference Recorder;
Turn off nVision with the
(power) button, then remove the 4AA
battery pack from the rear of the unit.
nVision Lab Reference;
Turn off nVision with the
(power) button, then disconnect the power
cord from the AC power source.
4
Remove any USB power connnection from the nVision chassis during module installation.
WARNING:
Failure to disconnect nVision from 4AA, USB or AC power before module re-
moval installation may cause damage.
5
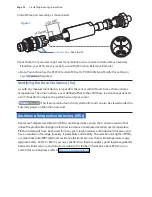
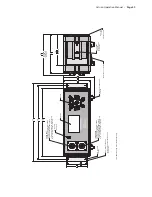
Using a Torx T10 wrench, loosen the four screws retaining the module face plate and carefully
pull the module out.
Avoid twisting the module when removing from the nVision.
Note:
Some modules may be difficult to remove due the physical form and the IP67 sealing
strategy employed.
It may be necessary to connect a fitting or RTD cable to the appropriate
module in order to gain better gripping power for removal.
Never force the separation of a
module from an nVision chassis.
6
Note the correct orientation of module connector on rear of module (located up or closest
toward the display) in relation to the nVision chassis during removal. Place the removed nVision
module in the ESD bag for safe protection.
7
Install new module in similar orientation as one removed in step 2 (rear module connector
facing up to keypad of nVision).
If improperly oriented the tri-lobe design of the module will not
allow proper installation.
Do not force installation of the module as permanent damage may
occur. Ensure light lubrication of the module’s unique quad-lobe o-ring (P/N: 4110) with Dow 111
silicon lubricant or equivalent to ensure an IP67 rated seal.
Note:
If installing blank plate, instead of module, ensure part is oriented flat and evenly within
the module bay for proper sealing.
8
Tighten face plate or blank plate screws to
50 in-oz (0.35 newton meter (N-m)) torque (T10 Torx)
.
9
Replace 4AA power module and tighten adequately to ensure IP67 seal.
When power is first
applied by the battery pack, the unit will automatically turn on.
Ensure that nVision recognizes
the new module by confirming in
CrystalControl or the Summary screens.
10
Before using the nVision to record,
Erase All Data
using
setup
button
Recording/Erase All Runs
menu items.
11
nVision is now ready to use.
If you have any problems during this process, check the
Troubleshooting section for relevant information or contact Crystal Engineering at
or (805) 595-5477.
Содержание nVision Lab Reference Recorder
Страница 1: ...C R Y S T A L engineering corporation Operation Manual Reference Recorder Lab Reference ...
Страница 6: ......
Страница 67: ......