background image

Issue 1

5

1.3 Fireplace / surround suitability


The fire must only be installed on a hearth it must not be installed directly on to a carpet or other 
combustible floor materials.
(this appliance may be installed without a hearth when fitted as a hole in the wall and is fitted so the 
bottom of the appliance is installed a minimum of 300mm from floor level)
This fire is suitable for fitting to a non combustible fire place surrounds and proprietary fireplace 
surrounds with a temperature rating of at least 150º C (class “o”)

If this appliance is fitted directly against a wall without the use of a fire surround  or fireplace all 
combustible materials must be removed from behind the trim .soft wall coverings such as blown 
vinyl ,wall paper etc, could be affected by the rising hot air scorching and /or discolouration may 
result ,due consideration should be made to this when installing or decorating.
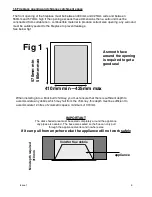
1.4  Shelf position 

The fire may be fitted below a combustible shelf providing there is a minimum distance of 200mm above 
the top of the fire and the shelf does not project more than 150mm.if the shelf overhangs more than 
150mm the distance between the fire and the shelf must be increased by 15mm for every 25mm of 
additional overhang over 150mm

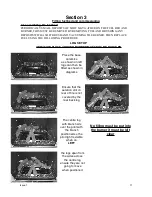
1.5       Flue / Chimney inspection 

Before commencing installation ,a flue or chimney should be inspected to ensure that all of the following 
conditions are satisfied.

1.

check that the chimney / flue only serves one fireplace and is clear of any obstruction .any dampers or 

register plates must be removed or securely locked in the open position 

2.

brick/stone built chimneys or any chimney or flue which has been used for an appliance burning fuel 

other than gas must be thoroughly swept .the base of the chimney /flue must also be cleared of debris etc 

3.

any under floor air supply to the fireplace must be completely sealed off 

4

.ensure that the inside of the chimney / flue is in good condition along its length and check that there is 

no leakage of smoke through the structure of the chimney / flue during and after the smoke pellet test 

5

.using a smoke pellet check there is an updraft in the chimney / flue and that the smoke  can be seen 

coming from the terminal/ pot outside
There must be no leakage of smoke through the structure of the chimney during or after the smoke pellet 
test and it is important to check the inside upstairs rooms adjacent to the chimney / flue

Check the chimney pot / terminal and general condition of the brickwork and masonry.if the chimney / flue 
is in poor condition or if there is no up-draught do not proceed with the installation, if there is a history of 
down draught conditions with the chimney / flue,
A tested and certificated flue terminal or cowl suitable for the relevant flue type should be considered
6.

a spillage test must always be carried out during commissioning of this appliance

Содержание CF3 MONTANA

Страница 1: ...A Installation maintenance user instructions HAND THESE TO THE USER Natural gas G20 at supply pressure of 20 mbar in GB IE This appliance is manufactured by Crystal fires limited aintree racecourse bu...

Страница 2: ...ETRAY 8 SECTION 2 INSTALLING THE APPLIANCE 2 1 INSTALLING THE FIREBOX 9 2 2 GAS SUPPLY 9 2 3 SECURE TO FIREPLACE 9 10 2 4 GAS TIGHTNESS INLET PRESSURE 10 SECTION 3 FUEL SETUP AND COMMISIONING 3 1 SETT...

Страница 3: ...e purpose is to ensure that customers are provided with the correct equipment for their needs that it is installed commissioned and serviced in accordance with the manufacturer s instructions by compe...

Страница 4: ...1856 2 metal flue pipes for gas appliances 6 Bs 8303 installation of domestic heating appliances 7 Is 813 domestic gas installation republic of Ireland No purpose made additional ventilation is normal...

Страница 5: ...be inspected to ensure that all of the following conditions are satisfied 1 check that the chimney flue only serves one fireplace and is clear of any obstruction any dampers or register plates must be...

Страница 6: ...seal 1 6 Fireplace opening and chimney catchment space The front opening of the fireplace must be between 400mm and 425mm wide and between 560mm and 570mm high if the opening exceeds these dimensions...

Страница 7: ...GREES C NOTE IF THE FLUE BOX IS TO BE USED WITH AN EXISTING BRICK OR STONE CHIMNEY A 125 mm 5 MINIMUM DIAMETER FLUE LINER CONFORMING TO BS 715 MAY BE USED NOTE A BRICK CHAMBER TO THE SIZES IN FIG 2 IN...

Страница 8: ...of operation 3 when this device is changed recommended yearly at service only a complete original manufacturers part may be used it is not possible to replace individual parts on this device only a co...

Страница 9: ...face of the fire opening in the positions shown below fig 2 FIG 2 Fit the wall plugs provided and screw the fixing eyes securely into the rear of the fire opening Uncoil the two fire fixing cables an...

Страница 10: ...lve on the fire 2 4 gas tightness and inlet pressure Refit gas fire tray into fire box and screw it secure using two screws at bottom Connect the gas supply to the inlet elbow and carry out a gas soun...

Страница 11: ...RE LOG SET UP AERATION SLOTS AROUND BURNER MUST NOT BE BLOCKED Place the base ceramics as shown on left logs can then be fitted as shown in diagrams Ensure that the aeration slot on rear of fire is no...

Страница 12: ...ner COAL PEBBLE LAYOUT The coal pieces sit across each other allow gaps for flames to come through AERATION SLOTS AROUND BURNER MUST NOT BE BLOCKED Place the base ceramics as shown on left coals can t...

Страница 13: ...ot light to be seen position this to allow enough of pilot to be on show Above small coal piece sits up at front Above small coal flake sits at front centre Left The coal flake sits to the left betwee...

Страница 14: ...he fire must be disconnected from the gas supply and expert advice obtained always ensure flue chimney is completely sealed including the base and any pipes no longer used or cavity may need pointing...

Страница 15: ...uter frame into place and put 8 screws in only tighten when glass is safe all screws in by hand 2 replacement of gas control and pilot Manual and remote Remove glass fuel set as above isolate applianc...

Страница 16: ...e cleaned by shaking any debris from them under no circumstances brush them or vacuum as this can damage them 4 3 installer spare parts Part code Part code FUEL PIECES LOGS CF3 logs ODS manual CF3 907...

Страница 17: ...ment I s 813 domestic gas installation which is issued by the national standards authority of Ireland If installing in northern Ireland please consult local building regulations In Scotland please con...

Страница 18: ...any type must never be thrown on to the fuel bed this could affect safe operation and damage the fire Any deposits and debris should be removed from the fuel bed periodically this may be carried out...

Страница 19: ...the gas burner 5 The appliance can be adjusted between high and low by moving the control knob to suit the knob will need to be depressed slightly to move from low high ignition 6 To turn the fire of...

Страница 20: ...ime of service or more often depending on use and quality of batteries we recommend using Energiser batteries as they do not leak YOUR REMOTE CONTROL WILL COME ALREADY PAIRED WITH YOUR FIRE This will...

Страница 21: ...gh or low To turn the fire off simply press the ON OFF Button whilst hand wrapped around handset and green light solid the appliance will turn off very easily as this is not a safety issue Whenever yo...

Страница 22: ...OLLOWING PROCEDURE Place the base ceramics as shown on left logs can then be fitted as shown in diagrams Ensure that the aeration slot on rear of fire is not covered by the rear back log The centre lo...

Страница 23: ...ner COAL PEBBLE LAYOUT The coal pieces sit across each other allow gaps for flames to come through AERATION SLOTS AROUND BURNER MUST NOT BE BLOCKED Place the base ceramics as shown on left coals can t...

Страница 24: ...ot light to be seen position this to allow enough of pilot to be on show Above small coal piece sits up at front Above small coal flake sits at front centre Left The coal flake sits to the left betwee...

Страница 25: ...ime the appliance is used the condensation produced will create marks on the inside glass panel and any impurities in the gas can embed into the glass only replace the glass if it is in good condition...

Страница 26: ...ance and especially watch the gauze filter for linting if necessary vacuum the filter when possible it will help assist a long life of trouble free use of the appliance Remote control problems always...

Отзывы: