background image

Section 4

4-10

460 Express Series

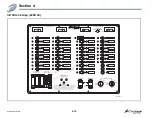
DC Master Panel 

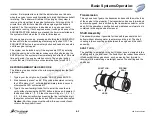
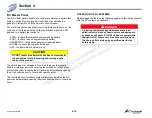
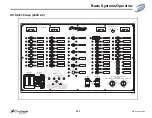
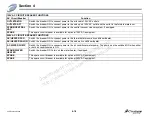
The DC master panel consists of a voltmeter, ammeter, a battery test 
switch, a series of switch type and resettable circuit breakers, a 
generator start switch, and the DC main circuit breaker.

The meter is a convenience feature which allows you to check on the 
condition of the three batteries. With master breaker switch in OFF 
position, turn battery test switch to: 

• STBD - to check the starboard engine cranking battery
• PORT - to check the port engine cranking battery
• GENERATOR - to check the generator cranking battery
• HOUSE - to check the house batteries and 
• OFF - to disable meter and test circuit

The switch type circuit breakers’ function allows you to manually 
enable or interrupt a circuit by moving the switch on or off, and they 
protect the system receiving the DC power by automatically opening 
the circuit should a short or overload condition occur. 

The resettable circuit breakers protect the system receiving the DC 
power by automatically opening the circuit should a short or overload 
occur.

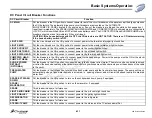
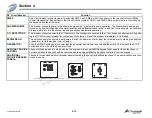
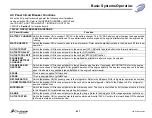
OPERATION OF DC SYSTEMS 

Read through the table on the following page(s) to familiarize yourself 
with the DC systems on your yacht.

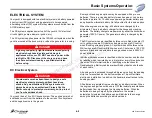
CAUTION

DO NOT reset a breaker which has been automatically 
tripped without first discovering and remedying the 
cause of the problem.

A

 DANGER

A glowing red polarity light indicates a reversed 
polarity electrical shock hazard exists and damage to 
appliances will occur. DO NOT use shore power while 
red light is ON. Disconnect the shore cord and have 
the shore outlet serviced by a qualified electrician 
before using.

Downloaded 

from 

CruisersOwnersForum 

http://www.CruisersOwnersForum.com

Содержание 460 Express Series

Страница 1: ...Series 460 Express Series Table of Contents 1 Introduction 1 1 2 Model Specific Information 2 1 3 Controls and Indicators 3 1 4 Basic Systems Operation 4 1 Downloaded from CruisersOwnersForum http ww...

Страница 2: ...460 Express Series 460 Express Series Downloaded from CruisersOwnersForum http www CruisersOwnersForum com...

Страница 3: ...Manual 1 2 Safety Symbols 1 3 Owner s Manuals for Onboard Systems and Components 1 4 Warranty Information 1 5 Dealership Responsibilities 1 5 Your Responsibilities 1 5 Warranty Service 1 5 Safety Labe...

Страница 4: ...luded is information about onboard systems and components furnished by suppliers other than Cruisers Yachts Owner s Manual The owner s manual contains specific information concerning the operation of...

Страница 5: ...to introduce you to floorplans as well as the locations of various components Section 3 contains descriptions of all the controls and indicators on the dash of the helm Section 4 contains principles o...

Страница 6: ...on the options you chose the kit may contain some or all of the following literature Engine Hydraulic Steering RACOR Fuel Filter Water Separator Electric Stove Battery Charger Water Heater Trim Tabs R...

Страница 7: ...dealer and go over all warranties Fill in the Cruisers Yachts Limited Warranty Registration card which is located inside the Skipper s Kit Keep a record of the hull number for future reference 2 Insp...

Страница 8: ...le waters and contiguous zone of the United States if such discharge causes a film or sheen upon or discoloration of the surface of the water or causes a sludge or emulsion beneath the surface of the...

Страница 9: ...ine General Layout 2 11 General Layout Engine Room Layout Volvo Option 2 13 General Layout Engine Room Layout Yanmar Option 2 14 Fuel Tank and Fittings 2 15 Forward Engine Room Bulkhead Volvo 2 17 For...

Страница 10: ...m Height Keel to Top of Windshield 12 4 3 75 m Height Keel to Top of Arch 15 7 4 7 m Draft 42 1 1 m Bridge Clearance with Arch 11 4 3 5 m Bridge Clearance with Hardtop 13 1 4 0 m Sleeping Accommodatio...

Страница 11: ...at 7 Windlass Deck Switch Out 8 Windlass Deck Switch In 9 Horn 10 Amidship Cleat 11 Waste Deck Plate 12 Water Deck Plate 13 Courtesy Light 14 Helm 15 Compass 16 Fire Extinguisher 17 Wetbar 18 Icemaker...

Страница 12: ...7 18 19 19 20 GL INTERIOR 1 Water Heater 2 A C Unit 3 AC DC Panel 4 TV DVD 5 ASR TV DVD 6 Refrigerator 7 Stove 8 Microwave 9 Galley Sink 10 Coffee Maker 11 Head Vanity 12 Head 13 Shower 14 FSR Closet...

Страница 13: ...Light Switch 9 Light Switch 10 Dual Receptacle Box 11 Light Switch 12 Dual Receptacle Box 13 Dual Receptacle Box Telephone Receptacle Light Switch 14 Light Switch 15 Telephone Receptacle Light Switch...

Страница 14: ...9 1 1 4 7 6 8 37 R009B 1 Exterior Speaker with Grill 2 Interior Speaker 3 Head Unit CD Player 4 Stereo Remote 5 6 Disc CD Changer 6 200 Watt Amplifier 7 100 Watt Amplifier 8 Fader Switch 9 Subwoofer...

Страница 15: ...7 R012D A 1 Air Conditioner 2 Air Conditioner 3 Port Plenum to Aft Head 4 Port Plenum to FSR 5 Port Plenum to Forward Head 6 Port Plenum to Galley 7 Center A C Unit to Starboard Plenum 8 Center A C Un...

Страница 16: ...3 5 2 7 6 37 R012D B 1 Air Conditioner 2 Center A C Unit to Starboard Plenum 3 Center A C Unit to Salon 4 Starboard Plenum 5 Starboard A C Diffuser 6 Center A C Diffuser 7 Salon A C Vent Downloaded fr...

Страница 17: ...6 8 37 R012D C 1 Air Conditioner 2 Port Plenum to Aft Head 3 Port Plenum to FSR 4 Port Plenum to Forward Head 5 Port Plenum to Galley 6 Port Plenum 7 Black Round A C Vent 8 Starboard A C Diffuser 9 Ga...

Страница 18: ...cock Macerator 12 Head Unit Standard 13 Vent 14 Waste Deck Plate 15 Shower Sump Pump 16 Bilge Pump 2200 GPH 17 Bilge Pump Float Switch 18 High Water Alarm 19 Port A C Unit 20 Starboard A C Unit 21 Ple...

Страница 19: ...over To Starboard Tank Return 11 Starboard Tank to Starboard Filter 12 Starboard Filter to Crossover 13 Crossover to Starboard Engine 14 Crossover to Starboard Engine Return 15 Crossover to Port Tank...

Страница 20: ...Tank Return 11 Starboard Tank to Starboard Filter 12 Starboard Filter to Crossover 13 Crossover to Starboard Engine 14 Crossover to Starboard Engine Return 15 Crossover to Port Tank Return 16 Port Ta...

Страница 21: ...rainer 8 Starboard Fuel Tank 9 Port Fuel Tank 10 Starboard Engine Battery Switch 11 Starboard Engine Battery 12 House Battery Switch 13 House Battery 14 Port Engine Battery Switch 15 Port Engine Batte...

Страница 22: ...ter Strainer 8 Starboard Fuel Tank 9 Port Fuel Tank 10 Starboard Engine Battery Switch 11 Starboard Engine Battery 12 House Battery Switch 13 House Battery 14 Port Engine Battery Switch 15 Port Engine...

Страница 23: ...Model Specific Information FUEL TANK AND FITTINGS 2 3 1 4 37 R002D 1 Starboard and Port Fuel Tanks 2 Neoprene Gasket 3 Neoprene Gasket 4 Mylar Sound Foam Downloaded from CruisersOwnersForum http www...

Страница 24: ...4 9 5 10 1 2 3 37 R003D 1 Brass Elbow 2 Fuel Switch 3 Fuel Barb 4 Reducer 5 Fuel Barb 6 Fuel Tank Vent 7 Elbow 8 Fuel Switch 9 Reducer 10 Fuel Barb Purple optional equipment located on starboard tank...

Страница 25: ...005D 3 1 Fire Extinguisher 2 Fire Extinguisher Board 3 Starboard Engine Fuel Filter 4 Port Engine Fuel Filter 5 Fuel Filter Board 6 Blower Board 7 Blower 8 Oil X Change R Unit 9 Oil X Change R Board 1...

Страница 26: ...er Board 3 Starboard Engine Fuel Filter 4 Port Engine Fuel Filter 5 Fuel Filter Board 6 Engine Room Light 7 Blower Board 8 Blower 9 Steering Controls Yanmar Only 10 Steering Controls Board 11 Oil X Ch...

Страница 27: ...14 37 R009D 1 PME 1 2 Blower Solenoid 3 PME 1 Solenoid 4 Upper Engine Room Board 5 Battery Charger 6 DC Main Fuse Block 7 DC Main Fuse 150 Amp 8 Windlass Fuse Block 9 Windlass Fuse 150 Amp 10 Termina...

Страница 28: ...ess Series HULL BONDING WIRE LAYOUT H C 35 34 27 33 16 14 12 1 4 8 6 10 28 33 34 35 31 29 32 21 22 23 11 9 7 15 17 13 2 5 20 3 25 19 18 24 26 37 R015D 30 Downloaded from CruisersOwnersForum http www C...

Страница 29: ...Tank Starboard 16 Starboard Transom Buss Bar Fuel Fill Port 17 Starboard Transom Buss Bar Fuel Fill Starboard 18 Starboard Transom Buss Bar Rudder Tower Port 19 Starboard Transom Buss Bar Rudder Tower...

Страница 30: ...DETAIL TO COCKPIT ICEMAKER TO COCKPIT SINK 1 Water Tank 2 Water Pump 3 Water Heater 11 Gal 4 Water Tank Fill Hose 5 Water Tank Vent Hose 6 Waterline Cold Blue 7 Waterline Hot Red 8 Galley Faucet w Spr...

Страница 31: ...4 1 Waste Tank 2 Head Unit Standard 3 Macerator 4 Seacock Macerator 5 Vent 6 Waste Deck Plate 7 Waste Hose 8 Deck Pump Out Hose To Deck 9 Pump Out Hose To Macerator 10 Waste Tank Vent Hose 11 Pump Ou...

Страница 32: ...STANDARD WASTE LAYOUT 2 5 1 5 2 4 6 3 7 37 R010D 3r 1 Waste Tank 2 Head Unit Standard 3 Vent 4 Waste Deck Plate 5 Waste Hose 6 Pump Out Hose 7 Waste Tank Vent Hose Downloaded from CruisersOwnersForum...

Страница 33: ...mp Drain Hose 13 Shower Sump Drain Hose 14 Galley Sink Drain Hose 15 FSR Head Sink Drain Hose 16 MSR Head Sink Drain 17 Shower Drain Hose 18 Port A C Condensation Hose 19 Starboard A C Condensation Ho...

Страница 34: ...T DRAINING 1 2 6 7 5 4 3 4 3 1 6 4 2 1 3 4 5 6 7 37 R004B 1 Thru Hull 2 Thru Hull 3 Sink Drain Waste 4 Drain 5 Tee 6 Drain Hose Storage Sink and Hatch 7 Drain Hose Cockpit Downloaded from CruisersOwne...

Страница 35: ...ull distortion Contact your Cruisers Yachts Dealer to order a cradle If a factory supplied cradle is not available use extreme care to support the hull as shown Do not support yacht by resting hull on...

Страница 36: ...2 2 28 460 Express Series 43 0 E p ess C G PLACE SLING HERE 37 R007B 105 2 67m 156 3 96m 297 7 54m 3 0 Ex r ss 37 R013B 4 72m 186 2 03m 80 Downloaded from CruisersOwnersForum http www CruisersOwnersFo...

Страница 37: ...tlet 3 4 Keypad 3 4 Steering Wheel 3 4 Compass 3 4 Engine Hourmeters 3 4 Smart Craft Display Screen 3 4 Volvo Display Screen 3 4 Gear Select Gauge 3 4 Mercury Smart Craft Dash Panel Layout 3 5 Volvo D...

Страница 38: ...details and see your Cruisers Yachts Dealer for more information 6 FUEL GAUGES The port gauge is the port fuel tank gauge and the starboard gauge is the starboard fuel tank gauge The gauges indicate t...

Страница 39: ...engine speed Gradually pull aft to go into REVERSE and continue to pull toward you to increase engine speed Always return the controls to NEUTRAL when the engines are not running 14 SPOTLIGHT CONTROLS...

Страница 40: ...qualified compass adjuster After the compass has been adjusted DO NOT allow any iron or steel objects to be placed in its vicinity even temporarily Refer to the owner s manual included in the Skipper...

Страница 41: ...Express Series Controls and Indicators MERCURY SMART CRAFT DASH PANEL LAYOUT 19 ON O 14 3970 003 ERCURY 1 2 3 23 20 12 16 17 13 11 15 18 10 Downloaded from CruisersOwnersForum http www CruisersOwnersF...

Страница 42: ...ection 3 3 6 460 Express Series VOLVO DASH PANEL LAYOUT 19 ON O 14 3970 006 V V V V 20 12 16 17 13 11 15 6 9 3 6 7 8 7 8 24 24 18 10 Downloaded from CruisersOwnersForum http www CruisersOwnersForum co...

Страница 43: ...0 Express Series Controls and Indicators YANMAR DASH PANEL LAYOUT 19 ON OFF 14 3970 007A 1 2 3 9 20 12 16 17 13 11 15 5 6 4 6 25 7 18 10 Downloaded from CruisersOwnersForum http www CruisersOwnersForu...

Страница 44: ...e 5 SPREADER ENGINE ROOM LIGHTS These buttons are toggle action buttons that control the corresponding lights When a button is pressed the corresponding light s will turn ON When it is pressed again t...

Страница 45: ...rol to enable engine functions Key in the four digit user code followed by the ENTER button The ENTER button also serves as a reset button if an error is made entering the four digit code Simply press...

Страница 46: ...ENGINE STOP ENGINE STOP PORT STBD PORT STBD DIM PUMP COCKPIT WASHER H PORT STBD ANCHOR SPREADER ENG ROOM NAV H L L BOARDING FWD PUMP MID AFT PUMP FANS ENGROOM ENGINE START ENGINE IGN ENGINE IGN ENGIN...

Страница 47: ...stem Crossover Valve 4 6 Steering System 4 6 Steering Wheel 4 6 Rudder 4 7 Trim Tabs 4 8 Electrical System 4 9 DC Electrical System 4 9 DC Master Panel 4 10 DC Panel Circuit Breaker Functions 4 11 US...

Страница 48: ...stem turn the ignition switch to the ON position Depending upon the engine the alarm may sound immediately or after a few seconds delay Engine Ignition Start Stop Keypad Successfully entering the corr...

Страница 49: ...OT press ENTER 2 Simultaneously press 1 and 4 If the code was entered correctly the LED adjacent to 1 will blink approximately twice a second otherwise the LED will remain off 3 Type in the new four d...

Страница 50: ...thly for wear leakage and deterioration Excessive water entry especially if unattended could result in the submergence of the engine compartment or of the entire yacht SHAFT LOG HOSE CLAMPS HOSE STAIN...

Страница 51: ...very sharp Be careful when you handle them Wear protective gloves when handling any propeller Remove the key from the ignition switch and remove the Emergency Stop Switch Clip if you yacht is equippe...

Страница 52: ...e port handle pointing aft and the starboard handle pointing outboard both engines receive fuel from the starboard tank 5 With the port handle pointing outboard and the starboard handle pointing aft b...

Страница 53: ...ach rudder is also canted inboard slightly to allow for a constant pressure of water to act upon the rudder face The pressure on the rudder face prevents flutter in a 0 rudder position 55 11 16 CENTER...

Страница 54: ...mp and solenoids The pump sends hydraulic oil to hydraulic actuators cylinders which lower the trim tabs To raise the trim tabs the rocker switch is moved which allows oil to flow from the actuator to...

Страница 55: ...res are AC neutral Black wires are AC hot wires in 120V AC systems Black and red wires are the ungrounded wires in 240V AC power systems Individual harness wires are identified with wire number and fu...

Страница 56: ...rcuit by moving the switch on or off and they protect the system receiving the DC power by automatically opening the circuit should a short or overload condition occur The resettable circuit breakers...

Страница 57: ...power to the forward head light switch PUMP FWD HEAD PUMP AFT HEAD Put the breakers in the ON position to connect power to the head pumps Power to the pumps must be ON or the electri cally controlled...

Страница 58: ...mmediately if it is tripped BLOWERS ON This switch controls the engine room blowers Switch the blowers on for at least four minutes prior to starting the engines or generator to rid the engine room of...

Страница 59: ...F OFF OFF OFF SPARE SPARE MID 20A OFF 20A OFF STBD MICROWAVE ICE 10A OFF 20A OFF REFRIGERATOR 10A 120 VAC 0 OFF 30 AC AM ERES 10 20 50 40 20A 240 VAC OFF AUXILIARY ENGINE CONTROL REMOVE KEYS DURING NO...

Страница 60: ...A OFF 10A 15A OFF OFF 5A PUMP 5A PUMP 5A 15A OFF STBD OFF START IGN PME 1 PME 2 C O DETECT DC AMPERES BOW THUSTER OFF 20A OFF 15A CHARGER DRYER WASHER OFF 15A 15A OFF OUTLETS OUTLETS OFF 10A OFF 15A S...

Страница 61: ...anually enable or interrupt a circuit by flipping the switch on or off and they also protect the system receiving the AC load by automatically breaking the circuit in cases of shorts or overloads GENE...

Страница 62: ...ch the shore dockside breaker to ON position Switch the yacht dockside power breaker to ON position Then check the AC DC panel POWER SOURCE AVAILABLE indicator lights The 120V AC LINE 1 V AC DOCKSIDE...

Страница 63: ...r to the optional bow thruster battery charger if equipped SPARE P S ENG HEATERS Switch the breaker ON to connect power to the optional engine heaters if equipped IMPORTANT Refer to the engine heater...

Страница 64: ...ker ON to connect power to the forward stateroom air conditioner heater AC HEATER SALON Switch the breaker ON to connect power to the salon air conditioner heater AC WATER PUMP Switch the breaker ON t...

Страница 65: ...subjected to improper operation trailering maintenance or storage commercial use or use for purposes other than those for which the boat was designed 3 Defects or damages caused by a force or impact w...

Страница 66: ...Downloaded from CruisersOwnersForum http www CruisersOwnersForum com...

Отзывы: