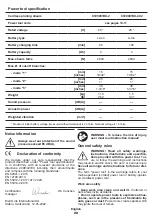
25
English
load or when the temperature of the battery
7
is ex-
ceeding 70°C� The system guarantees protection of
the power tool from damage in case of noncompliance
with the operation conditions�
Indicators of the state of battery charge (see fig. 6-7)
With the push of the button
9
the indicators
10
show
the state of charge of the battery
7
(see fig. 6-7).
Overload protection
Overload protection system of the engine automatically
switches off the power tool when it is operated in a man-
ner that causes it to draw an abnormally high current�
For example, if the force created by the engine when
attempting to cut a thick dry and dense branch is not
enough the power tool will switch off�
Operating modes (see fig. 4, 8)
You can set the opening distance of the movable
blade
1
� It will help you save time for each cut and
reduce battery consumption�
•
Turn off the stand-by mode and unlock the movable
blade
1
as shown above (see fig. 4).
•
Push and release the button
4
to choose the
operating mode:
•
mode "1" - to cut branches with diameter up
to 15 mm, 1 indicator
6
is lit (see fig. 8.1);
•
mode "2" - to cut branches with diameter up
to 25 mm, 2 indicators
6
are lit (see fig. 8.2);
•
mode "3" - to cut branches with diameter up
to 30 mm, 3 indicators
6
are lit (see fig. 8.3).
Recommendations on the power tool op-
eration
•
Inspect the work area carefully - there should be no
obstructions to move freely� Remove stones, hoses,
etc� from under your feet if necessary�
•
If working on a ladder, ensure that it is stable and
not shaking�
•
Switch on the power tool as described above and
set up the operating mode if necessary�
•
Put the power tool in such a way that the branch
to be cut is between the blades
1
and
2
and push the
actuating lever
3
(see fig. 9.1).
•
Always cut one branch at a time� It is not
recommended to cut branches in bundles, this makes
the power tool more difficult to control.
Attention! Keep the free hand at a safe
distance from the work area. Fig. 9.2 shows
unallowable working method which may
result in serious injuries (incised wounds,
traumatic amputation of fingers, etc.).
•
If overload protection has been activated and the
movable blade
1
has got trapped in the wood, do not
try to extract it, shaking the tool from side to side� It
may cause damage to elements of the power tool�
Remove the battery
7
from the power tool and try to
extract the movable blade
1
from the wood by carefully
moving it in the plane of movement of the movable
blade
1
� If it is impossible, use other tools, for example
cut the branch with a handsaw or carefully make a cut
in the wood near the movable blade
1
with a knife�
•
Observe tree and bush pruning rules in order not to
damage them�
•
After completing the work clean and smear the
blades
1
and
2
(as described below)�
•
Put the blade
1
into closed position (as described
above) and put the protective cover
20
onto blades
1
and
2
�
•
Store and carry the power tool only with the
protective cover
20
on�
Power tool maintenance / preventive
measures
Before carrying out any works on the power tool
remove the battery 7.
Battery maintenance instruction
•
Charge timely before the battery
7
is completely
exhausted� Stop operation in low power and charge
it immediately�
•
Do not overcharge when the battery
7
is full, other-
wise it will shorten the life time�
•
Charge battery
7
in the room temperature of 10°C
to 40°C (50°F to 104°F)�
•
Charge battery
7
every 6 months without operation
for a long time�
•
Replace worn out batteries in time� Decline of pro-
duction or a significantly shorter runtime of the power
tool after charging indicates aging of the battery
7
and
the need for replacement� It should be taken into ac-
count that the battery
7
may discharge faster if the
works take place in the temperature below 0°С.
•
In case of long time storage without use, it is recom-
mended to store the battery
7
at room temperature, it
should be charged to 50%�
Sharpening the blades (see fig. 10)
•
The blades
1
and
2
shall be sharpened with a
diamond-coated rasp (not included into the scope of
delivery) or the abrasive bar
19
�
•
Sharpen the blades
1
and
2
as shown in the figure 10.
•
Do not apply excess force when sharpening the
blades
1
and
2
, it will cause quick wear of them�
•
Do not sharpen the flat side of the blades
1
and
2
�
A few gentle movements to remove the bars will be
enough�
Setting up the gap between the blades (see fig. 11)
Pay attention to the gap between the
planes of the blades 1 and 2. If the gap is
too wide, cutting may be inefficient, and a
too narrow gap may cause motor overload
and reduce service life of the power tool.
•
Ensure that the blades
1
and
2
are not deformed
before setting up the gap�
•
Set up the gap as follows:
•
remove the battery
7
from the power tool;
•
loosen the fixing bolt
13
with the Allen key
17
(see
fig. 11.1);
•
turn the nut
11
with the socket wrench
18
to widen
or narrow the gap between the planes of the blades
1
and
2
(see fig. 11.2);
•
tighten the fixing bolt
13
with the Allen key
17
(see
fig. 11.1).
Содержание CT29001HX
Страница 1: ......
Страница 5: ...5 ...
Страница 6: ...6 ...
Страница 7: ...7 ...
Страница 8: ...8 ...
Страница 9: ...9 ...
Страница 10: ...10 ...
Страница 11: ...11 ...
Страница 137: ...137 ...
Страница 138: ...138 ...
Страница 139: ...139 ...
Страница 140: ...140 ...
Страница 141: ...141 ...
Страница 142: ...142 ...
Страница 143: ...143 ...
Страница 144: ...144 ...
Страница 145: ...145 ...
Страница 146: ...146 ...
Страница 147: ...147 ...
Страница 148: ...148 ...
Страница 149: ...149 ...
Страница 150: ...150 ...
Страница 151: ...151 ...
Страница 152: ......

