


18
English
Some of the above types of operations require special
accessories that are not included in the delivery scope
and not described in this manual�
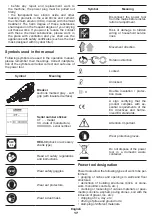
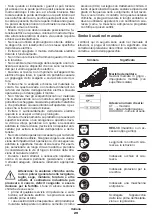
Power tool components
1
Chuck
HEX-30
2
Retainer
3
Clamping handle *
4
Additional handle *
5
Ventilation slots
6
On / off switch
7
Power indicator
8
Carbon brush replacement indicator
9
Tube with lubricant *
10
Locking screw of additional handle *
11
Washer *
12
Bolt *
13
Nut *
14
Screw of outer cover
15
Outer cover
16
Inner cover
17
Felt plug
18
Lubrication hole
* Optional extra
Not all of the accessories illustrated or described
are included as standard delivery.
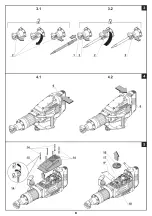
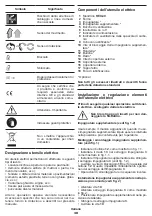
Installation and regulation of power tool
elements
Before carrying out any works on the power tool it
must be disconnected from the mains.
Do not draw up the fastening elements
too tight to avoid damaging the thread.
Additional handle (see fig. 1-2)
Always use the additional handle
4
when operating�
Additional handle
4
may be positioned as deemed
comfortable by the user�
Mounting / dismounting of additional handle (see
fig. 1)
•
Install bolt
12
as shown in fig. 1.1.
•
Install nut
13
in clamping handle
3
as shown in fig. 1.1.
•
Install additional handle
4
and
tighten clamping han-
dle
3
(see fig. 1.2).
•
Screw in locking screw
10
in the axial hole of the
bolt
12
� This will prevent the spontaneous loosening of
clamping handle
3
�
•
Disassembly operations do in reverse sequence�
Installing the additional handle in more comfort-
able position (see fig. 2)
•
Loose screw
10
�
•
Loose clamping handle
3
as shown in fig. 2.
•
Place additional handle
4
in desired position�
•
Tighten clamping handle
3
�
•
Tighten screw
10
�
Mounting / replacement of accessories (see fig. 3)
•
Release the retainer
2
as shown in figure 3.1.
•
Install / replace the working accessory in the chuck�
When installing the working accessory, it is necessary
to clear the shank end preliminarily� Install the acces-
sory only as shown in the figure: the groove on the
accessory must face the retainer
2
�
•
Lock the retainer
2
as shown in figure 3.2.
Gloves are to be used when removing
the chisel from chuck 1 (HEX-30), as the
chisel may be dangerously hot after long
work.
Initial operating of the power tools
•
Always use the correct supply voltage the power
supply voltage must match the information quoted on
the power tool identification plate.
•
The power tool is supplied properly lubricated and
ready for use�
•
A new power tool needs some time for its parts to
run in before a full load operation� The run-in period
duration is about 5 hours of operation�
•
The gear lubrications require a short time to get
warm� Depending on the ambient temperature this
period of time can alter within the range of approxi-
mately 15 s (at ambient temperature of 32°С) up to 2
minutes (at ambient temperature of 0°С).
Switching the power tool on / off
Switching on:
Move on / off switch
6
to the right until it stops (see
fig. 4.1).
Switching off:
Move on / off switch
6
to the left until it stops (see
fig. 4.2).
Design features of the power tool
Vibration protection system
The vibration protection system is design to reduce vi-
bration impact (during operation) on the operator�
Power indicator
Power indicator
7
is on when the power tool is con-
nected to the mains and is ready to be switched on�
Carbon brush replacement indicator
Carbon brush replacement indicator
8
- signals about
need to replace the carbon brushes�
Recommendations on the power tool
operation
Wear thick soft gloves when working to
reduce vibration impact on your body.
Содержание CT18095
Страница 1: ......
Страница 5: ...5...
Страница 6: ...6...
Страница 78: ...78 RCD RCD RCD GFCI ELCB...
Страница 79: ...79...
Страница 80: ...80 CCA CT XX XXXXXXX HEX 30 HEX 30...
Страница 81: ...81 1 HEX 30 2 3 4 5 6 7 8 9 10 11 12 13 14 15 16 17 18 1 2 4 4 1 12 1 1 13 3 1 1 4 3 1 2...
Страница 82: ...82 10 12 3 2 10 3 2 4 3 10 3 2 3 1 2 2 3 2 1 HEX 30 5 15 32 2 0 6 4 1 6 4 2 7 8...
Страница 83: ...83 5 50 14 15 5 16 17 18 50 9 18 5 16 15 14 9 5 www crown tools com...
Страница 85: ...85 RCD RCD RCD GFCI ELCB off...
Страница 86: ...86 off...
Страница 87: ...87 CCA CT...
Страница 88: ...88 HEX 30 HEX 30 1 HEX 30 2 3 4 5 6 7 8 9 10 11 12 13 14 15 16 17 18...
Страница 90: ...90 5 50 14 15 5 16 17 18 50 g 9 18 5 16 15 14 9 5 www crown tools com...
Страница 92: ...92 RCD GFCI ELCB...
Страница 93: ...93...
Страница 94: ...94...
Страница 95: ...95 CT XX XXXXXXX HEX 30 HEX 30 1 HEX 30 2 3 4 5 6 7 8...
Страница 97: ...97 5 50 14 15 5 16 17 18 50 9 18 5 16 15 14 9 5 www crown tools com...
Страница 99: ...99 RCD GFCI ELCB...
Страница 100: ...100...
Страница 101: ...101 CT XX XXXXXXX HEX 30 HEX 30...
Страница 102: ...102 1 HEX 30 2 3 4 5 6 7 8 9 10 11 12 13 14 15 16 17 18 1 2 4 4 1 12 1 1 13 3 1 1 4 3 1 2...
Страница 103: ...103 10 12 3 2 10 3 2 4 3 10 3 2 3 1 2 2 3 2 5 15 32 2 0 6 4 1 6 4 2 7 8 5 50...
Страница 104: ...104 14 15 5 16 17 18 50 9 18 5 16 15 14 9 5 www crown tools com i...
Страница 112: ...112 RCD GFCI ELCB...
Страница 113: ...113...
Страница 114: ...114 CCA CT XXXXXXX HEX 30 HEX 30...
Страница 116: ...116 2 2 3 2 1 HEX 30 5 15 32 2 0 6 4 1 6 4 2 7 8 5 50 14 15 5 16 17 18 9 50 18 5 16 15 14 9...
Страница 117: ...117 5 www crown tools com...
Страница 118: ...118...
Страница 119: ...119...
Страница 120: ...120...
Страница 121: ...121...
Страница 122: ...122...
Страница 123: ...123...
Страница 124: ...124...
Страница 125: ...125...
Страница 126: ...126...
Страница 127: ...127...
Страница 128: ...128...
Страница 129: ...129...
Страница 130: ...130...
Страница 131: ...131...
Страница 132: ......


