background image

English


Initial Setup 


Essential Setup


1.  Place the unit on a flat and level surface. The selected location should be 

stable and free from vibration. 

2.  Remove the tie-wrap that is holding the tonearm. 
3.  Plug the power cord to the power outlet. 


Aux Input Connection 


You can connect an audio device to this unit and play your music through its 
speakers. To do this, connect the 3.5mm auxiliary cable between your audio 
device and the Aux In Jack of this unit and start playing the music. 


Note: The aux in connection has the highest priority of all the functions. When there is an 
auxiliary cable plugged in, the aux in connection will automatically override the Bluetooth, 
turntable, CD, radio or cassette mode. To resume using the other features of the unit, 
unplug the auxiliary cable from the aux in jack.


Bluetooth Operation 


1.  Set the Function Knob to the Bluetooth position, you will hear an activation 

sound from the unit.  

2.  Turn on the Bluetooth feature of 

your audio device, search for “

CROSLEY 

CR7021A

” and 

pair.  

3.  Once your device is successfully paired with the unit, you will hear a short 

confirmation sound from the unit.  

4.  Play and stream music from your device to the unit.  

Note: Bluetooth version 

 5.0 


Содержание CR7021A-BK

Страница 1: ...21A BK Rochester Entertainment Center Instruction Manual Questions problems missing parts Before returning to the store call Customer Service 8 a m 6 p m EST Monday Friday 1 888 CROSLEY www crosleyradio com ...

Страница 2: ...ctric shock 6 Never push objects of any kind into this product through openings as they may touch dangerous voltage points or short out parts that could result in a fire or electric shock Never spill liquid of any kind on the product 7 Do not attempt to service this product yourself as opening or removing covers may expose you to dangerous voltage or other hazards Refer all servicing to qualified ...

Страница 3: ...inal packaging materials for exchange or return purposes Specifications Power 120V 60Hz Power consumption 15W Speaker 4 8Ω 5W x 2 Turntable speed 331 3 45 78 RPM Replacement needle Crosley NP6 Note Design and specifications are subject to change without notice To help save power consumption some models will comply with ERP energy saving standard When there is no audio input for 20 minutes their po...

Страница 4: ...rd Skip Button 11 CD Tray 12 LED Display 13 Bluetooth Indicator 14 Forward Skip Button 15 Stop Button 16 Play Pause Button 17 Headphone Jack 18 CD Door Open Close Button 19 Play Indicator 20 On Off Volume Knob 21 Tuning Knob 22 Turntable Platter 23 Turntable Spindle 24 45 RPM Adapter 25 Tonearm Lever 26 Tonearm 27 Auto stop Switch 28 Speed Switch 29 Hold Down Clip 30 Tonearm Rest ...

Страница 5: ...English 5 31 Cassette Eject Fast Forward Button 32 Cassette Door 33 Power Cord Plug 34 External Antenna ...

Страница 6: ...n connection has the highest priority of all the functions When there is an auxiliary cable plugged in the aux in connection will automatically override the Bluetooth turntable CD radio or cassette mode To resume using the other features of the unit unplug the auxiliary cable from the aux in jack Bluetooth Operation 1 Set the Function Knob to the Bluetooth position you will hear an activation soun...

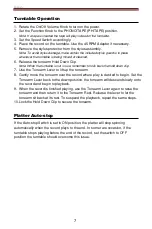
Страница 7: ...lip 7 Use the Tonearm Lever to lift up the tonearm 8 Gently move the tonearm over the record where play is desired to begin Set the Tonearm Lever back to the down position the tonearm will descend slowly onto the record and begin to playback 9 When the record is finished playing use the Tonearm Lever again to raise the tonearm and then return it to the Tonearm Rest Release the lever to let the ton...

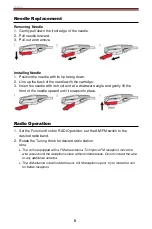
Страница 8: ...ly lift the front of the needle upward until it snaps into place Radio Operation 1 Set the Function Knob to RADIO position set the AM FM switch to the desired radio band 2 Rotate the Tuning Knob for desired radio station Note The unit is equipped with a FM wire antenna To improve FM reception move the wire around until the reception is clear without interferences Do not connect the wire to any add...

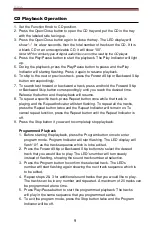
Страница 9: ...playing and the Repeat Indicator will start flashing To repeat all the tracks press the Repeat button twice and the Repeat Indicator will remain on To cancel repeat function press the Repeat button until the Repeat Indicator is off 9 Press the Stop button if you want to completely stop playback Programmed Playback 1 Before starting the playback press the Program button once to enter program mode P...

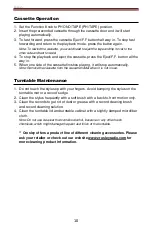
Страница 10: ...cally Note Remove the cassette from the cassette holder when it is not in use Turntable Maintenance 1 Do not touch the stylus tip with your fingers Avoid bumping the stylus on the turntable mat or a record s edge 2 Clean the stylus frequently with a soft brush with a back to front motion only 3 Clean the records to get rid of dust or grease with a record cleaning brush and record cleaning solution...

Страница 11: ...drive belt has slipped off An aux in cable is plugged into the aux in jack unplug it Cassette Tape is inserted eject it Turntable is spinning but there is no sound or sound not loud enough Stylus protector is still on Tone arm is lift up by the lever Headphone is plugged in CD does not play Function switch is not set to CD The CD is blank The CD is placed on the tray incorrectly with the label sid...

Страница 12: ...terference to radio or television reception which can be determined by turning the equipment off and on the user is encouraged to try to correct the interference by one or more of the following measures Reorient or relocate the receiving antenna Increase the separation between the equipment and receiver Connect the equipment into an outlet on a circuit different from that to which the receiver is ...

Страница 13: ...al de instrucciones Tiene preguntas ha tenido problemas o hay piezas faltantes Antes de devolver el producto a la tienda comuníquese con nuestro Servicio al Cliente de 8 a m a 6 p m hora del este de lunes a viernes 1 888 CROSLEY www crosleyradio com ...

Страница 14: ... el producto a través de las ranuras ya que pueden hacer contacto con puntos de alto voltaje o provocar un cortocircuito que ocasione fuego o una descarga eléctrica No derrame líquidos de ningún tipo sobre el producto 7 No intente realizar tareas de mantenimiento por su cuenta ya que abrir o remover la cubierta puede exponerlo a un voltaje peligroso y a otros riesgos Deje toda tarea de mantenimien...

Страница 15: ...luciones Especificaciones Fuente de energía 120V 60Hz Consumo de energía 15 W Potencia del altavoz 4 8Ω 5W x 2 Altavoz 331 3 45 78 RPM Aguja de repuesto Crosley NP6 Nota El diseño y las especificaciones están sujetos a cambios sin previo aviso Con el fin de ahorrar en el consumo de energía algunos modelos cumplirán con el estándar de ahorro de energía ERP productos relacionados con la energía En e...

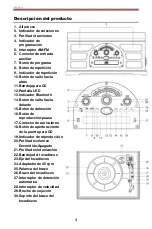
Страница 16: ...icador Bluetooth 14 Botón de salto hacia delante 15 Botón de detención 16 Botón de reproducción pausa 17 Conector de auriculares 18 Botón de apertura cierre de la puerta para CD 19 Indicador de reproducción 20 Perilla de volumen Encendido Apagado 21 Perilla de sintonización 22 Bandeja del tocadiscos 23 Eje del tocadiscos 24 Adaptador de 45 rpm 25 Palanca del brazo 26 Brazo del tocadiscos 27 Interr...

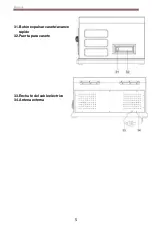
Страница 17: ...Español 5 31 Botón expulsar casete avance rápido 32 Puerta para casete 33 Enchufe del cable eléctrico 34 Antena externa ...

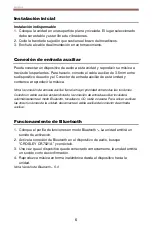
Страница 18: ...ica Nota la conexión de entrada auxiliar tiene la mayor prioridad entre todas las funciones Cuando un cable auxiliar está enchufado la conexión de entrada auxiliar invalidará automáticamente el modo Bluetooth tocadiscos CD radio o casete Para volver a utilizar las otras funciones de la unidad desconecte el cable auxiliar del conector de entrada auxiliar Funcionamiento de Bluetooth 1 Coloque el per...

Страница 19: ...levantar el brazo 8 Mueva suavemente el brazo del tocadiscos sobre el disco en la parte que desea comenzar a reproducir Ajuste la Palanca del brazo del tocadiscos de vuelta a la posición hacia abajo El brazo bajará lentamente hacia el disco y se comenzará a reproducir 9 Cuando el disco termine de reproducirse utilice la Palanca del brazo del tocadiscos una vez más para levantar el brazo y volver a...

Страница 20: ...ra de la aguja hacia arriba hasta que se trabe en su lugar Funcionamiento de la radio 1 Ajuste el perilla de funciones a la posición RADIO ajuste el interruptor AM FM para elegir la banda deseada 2 Gire la Perilla de sintonización para elegir la estación de radio deseada Nota En la unidad se incluye una antena de hilo FM Para mejorar la recepción FM mueva el hilo hasta que la recepción sea clara y...

Страница 21: ... el botón de Salto hacia atrás según corresponda hasta que llegue al tiempo deseado Suelte el botón y se reanudará la reproducción 8 Para repetir una pista específica presione el botón de Repetición una vez mientras se esté reproduciendo la pista El Indicador de repetición comenzará a parpadear Para repetir todas las pistas presione el botón de Repetición dos veces y el Indicador de repetición con...

Страница 22: ...anzar rápidamente 4 Para detener la reproducción y expulsar el casete presione el botón Expulsar Avance rápido hasta el fondo 5 Cuando un lado del casete termine de reproducirse se detendrá automáticamente Nota Quite el casete del soporte cuando no esté en uso Mantenimiento del tocadiscos 1 No toque la punta de la aguja fonográfica con los dedos Evite golpear la aguja fonográfica con el cobertor p...

Страница 23: ... transmisión del tocadiscos Un cable de entrada auxiliar está conectado en el conector de entrada auxiliar Desconéctelo La cinta de cassette está insertada expúlsela El tocadiscos gira pero no emite sonidos o los sonidos no son lo suficientemente fuertes El protector de la aguja fonográfica aún está colocado La palanca levanta el brazo del tocadiscos Los auriculares están conectados El CD no repro...

Страница 24: ...uede determinar al encender y apagar el equipo se recomienda que el usuario intente corregir la interferencia mediante una o más de las siguientes medidas Orientar o reubicar la antena de recepción Aumentar la separación entre el equipo y el receptor Conectar el equipo a una toma en un circuito diferente del circuito en el que está conectado el receptor Consultar al proveedor o a un técnico con ex...

Страница 25: ...ertissement Rochester Manuel d utilisation Des questions problèmes pièces manquantes Avant de retourner au magasin appelez le service à la clientèle De 8 h à 18 h HNE du lundi au vendredi 1 888 CROSLEY www crosleyradio com ...

Страница 26: ...ais pousser d objets quelle que soit leur nature dans les ouvertures car ils pourraient toucher des points de tension dangereux ou court circuiter des pièces ce qui pourrait entraîner un incendie ou une décharge électrique Ne jamais renverser de liquide quelle qu en soit la nature sur le produit 7 Ne pas tenter de réparer ce produit vous même car couvrir ou ôter des couvercles pourrait vous expose...

Страница 27: ...hange ou à un retour Spécifications Alimentation 120V 60Hz Consommation électrique 15 W Haut parleur 4 8Ω 5W x 2 Vitesse du tourne disque 331 3 45 78 T M Aiguille de rechange Crosley NP6 Remarque La conception et les spécifications sont sujettes à modification sans préavis Pour contribuer à économiser de l énergie certains modèles se conformeront à la norme d économie d énergie ERP Energy Related ...

Страница 28: ...à DEL 13 Voyant Bluetooth 14 Bouton Suivant 15 Bouton Arrêt 16 Bouton Lecture Pause 17 Prise pour casque d écoute 18 Bouton d ouverture fermeture de la porte du compartiment CD 19 Voyant Lecture 20 Bouton ON OFF du volume 21 Bouton de syntonisation 22 Plateau du tourne disque 23 Broche du tourne disque 24 Adaptateur 45 tours 25 Levier du bras de lecture 26 Bras de lecture 27 Commutateur d arrêt au...

Страница 29: ...Français 5 31 Bouton Éjection de la cassette Avance rapide 32 Porte cassette 33 Fiche du cordon d alimentation 34 Antenne externe ...

Страница 30: ...rque Le raccordement Aux in présente la plus haute priorité de toutes les fonctions Si un câble auxiliaire est branché le raccordement Aux in annulera automatiquement le mode Bluetooth tourne disque CD radio ou cassette Pour utiliser à nouveau les autres caractéristiques de l appareil débranchez le câble auxiliaire de la prise Aux in Utilisation du Bluetooth 1 Réglez le bouton de fonction sur la p...

Страница 31: ...bras de lecture pour soulever le bras de lecture 8 Déplacez doucement le bras de lecture au dessus du disque là où vous souhaitez commencer la lecture Abaissez le levier du bras de lecture Le bras de lecture descendra doucement sur le disque et commencera la lecture 9 Lorsque la lecture du disque est terminée utilisez à nouveau le levier du bras de lecture pour soulever le bras de lecture et le re...

Страница 32: ...e l aiguille vers le haut jusqu à ce qu il s enclenche Utilisation de la radio 1 Réglez le bouton de fonction en position RADIO RA et appuyez sur le bouton AM FM sur la bande radio désirée 2 Tournez le bouton de syntonisation pour sélectionner la station de radio désirée Remarque L appareil est équipé d une antenne FM filaire Pour améliorer la réception FM déplacez l antenne jusqu à ce que la réce...

Страница 33: ...itez jusqu à ce que vous ayez atteint le moment souhaité Relâchez le bouton et la lecture reprendra 8 Pour lire en boucle une piste en particulier appuyez une fois sur le bouton Lecture en boucle pendant la lecture de cette piste et le voyant Lecture en boucle se mettra à clignoter Pour lire en boucle toutes les pistes appuyez deux fois sur le bouton Lecture en boucle et le voyant Lecture en boucl...

Страница 34: ...Pour arrêter la lecture et éjecter la cassette appuyez sur la touche Éjection Avance rapide jusqu au bout 5 Quand la lecture d un côté de la cassette est terminée elle s arrêtera automatiquement Remarque Retirez la cassette du compartiment à cassettes lorsqu elle n est pas utilisée Entretien du tourne disque 1 Ne pas toucher l extrémité du stylet avec vos doigts Éviter de cogner le stylet sur le t...

Страница 35: ...aînement du tourne disque a glissé Un câble d entrée Aux est branché à la prise d entrée Aux débranchez le Une cassette est insérée éjectez la Le tourne disque tourne mais il n y a pas de son ou le son n est pas suffisamment fort La protection du stylet n a pas été enlevée Le bras de lecture est soulevé par le levier Le casque d écoute est branché Le CD ne fonctionne pas Le sélecteur fonction n es...

Страница 36: ... peut être déterminée en allumant et en éteignant le matériel il est conseillé à l utilisateur de tenter de remédier à l interférence par l un ou plusieurs des moyens suivants Réorienter ou déplacer l antenne de réception Augmenter la distance entre le matériel et le récepteur Brancher le matériel à une prise sur un circuit différent de celui du récepteur Consulter le détaillant ou un technicien d...

Отзывы: