Crivit 313762 Скачать руководство пользователя страница 15

15 

GB/MT

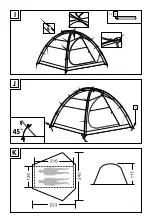
8.   Open the ventilating windows and secure them 

with the spacers. 

9.   Secure the outer tent 

1

 by tensioning the floor 

fastenings with the tent pegs 

5

10.  Now secure the outer tent 

1

 with the guy rope 

(pre-assembled) 

6

7

 and the tent pegs 

5

Illustration F: 

11.  Open the entrance, unroll it and attach it with 

the one fasteners. 

12.  Stretch the tent until taut and pull all of the 

corners and guy ropes 

6

 until they are tight. 

Do not over-tighten the guy ropes 

6

. If the 

strength of the wind increases the attachment 
point and seam of the tent might tear. 

Inner tent (without using the outer tent):
Warning: 

The inner tent and the mesh do not show 

a UV protection. Protect your skin. While using the 
inner test alone without the outer tent, rains may get 
in the inner tent through the mesh windows. Use the 
inner tent only under by a shelter covered in warm, 
dry conditions with fair weather. 

Illustration G:


1.   Place the inner tent 

2

 flat on the ground. The 

hooks for the poles 

3

 must be facing upwards. 

2.   Run the two poles 

3

 with the metal end forward 

into the hole of the hook on the inner tent one 
after another and slide them through to the end. 

Illustration H:

3.  

Push the pole 

3

 of the awning through the hooks 

on the awning so that it extends evenly on both 
sides of the hooks. 

4.   Set the tent 

2

 up and fix the poles to the plastic 

cup of the floor fastenings. 

Illustration I:

5.   Run the fiberglass poles 

4

 through the hooks 

and fix into the plastic cap on the both end of 
the top of inner tent 

2

6.   And then tie up the poles 

3

4

 tightly with the 

strings at the top of the inner tent 

2

.

Illustration J:

7.   Fix one side of the inner tent 

2

 in the ground 

with the tent pegs 

5

. Then take hold of the 

other end of the inner tent 

2

 and pull it apart 

in such a way that the tent is taut. 

8.   Secure the inner tent 

2

 by tensioning all the 

floor fastenings with the tent pegs 

5


Taking down the tent

   Clean the tent both inside and outside before you 

take the tent down. The tent must be dismantled 
in the reverse order to the manner in which it has 
been erected.

  Packing the tent together

   CAUTION!

 Please ensure that the tent is com-

pletely dry before you pack it together. Other-
wise this may result in stains and damage to the 
fabric.

   CAUTION!

 The tent pegs 

5

 and other indi-

vidual parts must be packed separately in the 
bags provided. Otherwise the tent pegs 

5


might damage the tent.

   Always fold the tent together in such a way 

that the floor of the tent is facing outwards.

   Collect all of the parts together carefully before 

you pack the tent. You should count the parts 
in order to ensure that none of them have been 
mislaid or lost.

   After the tent has been rolled up, pack it care-

fully into the carrying bag.

  Cleaning and care

  CAUTION! 

Never wash the tent in a washing 

machine. Otherwise the product may lose some 
of its ability to keep out water.

  CAUTION! 

Never use petrol, solvent or other 

cleaning agents. Otherwise there is a danger 
of damage to the product.

Содержание 313762

Страница 1: ...TENDA DA TREKKING PER 2 PERSONE Indicazioni per l uso e per la sicurezza TIENDA DE CAMPAÑA DE TREKKING PARA 2 PERSONAS Instrucciones de utilización y de seguridad 2 PERSONEN TREKKINGZELT Bedienungs und Sicherheitshinweise 2 PERSON HIKING TENT Operation and safety notes IAN 313762 ...

Страница 2: ... Instrucciones de utilización y de seguridad Página 5 IT MT Indicazioni per l uso e per la sicurezza Pagina 9 GB MT Operation and safety notes Page 13 DE AT CH Bedienungs und Sicherheitshinweise Seite 17 ...

Страница 3: ...A B 1 1x 3 2x 6 4x 1 1x 3 3 3 2x 2 1x 4 1x 7 4x 5 12x ...

Страница 4: ...D C E 4 4 1x 5 2 1x ...

Страница 5: ...utilizarse incluso en condiciones meteorológicas desfavorables por ej en caso de humedad o viento aunque no debe utilizarse en caso de situaciones climáticas extremas ni en la montaña Utilice la tienda interior únicamente junto con el doble techo o con otra protección adecuada Descripción de los componentes 1 Doble techo 2 Tienda interior 3 Varilla larga 4 Varilla corta 5 Piqueta 6 Viento 7 Viento...

Страница 6: ...les de la tienda en ningún momento quedan cubiertas Nunca deje a los niños sin vigilancia dentro de la tienda de campaña Medidas de seguridad relacionadas frente al fuego Para garantizar la seguridad durante la acampada deberá seguir estas reglas de sentido común No coloque aparatos calientes cerca de las paredes del techo o de las cortinas Tenga siempre en cuenta las indicaciones de seguridad de ...

Страница 7: ... tense los vientos 6 en exceso Al aumentar el viento pueden desgarrarse tanto el punto de fijación como las costuras de la tienda Tienda interior sin doble techo Advertencia La tienda interior y la malla no dis ponen de factor de protección UV Protéjase la piel Si utiliza la tienda interior sin el doble techo el agua de la lluvia accedería al interior a través de la ven tana Utilice la tienda inte...

Страница 8: ...da un aerosol impregnador regularmente disponible en tien das de bricolaje y tiendas especializadas Almacene el producto en un lugar seco y fresco Eliminación El embalaje está compuesto por materiales no con taminantes que pueden ser desechados en el centro de reciclaje local Para obtener información sobre las posibilidades de desecho del producto al final de su vida útil acuda a la administración...

Страница 9: ...o in caso di condi zioni atmosferiche gravose o in montagna Utilizzare la tenda interna soltanto insieme alla tenda esterna oppure con un altra protezione idonea Descrizione dei componenti 1 Tenda esterna 2 Tenda interna 3 Asta lunga 4 Asta corta 5 Picchetto 6 Tirante 7 Tirante corto Specifiche tecniche Dimensioni Tenda esterna ca 240 x 223 x 117cm L x L x A Tenda interna ca 210 x 120 x 108cm L x ...

Страница 10: ... i bambini nelle vicinanze di oggetti surriscaldati Lasciare liberi i passaggi Non bloccare i pas saggi con nessun oggetto Informarsi sulle avvertenze e le misure precau zionali locali contro gli incendi Montaggio della tenda All interno della custodia si trova un etichetta con un codice QR Facendo la scansione del codice QR è possibile visualizzare i dettagli relativi al montaggio del prodotto As...

Страница 11: ...nghe 3 del tetto nel canale del tetto in modo che risultino visibili nello stesso modo su entrambi i lati del canale Figura H 3 Spingere le aste lunghe 3 del tetto nel canale del tetto in modo che risultino visibili nello stesso modo su entrambi i lati del canale 4 Montare la tenda interna 2 e fissare le aste lunghe 3 ai tappi in plastica degli ancoraggi Figura I 5 Spingere le aste corte 4 nei can...

Страница 12: ...a locali per il riciclo E possibile informarsi circa le possibilità di smalti mento del prodotto usato presso l amministrazione comunale o cittadina Garanzia Il prodotto è stato prodotto secondo severe direttive di qualità e controllato con premura prima della con segna In caso di difetti del prodotto l acquirente può far valere i propri diritti legali nei confronti del venditore Questi diritti le...

Страница 13: ...but not designed for extreme or mountain con ditions Use the inner tent only under by a shelter covered Description of parts 1 Outer tent 2 Inner tent 3 Long pole 4 Short pole 5 Peg 6 Guy rope 7 Short guy rope Technical data Dimensions Outer tent dimension approx 240 x 223 x 117cm L x W x H Inner tent dimension approx 210 x 120 x 108cm L x W x H Water column 3000mm The outer tent fabric has an UPF...

Страница 14: ...is only assembled by people with the appropriate skills Note The polyester material of the outer tent consists of water repellent material It is possible that during the first rainfall the outer tent will not be completely watertight However the threads of the tent will contract when exposed to water so that after a short time the outer tent will become watertight Outer tent Inner tent Note The ou...

Страница 15: ...I 5 Run the fiberglass poles 4 through the hooks and fix into the plastic cap on the both end of the top of inner tent 2 6 And then tie up the poles 3 4 tightly with the strings at the top of the inner tent 2 Illustration J 7 Fix one side of the inner tent 2 in the ground with the tent pegs 5 Then take hold of the other end of the inner tent 2 and pull it apart in such a way that the tent is taut ...

Страница 16: ...f your worn out product Warranty The product has been manufactured to strict quality guidelines and meticulously examined before deliv ery In the event of product defects you have legal rights against the retailer of this product Your legal rights are not limited in any way by our warranty detailed below The warranty for this product is 3 years from the date of purchase Should this product show an...

Страница 17: ...n auch bei schlechtem Wetter z B feuchten und win digen Wetterbedingungen verwendet werden ist jedoch nicht für den Gebrauch bei extremen Wetter bedingungen oder in den Bergen geeignet Verwen den Sie das Innenzelt nur in Verbindung mit dem Außenzelt oder unter einem anderen geeigneten Schutz Teilebeschreibung 1 Außenzelt 2 Innenzelt 3 lange Stange 4 kurze Stange 5 Hering 6 Abspannleine 7 kurze Abs...

Страница 18: ...olgen Keine heißen Geräte in der Nähe der Wände des Daches oder der Vorhänge aufstellen Immer die Sicherheitsinstruktionen für diese Geräte beachten Niemals Kindern erlauben in der Nähe von heißen Geräten zu spielen Lassen Sie die Durchgänge frei Stellen Sie die Ausgänge nicht mit Gegenständen zu Erkundigen Sie sich nach den Einrichtungen und Vorkehrungen gegen Feuer auf dem Gelände Zelt aufbauen ...

Страница 19: ...t einreißen Innenzelt ohne Außenzelt Warnung Das Innenzelt und das Gewebe haben keinen UV Schutzfaktor Schütze Sie Ihre Haut Wenn Sie das Innenzelt ohne das Außenzelt verwenden kann Regenwasser durch die Stofffenster ins Innere eintreten Verwenden Sie das Innenzelt ohne das Außenzelt ausschließlich an einem warmen trocknenen und geschützten Ort und nur bei gutem Wetter Abbildung G 1 Legen Sie das ...

Страница 20: ...Bei häufiger Verwendung kann die Wasserdich tigkeit des Produkts negativ beeinflusst werden Sprühen Sie das Zelt daher regelmäßig mit einem Imprägnierspray im Baumarkt Fachhandel erhältlich ein Lagern Sie das Produkt an einem kühlen trockenen Ort Entsorgung Die Verpackung besteht aus umweltfreundlichen Materialien die Sie über die örtlichen Recycling stellen entsorgen können Möglichkeiten zur Ents...

Страница 21: ...G F H 7 5 6 2 1x 3 3 2x 3 ...

Страница 22: ...J I K 4 1x 5 ...

Страница 23: ...sbergstraße 1 DE 74167 Neckarsulm GERMANY Model No HG04765 Version 02 2019 Estado de las informaciones Versione delle informazioni Last Information Update Stand der Informationen 01 2019 Ident No HG04765012019 ES IAN 313762 ...

Отзывы: