


10
Congratulations on the purchase of this Crimson product! The product you now have in your posses-
sion is made of durable materials and is based on a design, every detail of which has been meticu-
lously thought-out. That is why Crimson AV LLC products are covered by a 10-year warranty against
defects in materials or manufacturing.
Crimson AV LLC disclaims any liability for modifications, improper installations, or installations over
the specified weight range. To the maximum extent permitted by law, Crimson AV LLC disclaims
any other warranties, expressed or implied, including warranties of fitness for a particular purpose
and warranties of merchantability. Crimson AV LLC will not be liable for any damages arising out of
the use of, or inability to use, Crimson AV LLC products. Crimson AV LLC bears no responsibility for
incidental or consequential damages. This includes, but is not limited to, any labor charges for the
repair of Crimson AV LLC products performed by anyone other than Crimson AV LLC.
Specifications are subject to change without prior notice.
¡Felicitaciones por su compra de este producto Crimson! Ahora tiene en su poder un pro-
ducto fabricado con materiales resistentes, basado en un diseño muy bien meditado. Por
ello, Crimson AV LLC responde de los posibles defectos de material o fabricación con una
garantía de 10 años.
Crimson AV LLC no se hace responsable de modificaciones, instalaciones inadecuadas
o instalaciones que superen el rango de peso especificado. En la medida en que la ley
lo permita, Crimson AV LLC no se hace responsable de ninguna otra garantía, expresa o
implícita, incluso las garantías de aptitud para un fin determinado o de comercialización.
Crimson AV LLC no se hace responsable de ningún tipo de daños causados por el uso
de los productos Crimson AV LLC o por el uso inapropiado de dichos productos. Crimson
AV LLC no es responsable de los daños incidentales o emergentes. Dentro de éstos se in-
cluyen todo tipo de gastos que pudieran surgir de las reparaciones de productos Crimson
AV LLC que no se hayan realizado en Crimson AV LLC.
Las especificaciones están sujetas a cambios sin previo aviso.
WARRANTY
GARANTÍA
`
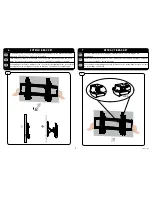
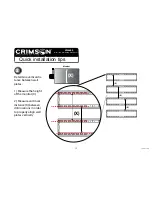
2.95"
Using a 6mm allen key, turn adjustment screw. Turn screw counterclockwise to adu-
jst screen out up to 2.95” and clockwise to retract screen.
Usando una llave Allen de 6 mm, gire el tornillo de ajuste. Gire el tornillo en sentido
antihorario para ajustar lateralmente la pantalla hasta 2.95 “
À l’aide d’une clé hexagonale de 6 mm, tournez la vis de réglage. Tournez la vis dans
le sens antihoraire pour ajuster latéralement l’écran jusqu’à 2,95”
10
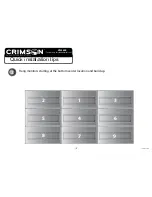
DEPTH ADJUSTMENT
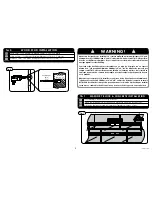
10
Only use 4V power drill or
less for adjustment screws
WARNING
!
!
VW4600G3-0002