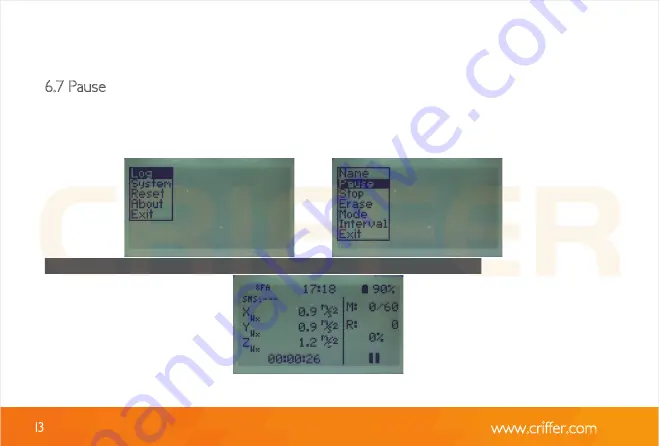
CRIFFER Vibrate Скачать руководство пользователя страница 13

13

www.criffer.com

6.7 Pause

The option “Pause” allows interrupting a measurement, if necessary. Press button 6 for 

3 seconds, select log by pressing button 6 again and then select pause by pressing 

button 6 to confirm.

When selecting pause, two dashes will be displayed on the screen.

6.21. Hand/Arm

6.22. Name

It allows creating an identification name for the sensor, which will be displayed in the assess-

ment report. To name the sensor, use buttons 4 and 5 to navigate between the letters of the 

same line, to change the line use button 3, to select the letter use button 6. To finish, select the 

empty space by pressing button 6 again.

6.23. Serial

This function allows you to enter the sensor’s serial number information. You can find the serial 

number in the document that comes with the sensor. Use buttons 4 and 5 to navigate between 

the numbers on the same line and change the line by using button 3, to select the number use 

button 6.

Содержание Vibrate

Страница 1: ...Operation Manual Vibrate Occupational Vibration Monitor ...

Страница 2: ...ferSuite 9 Downloading stored assessments 10 Assessment data 11 Opening an assessment saved on PC 12 About the instrument 13 Maintenance 14 Warranty term Table of contents 3 www criffer com 2 4 6 7 8 9 35 38 41 45 49 50 51 52 4 Display 5 Safety Information 6 Operation 7 Installing CrifferSuite 8 Operating CrifferSuite 7 8 9 35 38 ...

Страница 3: ...lting vibration dose value This product was developed to be simple and easy to operate however its applica tion involves risks and to avoid them it is important to READ THIS MANUAL THOROUGHLY Our expert technical support can assist you in case of doubts www criffer com 3 hygiene standards CrifferSuite software provides the necessary results for prepara tion of assessments studies and judicial expe...

Страница 4: ...ing Wk and Wd HAV Frequency weighting Wh Measurement parameters RMS VDV Aeq Am Amr Amep Are Aren A 8 Arep and Crest Factor Overload indication Calibration through sensitivity or with external calibrator High resistance to EMI RFI Displays battery percentage 0 to 100 4 www criffer com Hand arm vibration measurements with triaxial accelerometer and adapters Resolution 0 01 m s WBV Frequency weightin...

Страница 5: ...wer Supply 3 7V 1800mAh rechargeable li ion battery Battery Life 9h Charger bi volt with USB connection and USB Interface Dimensions 90 x 62 x 24 mm Weight 125g HAV accelerometer weight 25g WBV accelerometer weight 180g 2 2 Includes HAV accelerometer HAV accelerometer accessories T bar and block adapters WBV accelerometer Carrying case and USB cable Allen wrench Fixing screw 5 www criffer com ...

Страница 6: ...back sides 1 Accelerometer input 2 Display 3 On off 4 Increment button 5 Decrement button 6 Selection confirm button 7 USB input 8 Wearing clip www criffer com br 3 Description 7 www criffer com 6 3 2 3 4 1 5 6 8 ...

Страница 7: ...ighting 17 X axis weighting 18 Sensor disconnected 19 Type of sensor 20 Time weighting 21 Registry mode 22 Instantaneous acceleration value 23 Time www criffer com br 4 Display description www criffer com 7 10 11 12 16 17 15 18 19 23 21 20 22 9 14 13 Record Pause Stop Indicator 14 Assessment Duration 15 Z axis weighting 16 Y axis weighting 17 X axis weighting 10 11 12 16 17 15 18 ...

Страница 8: ...ct so Vibrate does not require complete charge cycles Note The charging time for the full battery charge is 6 hours The instrument must never be exposed to high temperatures which may cause defini tive damage or even the explosion Note The charging time for the full battery charge is 6 hours The instrument must never be exposed to high temperatures which may cause defini tive damage or even the ex...

Страница 9: ...brate follow these procedures 6 1 Before starting the Vibrate operation the instrument must be loaded with the bi volt charger Plug the charger into a wall outlet 110 220V with the mini USB cable 7 Note DO NOT charge Vibrate at hazardous areas 7 ...

Страница 10: ... following screen will be displayed Device s name Vibrate Manufacturer Criffer Firmware version V 5 14 Date month day year After turning the instrument on the following screen will be displayed 10 www criffer com Firmware version V 5 14 Date month day year ...

Страница 11: ... the following options Assessment system reset about and exit 6 4 Log The option log allows naming the assessment starting stopping deleting selecting mode setting logging intervals and exit 6 4 Log The option log allows naming the assessment starting stopping deleting selecting mode setting logging intervals and exit ...

Страница 12: ...e line use button 3 to switch between lines to enter a letter press button 6 To finish it select the blank space in the last line and confirm by pressing button 6 6 6 Start Press the option start to start data logging A circle will be displayed indicating the device is data logging 6 6 Start Press the option start to start data logging A circle will be displayed indicating the ...

Страница 13: ...hen select pause by pressing button 6 to confirm When selecting pause two dashes will be displayed on the screen number in the document that comes with the sensor Use buttons 4 and 5 to navigate between the numbers on the same line and change the line by using button 3 to select the number use button 6 When selecting pause two dashes will be displayed on the screen ...

Страница 14: ...ent press button 6 for three seconds Select Log by pres sing button 6 again Select resume by pressing button 4 and 5 Press button 6 again to confirm it The measurement will be resumed A circle will display on screen indicating the device is data logging ...

Страница 15: ...top To end the measurement press button 6 for three seconds Select log by pressing button 6 again Select stop and press button 6 to confirm When pressing stop the screen displays a square to indicate the measurement conclusion ...

Страница 16: ...16 www criffer com 6 10 Erase This function deletes all the stored data NOTE Once you click on Erase all data will be lost and cannot be recovered ...

Страница 17: ...ual see item 21 on display descrip tion 6 12 Intervals It allows configuring data logging interval on minutes from 0 to 20min or seconds from 0 to 59s use buttons 4 and 5 to change the values confirm it by pressing button 6 www criffer com 6 12 Intervals It allows configuring data logging interval on minutes from 0 to 20min or seconds from 0 to 59s use buttons 4 and 5 to change the values confirm ...

Страница 18: ... to main screen by pressing Exit 6 14 System This function allows setting the sensor time weighting language date time screen and beep 6 14 System This function allows setting the sensor time weighting language date time screen and beep ...

Страница 19: ...criffer com 6 15 Sensor Use this function to select the plugged sensor which can be HAV WBV or Palm V Glove You can also select the 8k Test for gauging with external calibrator CR 1 CR 1 is supplied separately ...

Страница 20: ...e line use button 3 to select the letter press button 6 To finish it select the empty space by pressing button 6 again 6 17 Name It allows creating an identification name for the sensor which will be displayed in the assessment report To name the sensor use buttons 4 and 5 to navigate between the letters of the same line to change the line use button 3 to select the letter press button 6 To finish...

Страница 21: ... the sensitivity present in the calibration certificate of HAV 00 0 and WBV 000 0 axes Adjust sensitivity by using buttons 4 and 5 to increase or decrease the displayed value To advance to the next parameter use button 6 Repeat the procedure for all axes 6 20 Return Return to the main menu 6 19 Sensitivity It allows to inform the sensitivity present in the calibration certificate of HAV 00 0 and W...

Страница 22: ... same line to change the line use button 3 to select the letter use button 6 To finish select the empty space by pressing button 6 again 6 22 Name It allows creating an identification name for the sensor which will be displayed in the assess ment report To name the sensor use buttons 4 and 5 to navigate between the letters of the same line to change the line use button 3 to select the letter use b...

Страница 23: ...s informing the sensitivity present in the calibration certificate of the HAV acce lerometer Adjust sensitivity by using buttons 4 and 5 to increase or decrease the displayed value To advance to the next parameter use button 6 Repeat the procedure for all axes 6 24 Sensitivity It allows informing the sensitivity present in the calibration certificate of the HAV acce lerometer Adjust sensitivity by...

Страница 24: ...een the letters of the same line to change the line use button 3 to select the letter use button 6 To save it select the empty space by pressing button 6 again 6 26 Palm 6 27 Name It allows creating an identification name for the sensor which will be displayed in the assessment report To name the sensor use buttons 4 and 5 to navigate between the letters of the same line to change the line use but...

Страница 25: ...itivity value informed in the calibration certificate of the HAV accelerometer Adjust sensitivity by using buttons 4 and 5 to increase or decrease the displayed value To advance to the next parameter press button 6 Repeat the proce dure for all axes 6 29 Sensitivity It allows setting the sensitivity value informed in the calibration certificate of the HAV accelerometer Adjust sensitivity by using ...

Страница 26: ...rn to the main menu 6 31 Time Weighting This function allows setting Time Weighting between Fast and Slow Use buttons 4 and 5 to select an option and press button 6 to confirm it and 5 to select an option and press button 6 to confirm it ...

Страница 27: ...he Vibrate Use buttons 4 and 5 to change the values press button 6 to confirm it Repeat the procedure for all parame ters The screen will return to the previous menu by finishing the adjustment 6 33 Date and time This function allows to adjust date and time of the Vibrate Use buttons 4 and 5 to change the values press button 6 to confirm it Repeat the procedure for all parame ters The screen will ...

Страница 28: ...just the contrast 6 35 Beep Activate or deactivate beep by using buttons 4 and 5 to navigate in the menu and confirm it by pressing the button 6 Use buttons 4 and 5 to switch between the options on off use button 6 to confirm it 6 35 Beep Activate or deactivate beep by using buttons 4 and 5 to navigate in the menu and confirm it by pressing the button 6 Use buttons 4 and 5 to switch between the op...

Страница 29: ...measurement 6 37 About Select about to see the following device s information device s name firmware s version and date and Criffer s website 6 37 About Select about to see the following device s information device s name firmware s version and date and Criffer s website ...

Страница 30: ...nds select the option System with button 6 and then select the option Sensor by using button 6 Change the sensor type by using buttons 4 and 5 to alternate between the options and confirm it by pressing button 6 Select the option Sensitivity by using buttons 4 and 5 and confirm it by pressing button 6 Press buttons 4 and 5 to increase or decrease the sensitivity value To advance to the next parame...

Страница 31: ...g button 6 again If you want to name the measurement before starting just select Name and follow the steps in item 6 27 of this manual Select Auto by following the steps of item 6 11 To start data logging select Start by pressing button 6 The display 2 will show a circle 13 confirming that the measurement has started The records will be stored according to the configured interval time ...

Страница 32: ...n 6 for three seconds Select Log by pres sing button 6 again Select resume by pressing button 4 and 5 Press button 6 again to confirm it The measurement will be resumed A circle will display on screen to inform the instrument is data logging again 6 43 Resume data logging To resume the measurement press button 6 for three seconds Select Log by pres sing button 6 again Select resume by pressing but...

Страница 33: ...g button 6 If you want to name the measurement before starting select Name and follow the steps in item 6 27 of this manual Select Manual by following the steps of item 6 11 Select Start by pressing button 6 The main screen will be displayed press button 6 again to start data logging The screen will display a circle 13 to confirm the measure ment has started NOTE Every datalog must be done manuall...

Страница 34: ... the instrument is currently measuring Follow the same steps to save more measurements 6 48 Finishing an assessment Press button 6 for 3 seconds select Log by pressing button 6 again Use button 4 and 5 to navigate between the options and press button 6 again to select Stop A square 13 will be displayed on the screen to indicate the assessment was finished 6 48 Finishing an assessment Press button ...

Страница 35: ...www criffer com 35 7 Installing CrifferSuite 7 1 To start the Criffer Suite installation click on next ...

Страница 36: ...om 36 7 2 On this window it s possible to choose the folder for saving the program files 7 3 Click on Browse to select a different folder from the default one to save the files Click on next to continue the process ...

Страница 37: ...7 4 Finishing Installation To finish the installation just click on Finish You are now ready to download your measurements and create your Vibrate reports 37 www criffer com ...

Страница 38: ...38 www criffer com 8 Operating Criffer Suíte On the software home screen you have the option of File About Exit and Search for Instruments ...

Страница 39: ...y the Vibrate connected to the computer It also displays the serial number and firmwa re version Select the instrument connected to the computer with a click A new window will appear with the tests stored in memory and the button to configure Vibrate Vibrate must be turned on to download the measurements ...

Страница 40: ...40 www criffer com Click on Configure to access the window where you can configure data logging intervals and clear memory ...

Страница 41: ... assessment www criffer com 41 Click on the Search for Instruments button on the Available Instruments field it will display the Vibrate connected to the computer the serial number and firmware version www criffer com ...

Страница 42: ...www criffer com 42 Select the instrument with one click It will display a new window with the assess ments stored in memory To save the assessment select the one you want and then click on Accept ...

Страница 43: ... to save the measurement After selecting the destination folder click on save it will ask you to inform the time of exposure to vibration Click on next to proceed it will display the measured values The Vibrate software makes it possible to combine assessments of different datalogs ...

Страница 44: ...ones you want and then click on Accept A window will open to select the folder of destination Select the destination folder and click on save another window will be displayed for filling the exposure time of each component To display the results click on next www criffer com 44 ...

Страница 45: ...rial number sensitivity K factor and weighting of axes The measurement results are displayed on the left side of the software which are Are Aren FC VDVexp X VDVexp Y VDVexp Z and the VDVR It also has a field to inform the workday of the worker evaluated In the central part of the screen are displayed the time of each record the recor ding interval the acceleration of each axis the resulting averag...

Страница 46: ...www criffer com 46 ...

Страница 47: ...igure the customizab le report information This window see image below allows you to fill the information you need to show on your report such as parameters certificate of calibrations client company s name worker s name and department identification company s name perfor med by evaluator and registry number logo and observations ...

Страница 48: ...www criffer com 48 12 Opening a saved assessment To open a measurement saved on the computer click on Open and select the vib file you want to view ...

Страница 49: ...49 www criffer com 13 About It displays the software version information ...

Страница 50: ...the consistency on the instrument s response If it is found any abnormality on its operation contact our Technical Support on the phone 55 51 3081 6675 or call authorized distributor in your region It is advisable that the periodicity of the calibration certification is annual For more information about the service contact Criffer by sending an e mail to sales criffer com or call authorized distri...

Страница 51: ...14 Warranty term This product has 1 one year of warranty which can be extended up to 3 three years check the extended warranty certificated 52 www criffer com ...

Страница 52: ...www criffer om br c ...

Отзывы: