background image

Crestron 

TPS-4500IMW


Wall-Mounted Interface Module


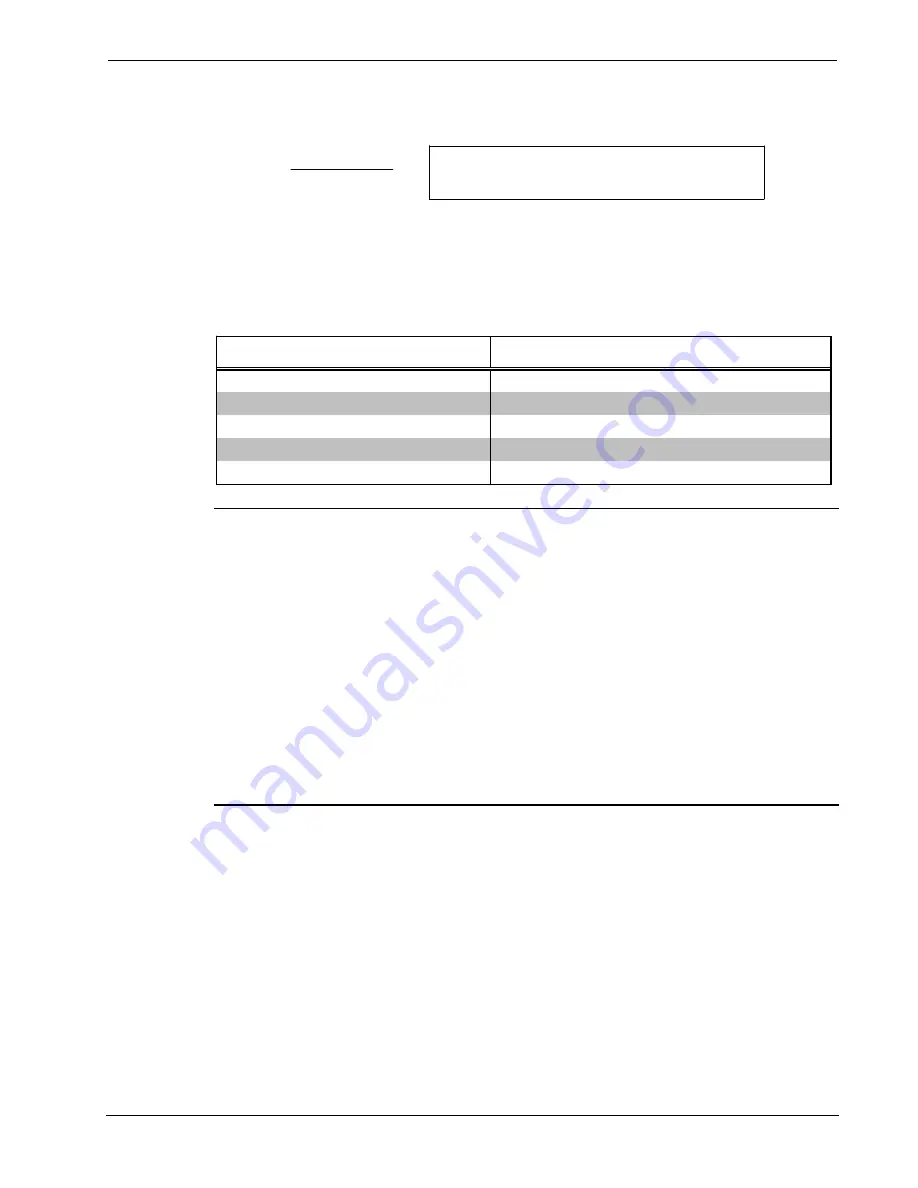
Resistance Equation 

R  =  Resistance (refer to following table).

L   =  Length of run (or chain) in feet.

LF = Load factor of entire run (or chain).

R  < L x LF

40,000

Where:


The required wire gauge should be chosen such that the resistance value 
is less than the value calculated in the resistance equation. Refer to the 
table after this paragraph. 

Wire Gauge Values 

RESISTANCE (R)

WIRE GAUGE

4

16

6

18

10

20

15

22

13

24 (Doubled-CAT 5)


NOTE:

  All network wiring must consist of two twisted-pairs. One 

twisted pair is the +24V conductor and the GND conductor and the other 
twisted pair is the Y conductor and the Z conductor.  

NOTE:  

When daisy chaining network units, always twist the ends of the 

incoming wire and outgoing wire which share a pin on the network 
connector. After twisting the ends, tin the twisted connection with solder. 
Apply solder only to the ends of the twisted wires. Avoid tinning too far 
up or the tinned end becomes brittle and breaks. After tinning the twisted 
ends, insert the tinned connection into the network connector and tighten 
the retaining screw. Repeat the procedure for the other three network 
conductors. 

Hardware Hookup 

Connections to the Back of the TPS-4500IMW 

The TPS-4500IMW serves as an optional interface between the 
touchpanel and the Cresnet system. Refer to the illustration after this 
paragraph for proper connections; apply power last. When making 
network connections to the CNX Generation control system or Cresnet 
peripherals, refer to "Network Wiring" on page 4 for details. It is not 
necessary to make connections to a video source unless the TPS-VID has 

Operations Guide - DOC. 5913 

Wall-Mounted Interface Module:  TPS-4500IMW  

  5 

Содержание TPS-4500IMW

Страница 1: ...Crestron TPS 4500IMW Wall Mounted Interface Module Operations Guide...

Страница 2: ...This document was prepared and written by the Technical Documentation department at Crestron Electronics Inc 15 Volvo Drive Rockleigh NJ 07647 1 888 CRESTRON...

Страница 3: ...Description 1 Physical Description 1 I O Ports 1 Leading Specifications 4 Setup 4 Network Wiring 4 Hardware Hookup 5 Problem Solving 9 Troubleshooting 9 Further Inquiries 9 Future Updates 10 Return a...

Страница 4: ......
Страница 5: ...with a decora wallplate not supplied so that the unit blends into any setting Physical Description The TPS 4500IMW shown on the next page is an option can be purchased separately The unit mounts into...

Страница 6: ...l Views of the TPS 4500IMW Front with Insert Plate Side and Back 2 505 in 6 363 cm CRESTRON TPS 4500IMW NET 75 Ohm INPUT INPUT GROUND 1 485 in 3 772 cm COMP 4 273 in 10 853 cm Y 24 Y C Z G 2 Wall Moun...

Страница 7: ...nector is used to connect to other four wire devices in the Cresnet system If making network connections to Cresnet peripherals refer to Network Wiring on page 4 for details NET VIDEO This 10 position...

Страница 8: ...r to the latest revision of the Cresnet Network Interconnect Drawing Doc 5411 The document can be obtained from the Downloads page CABLES and MANUAL Libraries of the Crestron website www crestron com...

Страница 9: ...ire which share a pin on the network connector After twisting the ends tin the twisted connection with solder Apply solder only to the ends of the twisted wires Avoid tinning too far up or the tinned...

Страница 10: ...TWISTED PAIR CABLE DEPENDING ON THE OPTION THE TWO JUMPERS ON THE NTSC PAL VIDEO FOUR PIN CONNECTOR REMAIN ATTACHED AS SHOWN OR ARE REMOVED CONNECT TO VIDEO SOURCE C NOTE If there is no video source...

Страница 11: ...s installed into the electrical box as shown after this paragraph Use the orientation of the RJ45 connector as a guide Secure the TPS 4500IMW to the electrical box with the two 6 32 flat head slotted...

Страница 12: ...reened insert plate supplied Affix the insert plate into the opening in the decora wallplate Refer to the diagram after this paragraph for the proper orientation of the insert plate with respect to th...

Страница 13: ...pplied to the network Touchpanel is not responding Incorrect network wiring Touch screen to remove message and verify correct wiring to all connectors Further Inquiries If after reviewing this Operati...

Страница 14: ...es are solely electronic and serve as intermediary supplements prior to the release of a complete technical documentation revision Check the Crestron website www crestron com periodically for manual u...

Страница 15: ...ered This warranty extends to products purchased directly from CRESTRON or an authorized CRESTRON dealer Purchasers should inquire of the dealer regarding the nature and extent of the dealer s warrant...

Страница 16: ...Crestron Electronics Inc Operations Guide DOC 5913 15 Volvo Drive Rockleigh NJ 07647 02 01 Tel 888 CRESTRON Fax 201 767 7576 Specifications subject to www crestron com change without notice...

Отзывы: