2
quickstart guide
PT-AMFMXM
PT-AMFMXM
QUICKSTART DOC. 6963B (2027132) 07.10
Radio Tuner
www.crestron.com/prodigy
888.273.7876
201.767.3400
©2010 Specifications subject to
change without notice.
All brand names, product names, and trademarks
are the property of their respective owners.
5
The following table provides corrective action for possible trouble situations. If further
assistance is required, please contact a Crestron customer service representative.
Problem Solving
Further Inquiries
If you cannot locate specific information or have questions after reviewing this guide,
please take advantage of Crestron's award winning customer service team by calling
Crestron at 1-888-CRESTRON [1-888-273-7876].
You can also log onto the online help section of the Crestron website
(www.crestron.com/onlinehelp) to ask questions about Crestron products. First-time
users will need to establish a user account to fully benefit from all available features.
Future Updates
As Crestron improves functions, adds new features and extends the capabilities of the
PT-AMFMXM, additional information may be made available as manual updates. These
updates are solely electronic and serve as intermediary supplements prior to the release
of a complete technical documentation revision.
Check the Crestron website periodically for manual update availability and its relevance.
Updates are identified as an “Addendum” in the Download column.
Troubleshooting
TROUBLE
POSSIBLE CAUSE(S)
CORRECTIVE ACTION
Tuner muted.
Antenna not connected or not
connected properly.
Connect antenna according to instructions.
The XM Tuner is not activated.
Follow instructions on page 1.
Receiving only XM
Channels 0 and 1.
Improper antenna connection.
Verify proper antenna connection.
Noisy AM/FM
reception.
For Regulatory Compliance information, refer to the latest
version of Doc. 6964.
Improper Net ID.
Verify Net ID matches Net ID in the Prodigy
Composer.
NET
LED does not
illuminate.
Either connect or remove chassis ground
(
G
) connection.
Hum or buzz in
audio.
Grounding problem.
3
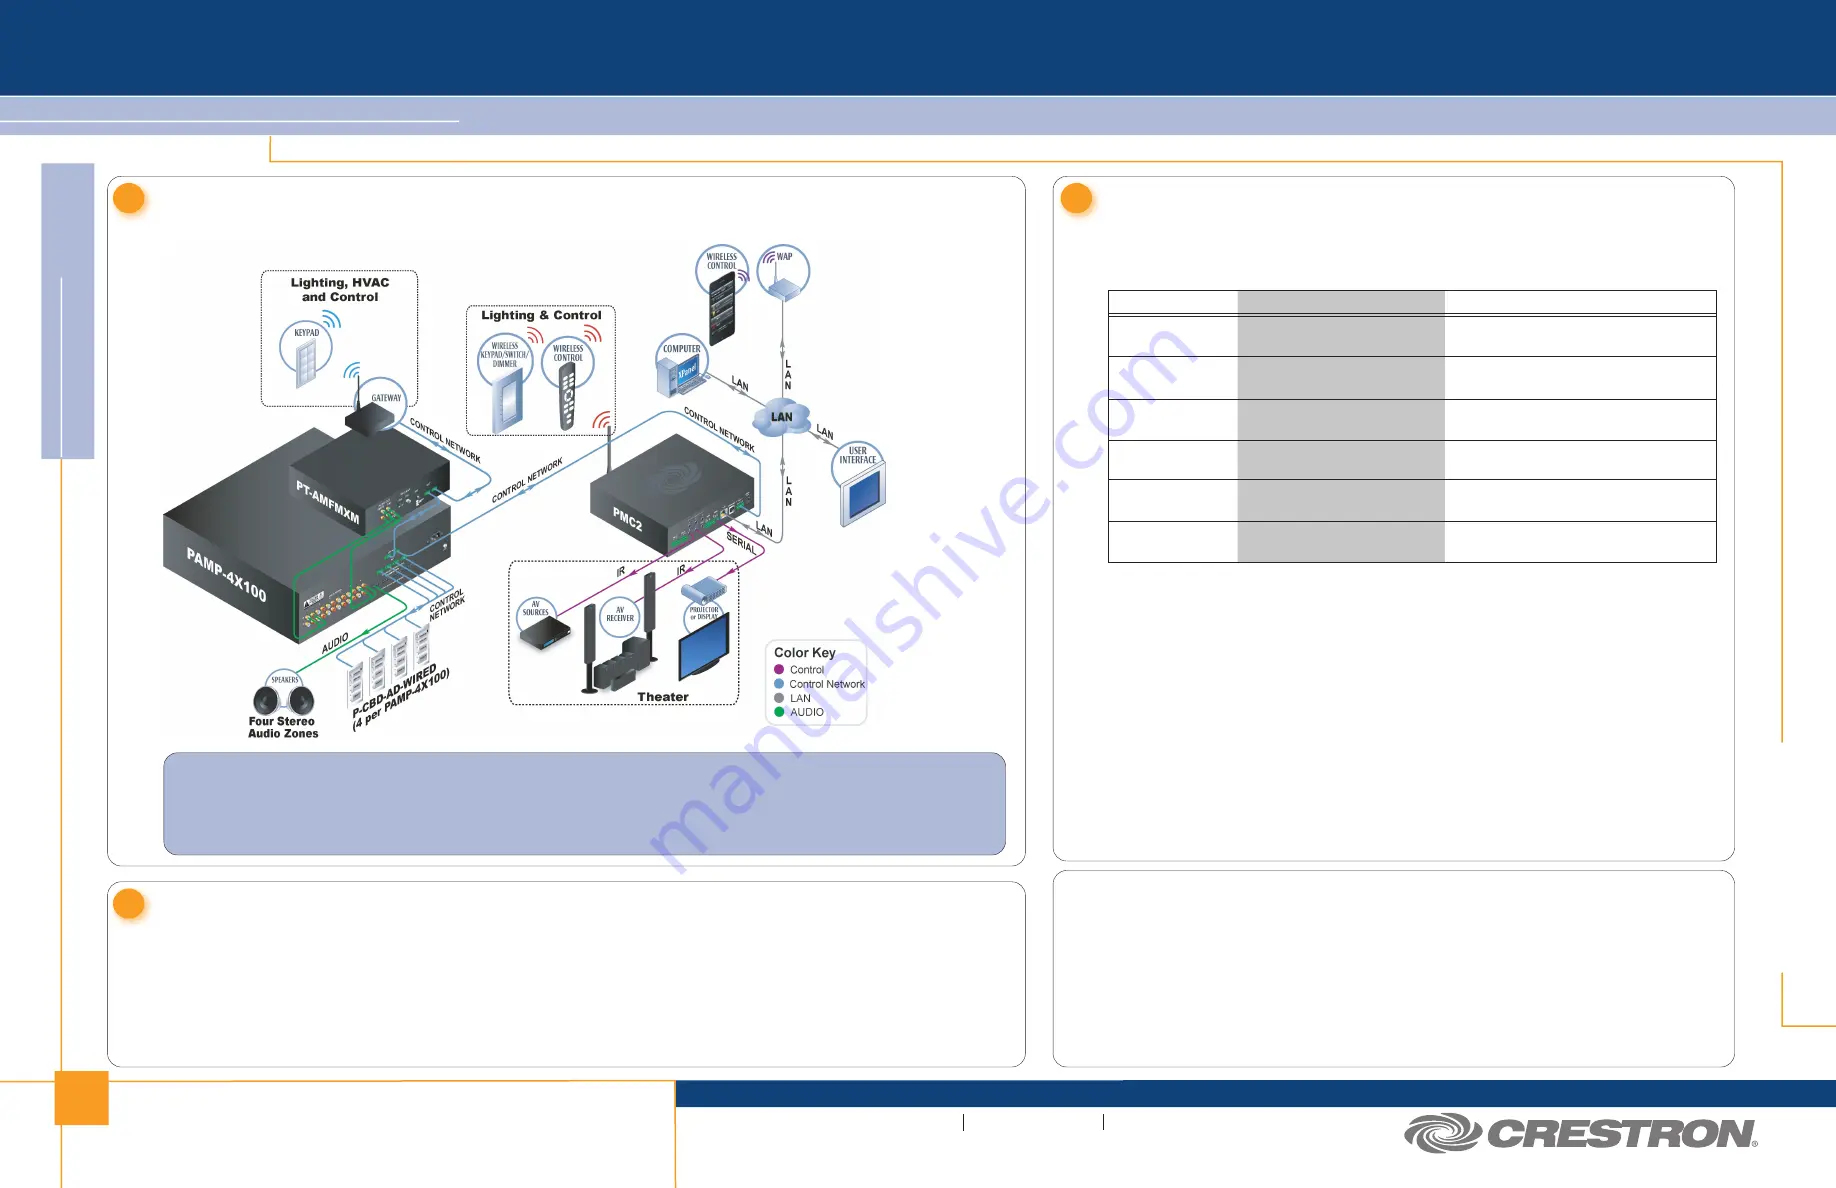
Application
The following diagram illustrates a PT-AMFMXM in a system with other Prodigy devices.
NOTE:
Use the Prodigy Composer software (available for download from www.crestron.com/prodigycomposer) to configure
your Prodigy system. A Prodigy Network Setup Wizard is included with Prodigy Composer. Before a PT-AMFMXM can be
used, it must first be integrated into a Prodigy system. Launch the Prodigy Network Setup Wizard and follow the steps in the
process. When the PT-AMFMXM is recognized, the front panel will instruct you to push a button. Press any button on the
front panel of the PT-AMFMXM to complete the process.
AM/FM scan does
not operate.
Station signal strength too weak. Check antenna placement and orientation
for good signal strength.
Notes on XM Radio
It is prohibited to copy, decompile, disassemble, reverse engineer, or manipulate any technology incorporated in
receivers compatible with the XM Satellite Radio system. Furthermore, the AMBE
®
voice compression software
included in this product is protected by intellectual property rights including patent rights, copyrights, and trade secrets
of Digital Voice Systems, Inc. The user of this or any other software contained in an XM Radio is explicitly prohibited
from attempting to copy, decompile, reverse engineer, or disassemble the object code, or in any other way convert the
object code into human-readable form. The software is licensed solely for use within this product.
Hardware and required basic monthly subscription sold separately. Installation costs and other fees and taxes,
including a one-time activation fee may apply. Subscription fee is consumer only. All fees and programming subject to
change. Subscriptions subject to Customer Agreement available at xmradio.com. Only available in the 48 contiguous
United States. ©2010 XM Satellite Radio Inc. All rights reserved.
4
Tuning/Presets
To tune and store a preset station:
1. Select a tuner by pressing
AM
,
FM
or
XM
.
2. Press
j
or
k
to tune a station.
3. Press
MENU
.
4. Press
j
or
k
until
Presets
is displayed.
5. Press
ENTER
to display the list of presets.
6. Press
j
or
k
until the desired preset location is displayed.
7. Press and hold
ENTER
for three seconds until the
Saving Preset
message is displayed.


