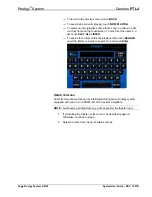
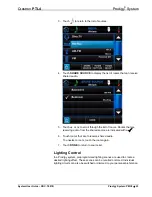
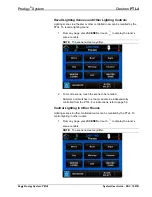
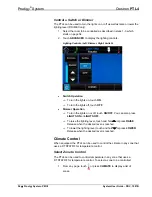
background image

Prodigy

®

 System 


Crestron 

PTL4


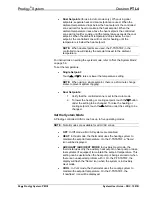
Dual Setpoints

 (for use in 

Auto

 mode only): When using dual 

setpoints, separate heat and cool setpoints are used. When the 
ambient temperature drops below the heat setpoint, the controlled 
zone will call for heat to maintain the heat setpoint. When the 
ambient temperature rises above the heat setpoint, the controlled 
zone will not call for cooling until the temperature exceeds the cool 
setpoint. When the ambient temperature drops below the cool 
setpoint, the controlled zone will not call for heating until the 
temperature is below the heat setpoint. 

NOTE:

  When dual setpoints are used, the P-TSTATRF in the 

controlled zone will display the setpoint closest to the ambient 
temperature.  

For instructions on setting the system mode, refer to “Set the System Mode” 
on page 58. 

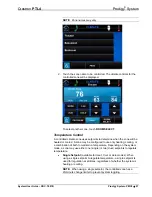
To set the temperature: 


Single Setpoint: 

Touch 

or 

j

 to raise or lower the temperature setting. 

NOTE:

  When using a single setpoint, there is a 20-minute change 

limiter to prevent system toggling. 


Dual Setpoints: 

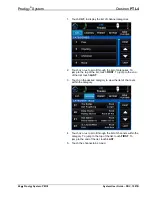
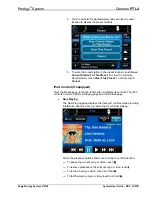
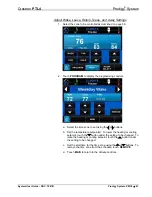
1.  Verify that the controlled zone is set to the 

Auto

 mode. 

2.  To lower the heating or cooling setpoint, touch the 

j

 button 

under the setting to be changed. To raise the heating or 
cooling setpoint, touch the 

button under the setting to be 

changed. 

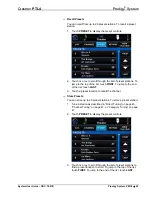
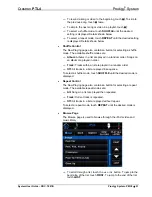
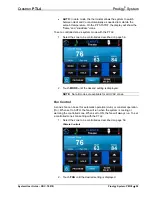
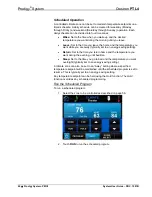
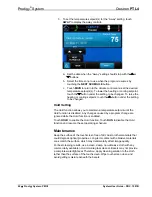
Set the System Mode  

A Prodigy-controlled HVAC zone has up to five operating modes: 

NOTE:  

Not all modes are available for all HVAC zones. 


OFF

: In 

Off

 mode, all HVAC systems are disabled.  


HEAT

: In 

Heat

 mode, the thermostat uses the heating system to 

maintain the setpoint temperature. On the P-TSTATRF, a “flame” 
icon will be displayed. 


AUXILIARY (AUX) HEAT MODE

: In 

Auxiliary Heat

 mode, the 

thermostat uses only the auxiliary heat output on heat pump or dual-
fuel systems (if equipped) to maintain the setpoint temperature. This 
setting can be useful when the heat pump is being serviced or when 
there is an unexpected problem with it. On the P-TSTATRF, the 
display will flash the “flame” icon when the system is in 

Auxiliary 

Heat

 mode.  


COOL

: In 

Cool

 mode, the thermostat uses the cooling system to 

maintain the setpoint temperature. On the P-TSTATRF, the 
“snowflake” icon will be displayed. 

58  

  Prodigy System: PMC2 

System User Guide – DOC. 7007B 

Содержание Prodigy System

Страница 1: ...Prodigy System User Guide ...

Страница 2: ...n by the Technical Documentation department at Crestron Electronics Inc 15 Volvo Drive Rockleigh NJ 07647 1 888 CRESTRON All brand names product names and trademarks are the property of their respective owners 2010 Crestron Electronics Inc ...

Страница 3: ... Controls 24 Control Lighting in Other Rooms 25 Store a Scene 26 Control a Switch or Dimmer 26 Whole House Lighting 28 Climate Control 28 Select Zone to Control 28 Temperature Control 29 Set the System Mode 30 Fan Control 32 Scheduled Operation 32 Hold Setting 34 Maintenance 34 Battery 34 Cleaning 34 PTL4 Prodigy 3 6 Wall Mount Touchpanel 36 Touchscreen Navigation 36 Function Buttons 37 General Co...

Страница 4: ...ces 79 Lighting Control 81 Recall Lighting Scenes and Other Lighting Controls 81 Control Lighting in Other Rooms 81 Store a Scene 83 Control a Switch or Dimmer 84 Climate Control 85 Select Zone to Control 85 Temperature Control 86 Set the System Mode 87 Fan Control 88 Scheduled Operation 89 Hold Setting 91 Crestron XPanel 92 General Controls 92 The Home Page 92 Power Control 92 Media Controls 93 S...

Страница 5: ...4 Scan Tuning AM and FM Bands Only 124 Category Tuning XM Only 125 Store Recall Presets 125 Display Station Information 125 Advanced Features XM Band 125 PAMP 4X100 Processor Amplifier 127 Turn the Amplifier On or Off 127 Select a Source 127 Select a Room 127 Volume Control Mode 128 P DIMEX Prodigy Single Button Wireless Dimmer and P SWEX Prodigy Single Button Wireless Switch 129 Control a Dimmer ...

Страница 6: ...Prodigy System Crestron Problem Solving 137 Troubleshooting 137 Further Inquiries 137 iv Contents System User Guide DOC 7007B ...

Страница 7: ...n your house or any place on the planet Keep all your music movies lights thermostats and security at your fingertips wherever you are and wherever you go You are always in touch and in control with Prodigy Just a simple tap of your finger brings you comfort convenience and pleasure If you have any questions while reviewing this user guide please contact your Crestron Prodigy Dealer To download th...

Страница 8: ...BD AD and P CBD AD WIRED keypads are used to listen to and control distributed audio in rooms connected to a Prodigy system Information on using these keypads begins on pages 120 and 122 respectively PT AMFMXM Radio Tuner optional The Radio Tuner PT AMFMXM provides simultaneous output of received AM FM and XM signals to the Prodigy system Information on using the PT AMFMXM begins on page 124 PAMP ...

Страница 9: ...STATRF Prodigy Wireless Thermostat optional The P TSTATRF is used to control climate in a zone controlled by a Prodigy system Information on using the P TSTATRF begins on page 134 System User Guide DOC 7007B Prodigy System PMC2 3 ...

Страница 10: ...lay system information The upper right corner of the touchpanel has a battery indicator showing available battery life When the battery indicator shows a low battery level place the PTX3 in its included docking station charger to recharge the battery Keypad The PTX3 has three soft buttons beneath the touchpanel that are programmed to perform the function shown on the display above A button on the ...

Страница 11: ... equipped and climate if equipped Press HOME to display the Home page Power Control The last selected device can be turned on or off with the power control NOTE If a device is active in another room i e the iPod source is on in the theater and another audio room using the power control will only affect the audio output in the controlled room To turn the last selected device on or off press the but...

Страница 12: ...fer to Room Selection if equipped on the following page NOTE The devices shown may differ from your system 2 Touch a device name to select a source for control If the system receiver is equipped with a tuner press the button on the side of the remote labeled MORE to display the receiver s tuner controls NOTE If your system is equipped with a PT AMFMXM Radio Tuner touch AM FM or XM from the device ...

Страница 13: ...CT to display a list of rooms controlled by the Prodigy system 2 Touch the room to be controlled Watch TV if equipped From the Media page touch the button for the cable or satellite receiver to display a list of preset stations The buttons located beneath the display can be used to control volume change channels and operate a DVR if equipped System User Guide DOC 7007B Prodigy System PMC2 7 ...

Страница 14: ...et station touch the preset To store a preset station 1 Touch and hold the preset to be stored for approximately five seconds 2 If desired touch on a channel icon to be displayed in the list of presets The default channel name and number will be displayed when an icon is selected Scroll through the list of available icons by pressing the or buttons on the 5 way Navigation Pad To clear an icon touc...

Страница 15: ...h the name of the preset and touch ENTER 7 Touch DONE to save the preset To directly access a channel with a numeric keypad press the button on the side of the remote until a numeric keypad is displayed Watch a Movie if equipped 1 From the Media page touch the button of the playback device to be controlled 2 Use the transport and menu controls to operate the playback device System User Guide DOC 7...

Страница 16: ...ons The AM FM tuner can tune stations manually scan through the band and store recall preset stations Manual Tuning 1 Press the button on the side of the remote labeled MORE to display the manual tuning controls 2 Touch FM or AM to select the FM or AM band 3 Touch SEARCH to select the Manual Tuning mode button is black 10 Prodigy System PMC2 System User Guide DOC 7007B ...

Страница 17: ...an Tuning 1 Press the button on the side of the remote labeled MORE to display the manual tuning controls 2 Touch FM or AM to select the FM or AM band 3 Touch SEARCH to select the Scan Tuning mode button is blue 4 To scan down to the next received station touch j To scan up to the next received station touch k System User Guide DOC 7007B Prodigy System PMC2 11 ...

Страница 18: ...s 2 Touch FM or AM to select the FM or AM band 3 Press or buttons on the 5 way Navigation Pad to scroll through the list of preset stations 4 Touch on a preset location to recall the station Store Presets You can store up to 20 AM and 20 FM preset stations To store a preset station 1 Tune a station as described in Manual Tuning on page 10 or Scan Tuning on page 11 12 Prodigy System PMC2 System Use...

Страница 19: ...he list of preset stations to find a preset location to store 4 Touch and hold for approximately two seconds a preset station to display the preset controls 5 To store the tuned station in the preset location touch SAVE CURRENT STATION TO THIS PRESET To clear the currently stored station touch CLEAR THIS PRESET To cancel touch CANCEL System User Guide DOC 7007B Prodigy System PMC2 13 ...

Страница 20: ...e recall preset stations Direct Tuning Use Direct Tuning if you know the channel number you want to tune 1 Press the button on the side of the remote labeled MORE to display the keypad controls 2 Touch the channel number on the numeric keypad and touch ENTER 14 Prodigy System PMC2 System User Guide DOC 7007B ...

Страница 21: ...ols are displayed 2 Touch SETUP to display the channel lineup 3 Press or buttons on the 5 way Navigation Pad to scroll through the list of channels 4 Touch the channel to be hidden or unhidden Channels that are hidden are indicated as such 5 Touch HIDE to hide or unhide the channel from the channel lineup 6 Touch BACK to return to the keypad controls System User Guide DOC 7007B Prodigy System PMC2...

Страница 22: ...ew other information about each channel s content touch DISPLAY 2 Press or buttons on the 5 way Navigation Pad to scroll through the list of channels 3 Touch the channel to be tuned Category Tuning Use Category Tuning to view channels within a category 1 Press the button on the side of the remote labeled MORE until the list of channel categories is displayed 16 Prodigy System PMC2 System User Guid...

Страница 23: ...the 5 way Navigation Pad to scroll through the list of channels within the category 5 Touch the channel to be tuned Recall Presets You can recall from up to 20 preset stations To recall a preset station 1 Press the button on the side of the remote labeled MORE until the preset controls are displayed To view other information about each preset s content touch DISPLAY System User Guide DOC 7007B Pro...

Страница 24: ...s described in Direct Tuning on page 14 Channel Tuning on page 16 or Category Tuning on page 16 2 Press the button on the side of the remote labeled MORE until the preset controls are displayed 3 Press or buttons on the 5 way Navigation Pad to scroll through the list of preset stations to find a preset location to store 4 Touch and hold for approximately two seconds a preset location to display th...

Страница 25: ...o press b To resume playback of the current song or video press h To rewind a song or video press and hold d To fast forward a song or video press and hold c To rewind a song or video to the beginning press f To skip to the previous song press f twice To skip to the next song or video in a playlist press e To select a shuffle mode touch the button under Shuffle until the desired setting is display...

Страница 26: ...repeat To select a repeat mode touch the button under Repeat until the desired mode is displayed Browse Page To browse through the iPod s video and music library touch BROWSE or press the button on the side of the remote To scroll through a list press the or buttons on the 5 way Navigation Pad To jump to the beginning of the list press k To jump to the end of the list press j To return to the prev...

Страница 27: ...with one or more PAMP 4x100 Processor Amplifiers 1 Select a room other than the theater room as described in Room Selection if equipped on page 7 2 Press the soft button labeled MEDIA to display the Media page A list of devices will be displayed 3 Touch a source to select for sharing 4 Press the soft button labeled MEDIA to display the Media page 5 Press the button on the side of the remote System...

Страница 28: ...j to scroll through the list of rooms Rooms that are receiving audio from the shared source are indicated with a 3 8 Touch rooms that are to receive shared audio To unselect a room touch the room again 9 Touch DONE to return to source list Sleep Timer A sleep timer can be used to turn off the sound in a room after a set amount of time 22 Prodigy System PMC2 System User Guide DOC 7007B ...

Страница 29: ... page to display the Media page A list of devices will be displayed 2 Press the button on the side of the remote three times to display the ADVANCED controls 3 Touch SLEEP to display the sleep timer controls 4 Touch or to select the timer duration 5 Touch ON to turn the timer on or OFF to turn the timer off 6 Touch CLOSE to close the sleep timer controls System User Guide DOC 7007B Prodigy System ...

Страница 30: ... and Other Lighting Controls Lighting scenes in a theater or other controlled room can be recalled by the PTX3 To recall a lighting scene 1 Press the soft button labeled LIGHTS or touch from the Home page to display the room s scene controls NOTE The scene names may differ 2 To recall a scene touch the scene to be recalled Dimmers and switches in a room can also be independently controlled from th...

Страница 31: ...abeled LIGHTS or touch from the Home page to display the room s scene controls NOTE The scene names may differ 2 Press the button on the side of the remote to display the list of rooms with controlled lighting To select a room touch the name of the room to be controlled To scroll through the list of controlled rooms touch the k or j buttons System User Guide DOC 7007B Prodigy System PMC2 25 ...

Страница 32: ...r below or go to a dimmer or switch and adjust the lighting as described in P DIMEX Prodigy Single Button Wireless Dimmer and P SWEX Prodigy Single Button Wireless Switch on page 129 2 Touch and hold for three seconds the scene name to be saved Control a Switch or Dimmer The PTX3 can be used to turn the lights on or off as well as raise or lower the lighting level P DIMEX and P LDIMEX only 1 Selec...

Страница 33: ...ON To turn the lights off touch OFF Dimmer Operation To turn the lights on or off touch ON OFF To raise the lighting level touch and hold k Release when the desired level is reached To lower the lighting level touch and hold j Release when the desired level is reached System User Guide DOC 7007B Prodigy System PMC2 27 ...

Страница 34: ... WHOLE HOUSE ON to turn on all of the lighting circuits in the house or touch WHOLE HOUSE OFF to turn off all of the lighting Climate Control When equipped the PTX3 can be used to control the climate in any zone that uses a P TSTATRF for temperature control Select Zone to Control The PTX3 can be used to control temperature in any zone that uses a P TSTATRF for temperature control To select a zone ...

Страница 35: ... will be heated or cooled A zone may be configured to use only heating cooling or a combination of both to maintain a temperature Depending on the system mode a zone may use either one single or two dual setpoints to regulate temperature Single Setpoint available for Heat Cool or Auto modes When using a single setpoint to regulate temperature a single setpoint is used for regulation at all times r...

Страница 36: ...e Setpoint Touch k or j to raise or lower the temperature setting NOTE When using a single setpoint there is a 20 minute change limiter to prevent system toggling Dual Setpoints 1 Verify that the controlled zone is set to the Auto mode 2 Touch the setting Cool or Heat to be adjusted 3 To lower the selected setpoint touch j To raise the selected setpoint touch k Set the System Mode A Prodigy contro...

Страница 37: ... to switch between Heat and Cool automatically as needed to maintain the setpoint temperature On the P TSTATRF the display will show the flame and snowflake icons To set a controlled zone s system mode with the PTX3 1 Select the zone to be controlled as described on page 28 2 Touch MODE until the desired setting is displayed NOTE Not all modes are available for all HVAC zones System User Guide DOC...

Страница 38: ... be divided into four time zones Wake Set to the time when you wake up and the desired temperature you want during the morning until you leave Leave Set to the time you leave the home and the temperature you want while you are away typically set to an energy saving setting Return Set to the time you return home and the temperature you want during the evening until bedtime Sleep Set to the time you...

Страница 39: ...eduled program 1 Select the zone to be controlled as described on page 28 2 Touch RUN to run the scheduled program Adjust Wake Leave Return and Sleep Settings 1 Select the zone to be controlled as described on page 28 System User Guide DOC 7007B Prodigy System PMC2 33 ...

Страница 40: ... a temperature setpoint until the Hold function is disabled Any changes caused by a program change are ignored while the Hold function is enabled Touch HOLD to enable the Hold function Touch RUN to disable the Hold function and resume the set operating schedule Maintenance Battery The PTX3 is powered by a lithium polymer rechargeable battery Battery life is indicated in the upper right corner of t...

Страница 41: ...mercially available non ammonia glass cleaner Bezels may not provide a complete watertight seal Therefore apply cleaning solution to the cloth rather than the surface of the touchscreen Wipe touchscreen clean and avoid getting moisture beneath the bezels System User Guide DOC 7007B Prodigy System PMC2 35 ...

Страница 42: ...nformation and control for devices in the Prodigy system The touchscreen consists of various pages used to control the specific functions of your Prodigy system The top of each page in the touchscreen contains controls to directly access the Home page the Media page lighting controls and climate controls MEDIA Button Press here to return to the media list HOME Button Press here to return to the ho...

Страница 43: ...Media page NOTE Pressing MEDIA on touchpanels that are not installed in the theater room will display a list of available audio sources MUTE Press the MUTE button to mute the audio output in the controlled room VOL k Press VOL k to raise the audio volume in the room VOL j Press VOL j to lower the audio volume in the room LIGHTS ON Press the LIGHTS ON button to turn on the lights in the room for sy...

Страница 44: ...d room To turn the last selected device on or off press POWER or touch Media Controls Select a Source 1 Press MEDIA or touch to display the Media page A list of devices will be displayed Receiver functions i e built in tuner are listed on the bottom of the touchscreen NOTE If your system has two or more room outputs the ROOM SELECT button will be displayed Touch ROOM SELECT to choose the room to b...

Страница 45: ...XM from the source list to control the PT AMFMXM The MUTE VOL k and VOL j buttons will always control the mute function and system volume Room Selection if equipped Your Prodigy system may be configured to control audio in other rooms To select a room to control 1 From the Media page touch ROOM SELECT to display a list of rooms controlled by the Prodigy system 2 Touch the room to be controlled Sys...

Страница 46: ...reset stations To recall a preset station touch the preset To store a preset station 1 Touch and hold the preset to be stored for approximately five seconds 2 If desired touch on a channel icon to be displayed in the list of presets The default channel name and number will be displayed when an icon is selected Scroll through the list of available icons by touching the k or j buttons To clear an ic...

Страница 47: ...mber and touch ENTER 5 To assign a custom name to the preset touch EDIT NAME to display the custom name controls 6 Touch the name of the preset and touch ENTER 7 Touch DONE to save the preset Touch KEYPAD to directly access a channel with a numeric keypad System User Guide DOC 7007B Prodigy System PMC2 41 ...

Страница 48: ...transport and menu controls to operate the playback device Listen to Radio if equipped From the Media page touch AM FM or XM from the source list to display the respective tuner controls AM FM Operations The AM FM tuner can tune stations manually scan through the band and store recall preset stations 42 Prodigy System PMC2 System User Guide DOC 7007B ...

Страница 49: ...equency touch j or k To directly tune a station touch the frequency on the numeric keypad and touch ENTER Scan Tuning 1 Touch TUNE on the bottom of the screen to display the tuning controls 2 Touch FM or AM to select the FM or AM band 3 Touch SEARCH to select the Scan Tuning mode 4 To scan down to the next received station touch j To scan up to the next received station touch k System User Guide D...

Страница 50: ...o the end of the list touch LAST 4 Touch a preset location to recall the station Store Presets You can store up to 20 AM and 20 FM preset stations To store a preset station 1 Tune a station as described in Manual Tuning on page 43 or Scan Tuning on page 43 2 Touch PRESETS to display the preset controls 3 Touch j or k to scroll through the list of preset stations to find a preset location to store ...

Страница 51: ...ocation touch Save Current Station To This Preset To clear the currently stored station touch Clear This Preset To cancel touch Cancel XM Operations The XM tuner can tune stations directly tune by category and store recall preset stations Direct Tuning Use Direct Tuning if you know the channel number you want to tune System User Guide DOC 7007B Prodigy System PMC2 45 ...

Страница 52: ...d controls 2 Touch the channel number on the numeric keypad and touch ENTER Hide Channels Channels can be hidden from the channel lineup To hide and or unhide a channel 1 Touch KEYPAD to display the keypad controls 46 Prodigy System PMC2 System User Guide DOC 7007B ...

Страница 53: ... to hide or unhide the channel from the channel lineup 6 Touch BACK to return to the keypad controls Channel Tuning Use Channel Tuning to browse through channels in the XM lineup 1 Touch CHANNEL to display the list of channels 2 Touch j or k to scroll through the list of channels To jump to the top of the list touch FIRST To jump to the end of the list touch LAST 3 Touch on the channel to be tuned...

Страница 54: ...uch FIRST To jump to the end of the list touch LAST 3 Touch on the desired category to view the list of channels within the category 4 Touch j or k to scroll through the list of channels within the category To jump to the top of the list touch FIRST To jump to the end of the list touch LAST 5 Touch the channel to be tuned 48 Prodigy System PMC2 System User Guide DOC 7007B ...

Страница 55: ...uch a preset location to recall the channel Store Presets You can store up to 20 preset stations To store a preset station 1 Tune a station as described in Direct Tuning on page 45 Channel Tuning on page 47 or Category Tuning on page 47 2 Touch PRESET to display the preset controls 3 Touch j or k to scroll through the list of preset stations to find a preset location to store To jump to the top of...

Страница 56: ...he iPod button to display its controls The iPod controls consist of the Now Playing page and the Browse page Now Playing The Now Playing page displays the transport controls while providing information about the song or video that is currently playing Touch the playback buttons and menu buttons to control the iPod To pause the current song or video touch b To resume playback of the current song or...

Страница 57: ...der Track Tracks within a list are played in a random order Off All tracks in a list are played in sequence To select a shuffle mode touch SHUFFLE until the desired mode is displayed Repeat Control The Now Playing page also contains a button for selecting a repeat mode The available repeat modes are All Songs in a list are played then repeated Track Current track is repeated Off All tracks in a li...

Страница 58: ... within the displayed list touch SEARCH enter the letters or words to search for and touch Enter Share Sources Audio from media sources can be distributed throughout a Prodigy system equipped with one or more PAMP 4x100 Processor Amplifiers NOTE Audio can be shared from any room except for the theater room 1 If controlling the theater select a room as described page 39 Otherwise continue to step 2...

Страница 59: ...ed source are indicated with a 3 6 Touch rooms that are to receive shared audio To unselect a room touch the room again 7 Touch DONE to return to source list Lighting Control In a Prodigy system preprogrammed lighting scenes are used to create a desired lighting effect These scenes can be recalled or stored Individual lighting circuits can also be switched or dimmed to your personal preference Sys...

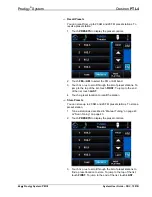
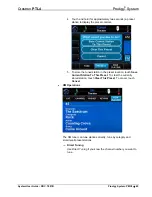
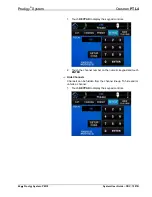
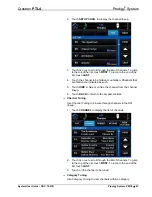
Страница 60: ... names may differ 2 To recall a scene touch the scene to be recalled Dimmers and switches in a room can also be independently controlled from the PTL4 For instructions refer to page 56 Control Lighting in Other Rooms Lighting scenes in other controlled rooms can be recalled by the PTL4 To control lighting in other rooms 1 From any page press SCENES or touch to display the room s scene controls NOT...

Страница 61: ...trol a Switch or Dimmer on page 56 Store a Scene The current light settings can be saved as a scene for recall at a later time To save light settings as a scene 1 Adjust the room s lighting to the desired level s as described in Control a Switch or Dimmer on page 56 or go to a dimmer or switch and adjust the lighting as described in P DIMEX Prodigy Single Button Wireless Dimmer and P SWEX Prodigy ...

Страница 62: ...f touch ON OFF You can also press LIGHTS ON or LIGHTS OFF To raise the lighting level touch and hold k or press RAISE Release when the desired level is reached To lower the lighting level touch and hold j or press LOWER Release when the desired level is reached Climate Control When equipped the PTL4 can be used to control the climate in any zone that uses a P TSTATRF for temperature control Select...

Страница 63: ...ating cooling or a combination of both to maintain a temperature Depending on the system mode a zone may use either one single or two dual setpoints to regulate temperature Single Setpoint available for Heat Cool or Auto modes When using a single setpoint to regulate temperature a single setpoint is used for regulation at all times regardless of whether the system is heating or cooling NOTE When u...

Страница 64: ...ggling Dual Setpoints 1 Verify that the controlled zone is set to the Auto mode 2 To lower the heating or cooling setpoint touch the j button under the setting to be changed To raise the heating or cooling setpoint touch the k button under the setting to be changed Set the System Mode A Prodigy controlled HVAC zone has up to five operating modes NOTE Not all modes are available for all HVAC zones ...

Страница 65: ...2 Touch MODE until the desired setting is displayed NOTE Not all modes are available for all HVAC zones Fan Control A zone s fan can be set for automatic operation Auto or constant operation On When set to AUTO the fan will run when the system is cooling or warming the controlled zone When set to ON the fan will always run To set a controlled zone s fan setting with the PTL4 1 Select the zone to b...

Страница 66: ...tting Return Set to the time you return home and the temperature you want during the evening until bedtime Sleep Set to the time you go to bed and the temperature you want overnight typically set to an energy saving setting A climate zone can also be set to an Away setting where a specified temperature setpoint will be maintained until the scheduled program is set to resume This is typically set t...

Страница 67: ...ttons b Set the temperature setpoint s To lower the heating or cooling setpoint touch the j button under the setting to be changed To raise the heating or cooling setpoint touch the k button under the setting to be changed c Set the start time for the time zone using the k or j buttons To remove the time zone from the schedule touch REMOVE d Touch MAIN to return to the climate controls System User...

Страница 68: ...l the Hold function is disabled Any changes caused by a program change are ignored while the Hold function is enabled Touch HOLD to enable the Hold function Touch RUN to disable the Hold function and resume the set operating schedule Maintenance Keep the surface of the touchscreen free of dirt dust or other materials that could degrade optical properties Long term contact with abrasive materials c...

Страница 69: ...ity within this guide the Crestron Mobile Pro App will be used to describe the interface for the iPhone iPod Touch and Macintosh computer General Controls The Home Page The Home page is where you can access controls for media lighting if equipped and climate if equipped Touch to display the Home page Power Control The last selected device can be turned on or off with the power control NOTE If a de...

Страница 70: ... button will be displayed Touch Room Select to choose the room to be controlled For more information refer to Room Selection if equipped on page 65 NOTE The devices shown may differ from your system 2 Touch a device name or receiver function to display its controls NOTE If your system is equipped with a PT AMFMXM Radio Tuner touch AM FM or XM from the source list to control the PT AMFMXM The Mute ...

Страница 71: ...play a list of rooms controlled by the Prodigy system 2 Touch the room to be controlled Watch TV if equipped From the Media page touch the button for the cable or satellite receiver to display its controls If the receiver is equipped with a DVR transport controls will be displayed as well Touch Presets to display a list of preset stations To recall a preset station touch the preset System User Gui...

Страница 72: ...o App XPanel for Mac To store a preset station 1 Touch and hold the preset location to be stored for approximately five seconds 2 Touch the channel to be stored in the preset location 66 Prodigy System PMC2 System User Guide DOC 7007B ...

Страница 73: ...nel number and touch Enter 5 To assign a custom name to the preset touch Edit Name to display the custom name controls 6 Touch the name of the preset and touch enter 7 Touch Done to save the preset Touch Keypad to directly access a channel with a numeric keypad System User Guide DOC 7007B Prodigy System PMC2 67 ...

Страница 74: ...s 2 Use the transport and menu controls to operate the playback device Listen to Radio if equipped From the Media page touch AM FM or XM from the source list to display the respective tuner controls AM FM Operations The AM FM tuner can tune stations manually scan through the band and store recall preset stations 68 Prodigy System PMC2 System User Guide DOC 7007B ...

Страница 75: ... Tune to select the Manual Tuning mode 4 To adjust the tuned frequency touch I or H To directly tune a station touch the frequency on the numeric keypad and touch Enter Scan Tuning 1 Touch Tune on the bottom of the screen to display the tuning controls 2 Touch FM or AM to select the FM or AM band 3 Touch Search to select the Scan Tuning mode System User Guide DOC 7007B Prodigy System PMC2 69 ...

Страница 76: ...lay the preset controls 2 Touch FM or AM to select the FM or AM band 3 Touch j or k to scroll through the list of preset stations To jump to the top of the list touch To jump to the end of the list touch 4 Touch a preset location to recall the station Store Presets You can store up to 20 AM and 20 FM preset stations To store a preset station 1 Tune a station as described in Manual Tuning on page 6...

Страница 77: ...p of the list touch To jump to the end of the list touch 4 Touch and hold for approximately two seconds a preset station to display the preset controls 5 To store the tuned station in the preset location touch Save Current Station to this Preset To clear the currently stored station touch Clear This Preset To cancel touch Cancel System User Guide DOC 7007B Prodigy System PMC2 71 ...

Страница 78: ...directly tune by category and store recall preset stations Direct Tuning Use Direct Tuning if you know the channel number you want to tune 1 Touch Keypad to display the keypad controls 2 Touch the channel number on the numeric keypad and touch Enter 72 Prodigy System PMC2 System User Guide DOC 7007B ...

Страница 79: ...l to display the channel lineup 3 Touch j or k to scroll through the list of channels To jump to the top of the list touch To jump to the end of the list touch 4 Touch the channel to be hidden or unhidden Channels that are hidden are indicated as such 5 Touch Hide to hide or unhide the channel from the channel lineup 6 Touch Back to return to the keypad controls System User Guide DOC 7007B Prodigy...

Страница 80: ...hannels To jump to the top of the list touch To jump to the end of the list touch 3 Touch on the channel to be tuned Category Tuning Use Category Tuning to view channels within a category 1 Touch Category to display the list of channel categories 2 Touch j or k to scroll through the list of categories To jump to the top of the list touch To jump to the end of the list touch 74 Prodigy System PMC2 ...

Страница 81: ...touch To jump to the end of the list touch 5 Touch the channel to be tuned Recall Presets You can recall from up to 20 preset stations To recall a preset station 1 Touch Preset to display the preset controls 2 Touch j or k to scroll through the list of preset stations To jump to the top of the list touch To jump to the end of the list touch 3 Touch a preset location to recall the channel System Us...

Страница 82: ...3 Touch j or k to scroll through the list of preset stations to find a preset location to store To jump to the top of the list touch To jump to the end of the list touch 4 Touch and hold for approximately two seconds a preset location to display the preset controls 5 To store the tuned station in the preset location touch Save Current Station to this Preset To clear the currently stored station to...

Страница 83: ...ious song touch f twice To skip to the next song or video in a playlist touch e To select a shuffle mode touch Shuffle until the desired setting is displayed Refer to Shuffle Control below for details To select a repeat mode touch Repeat until the desired setting is displayed Refer to Repeat Controls on the following page for details Shuffle Control The Now Playing page also contains a button for ...

Страница 84: ... touch the button under Repeat until the desired mode is displayed Browse Page The Browse page is used to browse through the iPod s video and music library To select an item playlist artist album song or video in a list touch its name on the touchscreen To scroll through a list touch the k or j button To jump to the beginning of the list touch To jump to the end of the list touch To return to the ...

Страница 85: ... media sources can be distributed throughout a Prodigy system equipped with one or more PAMP 4x100 Processor Amplifiers NOTE Audio can be shared from any room except for the theater room 1 If controlling the theater select a room as described on page 65 Otherwise continue to step 2 2 Touch Share Source to display the list of rooms that can receive shared audio System User Guide DOC 7007B Prodigy S...

Страница 86: ... through the list of rooms Rooms that are receiving audio from the shared source are indicated with a 3 4 Touch rooms that are to receive shared audio To unselect a room touch the room again 5 Touch Done to return to source list 80 Prodigy System PMC2 System User Guide DOC 7007B ...

Страница 87: ...can be recalled by the the Crestron Mobile Pro App 1 Touch to display the Home page and touch to display the room s scene controls NOTE The scene names may differ 2 To recall a scene touch the scene to be recalled Dimmers and switches in a room can also be independently controlled from the Crestron Mobile Pro App For instructions refer to page 84 Control Lighting in Other Rooms Lighting scenes in ...

Страница 88: ...scene names may differ 2 Touch Room Select to display a list of controlled rooms To select a room touch the name of the room to be controlled To scroll through the list of controlled rooms touch the k or j buttons 82 Prodigy System PMC2 System User Guide DOC 7007B ...

Страница 89: ...l at a later time To save light settings as a scene 1 Adjust the room s lighting to the desired level s as described in Control a Switch or Dimmer on page 84 or go to a dimmer or switch and adjust the lighting as described in P DIMEX Prodigy Single Button Wireless Dimmer and P SWEX Prodigy Single Button Wireless Switch on page 129 2 To store the scene touch and hold for three seconds the scene nam...

Страница 90: ...g level P DIMEX only 1 Select the room to be controlled as described in steps 1 2 which starts on page 81 2 Touch Advanced to display the lighting controls Lighting Controls Left Dimmer Right Switch Switch Operation To turn the lights on touch On To turn the lights off touch Off Dimmer Operation To turn the lights on or off touch On Off 84 Prodigy System PMC2 System User Guide DOC 7007B ...

Страница 91: ...be used to control the climate in any zone that uses a P TSTATRF for temperature control Select Zone to Control The Crestron Mobile Pro App can be used to control temperature in any zone that uses a P TSTATRF for temperature control To select a zone to be controlled 1 Touch to display the Home page and touch to display the list of controlled zones NOTE Zone names may vary 2 Touch the zone to be co...

Страница 92: ... zone has a 20 minute change limiter to prevent system toggling Dual Setpoints for use in Auto mode only When using dual setpoints separate heat and cool setpoints are used When the ambient temperature drops below the heat setpoint the controlled zone will call for heat to maintain the heat setpoint When the ambient temperature rises above the heat setpoint the controlled zone will not call for co...

Страница 93: ...stat uses the heating system to maintain the setpoint temperature On the P TSTATRF a flame icon will be displayed AUXILIARY AUX HEAT MODE In Auxiliary Heat mode the thermostat uses only the auxiliary heat output on heat pump or dual fuel systems if equipped to maintain the setpoint temperature This setting can be useful when the heat pump is being serviced or when there is an unexpected problem wi...

Страница 94: ...or all HVAC systems Fan Control A zone s fan can be set for automatic operation Auto or constant operation On When set to AUTO the fan will run when the system is cooling or warming the controlled zone When set to ON the fan will always run To set a controlled zone s fan setting with the Crestron Mobile Pro App 1 Select the zone to be controlled as described on page 85 2 Touch Fan until the desire...

Страница 95: ...re you want during the evening until bedtime Sleep Set to the time you go to bed and the temperature you want overnight typically set to an energy saving setting A climate zone can also be set to an Away setting where a specified temperature setpoint will be maintained until the scheduled program is set to resume This is typically set to an energy saving setting Any temperature setpoint can be hel...

Страница 96: ...one from the schedule touch Remove c Set the temperature setpoint s To lower the heating or cooling setpoint touch the j button under the setting to be changed To raise the heating or cooling setpoint touch the k button under the setting to be changed d Touch Prev to return to the climate controls 3 To set the temperature setpoint s for the Away setting touch Away to display the away controls 90 P...

Страница 97: ...g to be changed To raise the heating or cooling setpoint touch the k button under the setting to be changed e Touch Prev to return to the climate controls Hold Setting The Hold function allows you to maintain a temperature setpoint until the Hold function is disabled Any changes caused by a program change are ignored while the Hold function is enabled Touch HOLD to enable the Hold function Touch R...

Страница 98: ...can access controls for media lighting if equipped and climate if equipped Click to display the Home page Power Control The last selected device can be turned on or off with the power control NOTE If a device is active in another room i e the iPod source is on in the theater and the second audio room using the power control will only affect the audio output in the controlled room To turn the last ...

Страница 99: ... be controlled For more information refer to Room Selection if equipped on page 94 NOTE The devices shown may differ from your system 2 Click a device name or receiver function to display its controls To control the receiver s tuner click TUNER XM or SIRIUS on the bottom of the screen NOTE If your system is equipped with a PT AMFMXM Radio Tuner click AM FM or XM from the source list to control the...

Страница 100: ...Prodigy system 2 Click the room to be controlled Watch TV if equipped From the Media page click the button for the cable or satellite receiver to display its controls If the receiver is equipped with a DVR transport controls will be displayed as well Use the numeric keypad to directly access a channel Use the presets to recall and or store preset stations To recall a preset station click the prese...

Страница 101: ...ill be displayed when an icon is selected Navigate the list by clicking on HOME jump to the top of the icon list END jump to the bottom of the icon list or use the k or j buttons to scroll through the list of available icons To clear an icon click CLEAR IMAGE 4 To assign a custom name to the preset click EDIT NAME to display the custom name controls 5 Click the name to be assigned to the preset an...

Страница 102: ... transport and menu controls to operate the playback device Listen to Radio if equipped From the Media page click AM FM or XM from the source list to display the respective tuner controls AM FM Operations The AM FM tuner can tune stations manually scan through the band and store recall preset stations 96 Prodigy System PMC2 System User Guide DOC 7007B ...

Страница 103: ...y click j or k To directly tune a station use the mouse to click the frequency on the numeric keypad and click ENTER Scan Tuning 1 Click TUNE to display the tuning controls 2 Click FM or AM to select the FM or AM band 3 Click SEARCH to select the Scan Tuning mode 4 To scan down to the next received station click j To scan up to the next received station click k System User Guide DOC 7007B Prodigy ...

Страница 104: ...l through the list of preset stations To jump to the top of the list click FIRST To jump to the end of the list click LAST 4 Click on a preset location to recall the station Store Presets You can store up to 20 AM and 20 FM preset stations To store a preset station 1 Tune a station as described in Manual Tuning on page 97 or Scan Tuning on page 97 2 Click PRESETS to display the preset controls 98 ...

Страница 105: ...a preset station to display the preset controls 5 To store the tuned station in the preset location click Save Current Station To This Preset To clear the currently stored station click Clear This Preset To cancel click Cancel XM Operations The XM tuner can tune stations directly tune by category and store recall preset stations Direct Tuning Use Direct Tuning if you know the channel number you wa...

Страница 106: ...ls 2 Use the mouse to click the channel number on the numeric keypad and click ENTER Hide Channels Channels can be hidden from the channel lineup To hide and or unhide a channel 1 Click KEYPAD to display the keypad controls 100 Prodigy System PMC2 System User Guide DOC 7007B ...

Страница 107: ...nels that are hidden are indicated as such 5 Click HIDE to hide or unhide the channel from the channel lineup 6 Click BACK to return to the keypad controls Channel Tuning Use Channel Tuning to browse through channels in the XM lineup 1 Click CHANNELS to display the list of channels 2 Click j or k to scroll through the list of channels To jump to the top of the list click FIRST To jump to the end o...

Страница 108: ... jump to the top of the list click FIRST To jump to the end of the list click LAST 3 Click on the desired category to view the list of channels within the category 4 Click j or k to scroll through the list of channels within the category To jump to the top of the list click FIRST To jump to the end of the list click LAST To return to the list of categories click BACK 5 Click on the channel to be t...

Страница 109: ...o jump to the top of the list click FIRST To jump to the end of the list click LAST 3 Click on a preset location to recall the channel Store Presets You can store up to 20 preset stations To store a preset station 1 Tune a station as described in Direct Tuning on page 99 Channel Tuning on page 101 or Category Tuning on page 102 2 Click PRESETS to display the preset controls System User Guide DOC 7...

Страница 110: ...e Current Station To This Preset To clear the currently stored station click Clear This Preset To cancel click Cancel iPod Control if equipped From the Media page click the iPod button to display its controls The iPod controls consist of the Now Playing page and the Browse page The Now Playing page displays the transport controls while providing information about the song or video that is currentl...

Страница 111: ... Control The Now Playing page also contains a button for selecting a shuffle mode The available shuffle modes are Album Albums in a list are played in a random order Songs on an album are played in order Track Tracks within a list are played in a random order Off All tracks in a list are played in sequence To select a shuffle mode click the button next to Shuffle until the desired mode is displaye...

Страница 112: ...To select an item playlist artist album song or video in a list click its name on the list To return to the previous click click BACK To see what is currently playing click NOW PLAYING To play all of the items in a list click PLAY ALL LISTED To play all of the items on the iPod click PLAY ALL ON iPod To search for an item within the displayed list click SEARCH and click the first letter of the son...

Страница 113: ... 1 If controlling the theater select a room as described page 94 Otherwise continue to step 2 2 Select a source from the list of audio sources 3 Click to return to the list of sources 4 Click SHARE SOURCE to display the list of rooms that can receive shared audio 5 Click k or j to scroll through the list of rooms Rooms that are receiving audio from the shared source are indicated with a 3 System U...

Страница 114: ...digy System Crestron XPanel 6 Click rooms that are to receive shared audio To unselect a room click the room again 7 Click DONE to return to source list 108 Prodigy System PMC2 System User Guide DOC 7007B ...

Страница 115: ...ference Recall Lighting Scenes and Other Lighting Controls Lighting scenes in a theater or other controlled room can be recalled by the Crestron XPanel project 1 From any page click to display the room s scene controls NOTE The scene names may differ 2 To recall a scene click a scene name Dimmers and switches in a room can also be independently controlled from the XPanel project For instructions r...

Страница 116: ...gram 1 From any page click to display the room s scene controls NOTE The scene names may differ 2 Click ROOM SELECT to display a list of controlled rooms To select a room click the name of the room to be controlled To scroll through the list of controlled rooms click the k or j buttons 110 Prodigy System PMC2 System User Guide DOC 7007B ...

Страница 117: ...s as described in Control a Switch or Dimmer below or go to a dimmer or switch and adjust the lighting as described in P DIMEX Prodigy Single Button Wireless Dimmer and P SWEX Prodigy Single Button Wireless Switch on page 129 2 To store the scene click and hold for three seconds the scene name to be saved Control a Switch or Dimmer XPanel can be used to turn the lights on or off as well as raise o...

Страница 118: ...E Release when the desired level is reached To lower the lighting level click and hold j or click LOWER Release when the desired level is reached Climate Control When equipped the XPanel program can be used to control the climate in any zone that uses a P TSTATRF for temperature control Select Zone to Control The XPanel program can be used to control temperature in any zone that uses a P TSTATRF f...

Страница 119: ...From any page click to display a list of zones NOTE Zone names may vary 2 Click the zone name to be controlled The climate controls for the controlled zone will be displayed 3 To select another zone click ROOM SELECT System User Guide DOC 7007B Prodigy System PMC2 113 ...

Страница 120: ...ve the heat setpoint the controlled zone will not call for cooling until the temperature exceeds the cool setpoint When the ambient temperature drops below the cool setpoint the controlled zone will not call for heating until the temperature is below the heat setpoint NOTE When dual setpoints are used the P TSTATRF in the controlled zone will display the setpoint closest to the ambient temperature...

Страница 121: ...lay will flash the flame icon when the system is in Auxiliary Heat mode COOL In Cool mode the thermostat uses the cooling system to maintain the setpoint temperature On the P TSTATRF the snowflake icon will be displayed AUTO In Auto mode the thermostat allows the system to switch between Heat and Cool automatically as needed to maintain the setpoint temperature On the P TSTATRF the display will sh...

Страница 122: ...ivided into four time zones Wake Set to the time when you wake up and the desired temperature you want during the morning until you leave Leave Set to the time you leave the home and the temperature you want while you are away typically set to an energy saving setting Return Set to the time you return home and the temperature you want during the evening until bedtime Sleep Set to the time you go t...

Страница 123: ... Select the zone to be controlled as described on page 112 2 Click RUN to run the scheduled program Adjust Wake Leave Return Sleep and Away Settings 1 Select the zone to be controlled as described on page 112 System User Guide DOC 7007B Prodigy System PMC2 117 ...

Страница 124: ...point click the k button under the setting to be changed c Set the start time for the time zone using the or buttons To remove the time zone from the schedule click REMOVE SCHED 3 To set the temperature setpoint s for the Away setting click AWAY to display the away controls a Set the date when the Away setting should stop with the k or j buttons b Select the time zone to use when the program resum...

Страница 125: ... the k button under the setting to be changed Hold Setting The Hold function allows you to maintain a temperature setpoint until the Hold function is disabled Any changes caused by a program change are ignored while the Hold function is enabled Click HOLD to enable the Hold function Click RUN to disable the Hold function and resume the set operating schedule System User Guide DOC 7007B Prodigy Sys...

Страница 126: ...ed room To turn the last selected device on or off press ON OFF Adjust Volume To raise the volume press VOL k To lower the volume press VOL j Listen to TV if equipped To listen to the audio program of a TV press the corresponding source button CABLE SATELLITE etc Listen to a Movie if equipped To listen to the audio program of a movie that is playing press the corresponding source button BLU RAY Ap...

Страница 127: ...e next preset station press the XM source button again To go to the next channel in the channel lineup press and hold the XM button Listen to iPod if equipped To listen to an iPod that is playing press the IPOD source button To skip to the next track press the IPOD source button again To skip to the next playlist press and hold the IPOD source button System User Guide DOC 7007B Prodigy System PMC2...

Страница 128: ...ut in the controlled room To turn the last selected device on or off press ON OFF Adjust Volume To raise the volume press VOL k To lower the volume press VOL j Listen to TV if equipped To listen to the audio program of a TV press the corresponding source button CABLE SATELLITE etc Listen to a Movie if equipped To listen to the audio program of a movie that is playing press the corresponding source...

Страница 129: ... the next preset station press the XM source button again To go to the next channel in the channel lineup press and hold the XM button Listen to iPod if equipped To listen to an iPod that is playing press the IPOD source button To skip to the next track press the IPOD source button again To skip to the next playlist press and hold the IPOD source button System User Guide DOC 7007B Prodigy System P...

Страница 130: ...To manually tune a station 1 Select a band as described in Select a Band above 2 Press MENU to display the band s list of options 3 Press j or k to display Manual Tuning and press ENTER 4 Press and hold j or k to tune down or up respectively until the desired station is displayed 5 XM only Press ENTER to select the displayed station Scan Tuning AM and FM Bands Only To scan through a band 1 Select ...

Страница 131: ... or k until the desired preset location is displayed 6 Press and hold ENTER for three seconds until the Saving Preset message is displayed To recall a preset 1 Select a band as described in Select a Band on page 124 2 Press MENU to display the list of options 3 Press j or k to display Presets and press ENTER 4 Press j or k until the desired preset location is displayed 5 Press ENTER to recall the ...

Страница 132: ... list of options To view the signal strength 1 Select the XM tuner as described in Select a Band on page 124 2 Press MENU to display the list of options 3 Press j or k to display Signal Strength and press ENTER The signal strength will be displayed 4 Press MENU to return to the list of options 126 Prodigy System PMC2 System User Guide DOC 7007B ...

Страница 133: ...ressing a SOURCE button will exit the room s Volume Control mode Select a Room Once a source is selected press any ROOM button that is to receive the selected source The room will be connected to the selected source and its LED will light To remove a room from the selected source press the ROOM button of a connected room The LED will turn off NOTE If a room is in the Volume Control mode pressing a...

Страница 134: ...onds Press j or k to change the volume in 1 dB increments Hold j or k for more than one second to ramp the volume up or down in 1 dB 1 second increments If the maximum volume or minimum volume is reached all front panel LED s will blink three times 2 Press the ROOM button again to exit the Volume Control mode If j or k is not pressed for 10 seconds the PAMP 4X100 will automatically exit the Volume...

Страница 135: ...on The LED indicates the status of the load while the rocker button can be pushed at the top or bottom to perform specific functions Control a Dimmer Raise Lower the Lighting Level Use the rocker button to recall a preset lighting level raise the level to 100 brightness lower the lighting level or turn off the light To raise the light level to its preset lighting level tap the upper part of the ro...

Страница 136: ...utton until the LED blinks The preset lighting level is now stored Disconnect the Dimmer from the Load Press the left side of air gap switch located beneath the rocker button to disconnect the dimmer from the load This must be used when changing light bulbs to ensure that the load is fully disconnected from power Any P CBD devices that control the same load will not perform any function Control a ...

Страница 137: ...MEX has a pushbutton with integrated light emitting diode LED and an electrical receptacle The LED indicates the status of the electrical receptacle The P LSWEX has a pushbutton with integrated light emitting diode LED and an electrical receptacle The LED indicates the status of the electrical receptacle Control a Dimmer Tap the button to toggle the connected device on or off The LED will light to...

Страница 138: ... Crestron P LDIMEX P LSWEX Control a Switch Tap the button to toggle the connected device on or off The LED will light to indicate that the receptacle is energized 132 Prodigy System PMC2 System User Guide DOC 7007B ...

Страница 139: ... Button for Use with P DIMEX Right P CBD 2 Button for Use with P SWEX The two button model is for switching with the P SWEX in a lighting application while the four button model is for dimming with the P DIMEX in a dimming lighting application To turn on the lights tap the ON button To turn off the lights tap the OFF button To raise or lower the lighting level 4 button models only press and hold t...

Страница 140: ...lation at all times regardless of whether the system is heating or cooling NOTE When using a single setpoint the controlled zone has a 20 minute change limiter to prevent system toggling Dual Setpoints for use in Auto mode only When using dual setpoints separate heat and cool setpoints are used When the ambient temperature drops below the heat setpoint the controlled zone will call for heat to mai...

Страница 141: ...at mode the thermostat uses only the auxiliary heat output on heat pump or dual fuel systems if equipped to maintain the setpoint temperature This setting can be useful when the heat pump is being serviced or when there is an unexpected problem with it On the P TSTATRF the display will flash the flame icon when the system is in Auxiliary Heat mode COOL In Cool mode the thermostat uses the cooling ...

Страница 142: ...by a program change are ignored while the Hold function is enabled Press HOLD MODE FAN to maintain a temperature setting until HOLD MODE FAN is pressed again Maintenance When the display shows LO the batteries inside the P STATRF need to be replaced The P TSTATRF requires two AA batteries Refer to the following diagram when replacing batteries Observe polarity when installing batteries When you ch...

Страница 143: ...eries P TSTATRF does not respond to system commands P TSTATRF Battery power is low Replace the batteries Controlled media device does not function as expected Device is not synchronized with Prodigy System For example AV receiver is set to the wrong input or display device is turned off Manually set device to desired setting For example push the correct input button on the AV receiver or turn on t...

Страница 144: ...Crestron Electronics Inc User Guide DOC 7007B 15 Volvo Drive Rockleigh NJ 07647 2027855 Tel 888 CRESTRON 06 10 Fax 201 767 7576 Specifications subject to www crestron com change without notice ...

Отзывы: