background image

Enable Automatic Cable Retraction (Optional)

A network connection between the FT2-ELEC assembly and a Crestron
control system or DMPS3 enables remote control of the installed
FT2A-CBLR-1T series. For example, when a networked FT2-ELEC
assembly with a one-touch cable retractor is installed in a room with an
occupancy sensor and the sensor detects an unoccupied room, the
FT2-ELEC assembly communicates with the system to automatically
retract the cable.

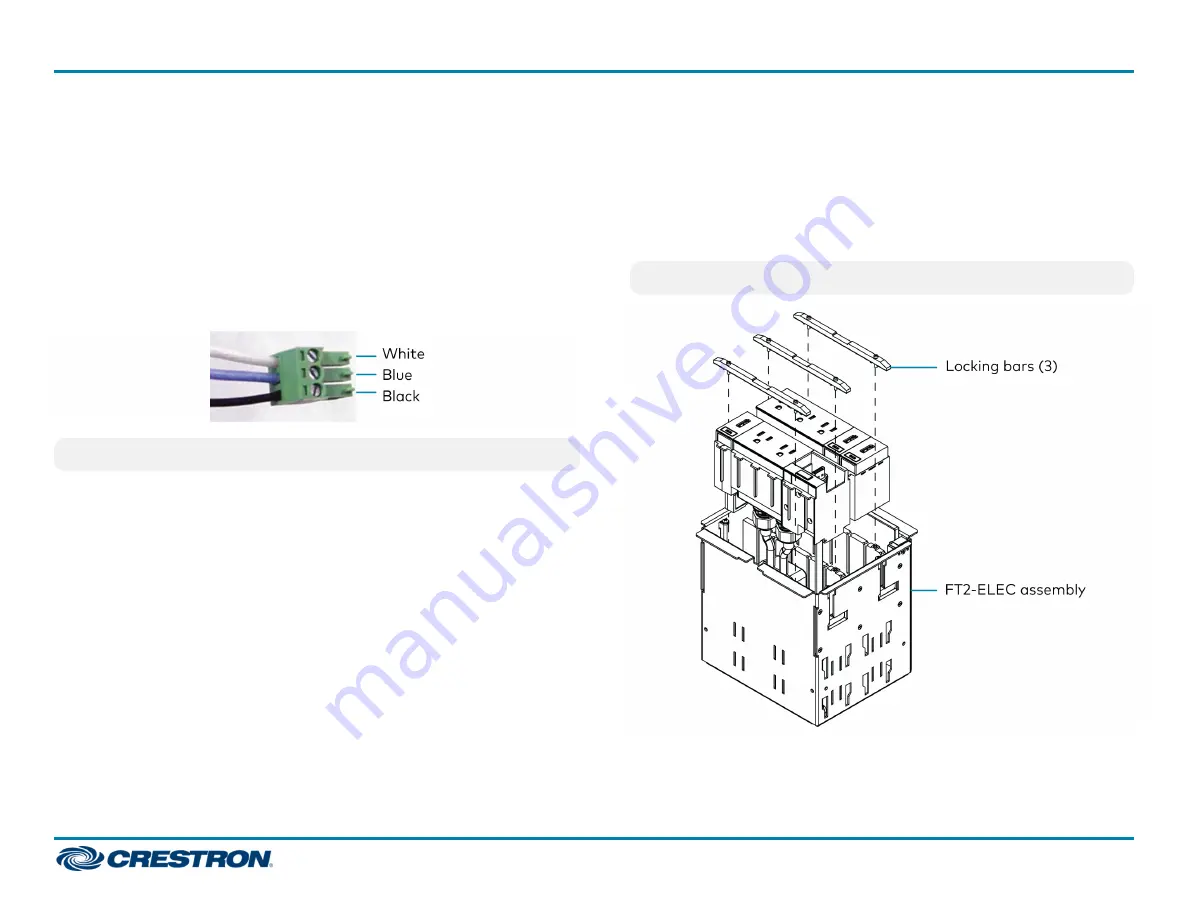
On an FT2-ELEC assembly using standard Cresnet® cable, connect the 3-
pin connector to a Crestron control system or DMPS3.

NOTE:

The red power lead should not be connected.

To ensure that the FT2A-CBLR-1T series retractor retracts automatically,
FT2A-CBLR-1T series check the following:

l

The FT2A-CBLR-1T series pass-through module is properly seated
within the FT2-ELEC assembly.

l

The FT2A-CBLR-1T series pass-through module’s power cable is
properly connected to the FT2A-CBLR-1T series retractor.

l

The 3-pin connector on the FT2-ELEC assembly is connected properly
to the Crestron control system or DMPS3.

Install the Locking Bars

1. Place the locking bars into position so that the screws attached to the

locking bars engage the screw holes in the FT2-ELEC assembly.

2. Using a manual torque screwdriver set to its lowest possible setting,

hand tighten the locking bar screws until the locking bars are secured
to the FT2-ELEC assembly.

CAUTION:

Do not overtighten the locking bar screws.

8

FT2A-CBLR-1T Series

Quick Start

FlipTop™ One-Touch Cable Retractors

Содержание FlipTop FT2A-CBLR-1T Series

Страница 1: ...or In the Box 1 FT2A CBLR 1T Series FlipTop One Touch Cable Retractors Additional Items FT2A CBLR 1T 4K DP and FT2A CBLR 1T 4K DP HD Only 1 DisplayPort pass through module 4526967 FT2A CBLR 1T 4K MDP...

Страница 2: ...for each FT2 ELEC assembly For example if installing the retractor into an FT2 700 ELEC device there are four possible locations two per side 1 Pull the cable connector out of the retractor and tuck i...

Страница 3: ...losable fastener strips One fastener strip is placed on the FT2 ELEC assembly and the other strip is placed on the adapter NOTES l This procedure is intended for the FT2A CBLR 1T USBC PWR retractor on...

Страница 4: ...FT2 ELEC assembly 4 Remove the protective backing from the remaining fastener strip and press it firmly onto the power adapter 5 Align the power adapter s fastener strip with the assembly s fastener...

Страница 5: ...s broken 2 Unscrew and remove the two locking bars on either side of the module row that is required for installation For example if installing the FT2A CBLR 1T series pass through module in the botto...

Страница 6: ...Top View Install the Module into the FT2 ELEC Assembly 1 Orient the module so that its LED is facing toward the front of the FT2 ELEC assembly as shown in the following illustration 2 Feed the module...

Страница 7: ...mbly 4 Route the module s power cable through the wire saddle on the retractor and then connect the cable to the retractor as shown in the following illustration CAUTION If the FT2A CBLR 1T series pas...

Страница 8: ...series retractor retracts automatically FT2A CBLR 1T series check the following l The FT2A CBLR 1T series pass through module is properly seated within the FT2 ELEC assembly l The FT2A CBLR 1T series...

Страница 9: ...ract the cable back into its seat The LED backlight provides the cable connector status l Solid The cable retracted successful l Flashing The cable did not fully retract after the cable retractor butt...

Страница 10: ...cover Crestron products are listed at www crestron com legal patents Certain Crestron products contain open source software For specific information visit www crestron com opensource Crestron the Cre...

Отзывы: