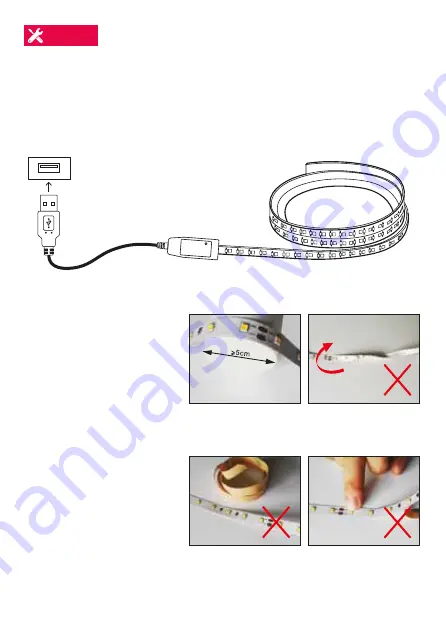
Install:
6. The device will commence the pairing process and connect to
the app.
1. Connect the LED strip to the WiFi controller, making sure the
appropriate connections as per diagram on page 1.
2. Connect the WiFi controller USB Cable to an appropriate
USB port.
Ensure your smart phone is connected to your 2.4GHz WiFi
network.
Note:
Your smart phone needs to have good signal strength and
be close to your WiFi router.
Add a Device:
1. Turn on the LED Strip, on first activation
the device will flash rapidly. If the LED
Strip does not start flashing, reset by
pressing and holding the power button
on the WiFi Controller for 10 seconds
until the LED Strip begins flashing rapidly.
2. Open the Crest Smart app and tap “+” in
the upper right to add a new device on
your network.
3. Navigate to the Lighting tab then select
the LED Strip image.
4. Ensure the LED Strip is flashing rapidly
and tap “confirm” light is rapidly flashing.
5. Select your WiFi Network (note: network
must be 2.4GHz) and enter your WiFi
password.
Connecting to your Google Home:
Note:
You will need to have set up a Google Home Account prior
to linking your Crest Smart Device.
1. On the “home control” screen, select the + icon.
2. On the “Add and manage” screen select "Set up device".
3. A list will appear showing actions and a search function to
access more apps: from here search for the Crest Smart app.
4. Log into your Crest Smart account with your email address or
mobile number. (If you have signed up using a mobile number
you will need to retrieve a verification code from within the
Crest Smart app. Found under Settings / More Services /
Third party access
service).
5. Once linked it will
show the devices
linked to your
account: You can
assign them to
rooms and you will
be prompted to
authorise apps to
sync.
6. When successfully
linked, you will see
your devices on the
“home control”
screen. You can now
control your Crest
Smart devices
through Google
Home.
Connecting to your Amazon Alexa:
Note:
you will need to have set up an Alexa account prior to
linking your Crest Smart device.
4.
LED Strip
WiFi
Controller
USB
Cable
USB Port
3. Select an appropriate
location for the LED
Strip Light to be
adhered to.
Note:
The
USB Cable is only
42cm long, please
consider access to a
USB port before
adhering to desired
surface.
4. Once location and
position has been set,
remove the
double-sided tape
and press firmly to
achieve good
adhesion to the
surface.
Max bending
diameter 5cm
Do NOT twist
the LED Strip
Do NOT remove the
backing abruptly
Do NOT press down
on the LEDs
7. After successful connection, the App will display a screen
advising the device has been added. It also provides an option
to rename the device appropriate to your use, press save and
then press the "Done" button and this device will be displayed
on the home screen.
Note:
If there is an interruption of the power or wireless network
signal to the LED Strip Light, then it will be displayed as "offline"
and cannot be remotely controlled.
App Control:
The LED Strip Lights can be
altered via the following
adjustments:
• Brightness
• Colour
• Opacity
• Timer mode
• Scene mode
1. Select “Devices” and
then “Your smart home
skills”.
2. Press "Enable Smart
Home Skills".
3. Search for "Crest
Smart" and select
"Enable to use".
4. Login to "Crest Smart". 5. Select "Discover
Devices".
6. When successfully
linked you will see a list
of devices on the
devices menu.


