Cressi-sub XS Compact Скачать руководство пользователя страница 54

Regulators repair and maintenance 

January 2014 

Rev  XSC /3 

 Ed. C /14 

54 

XS Compact 2nd stage: 

phases of assembly


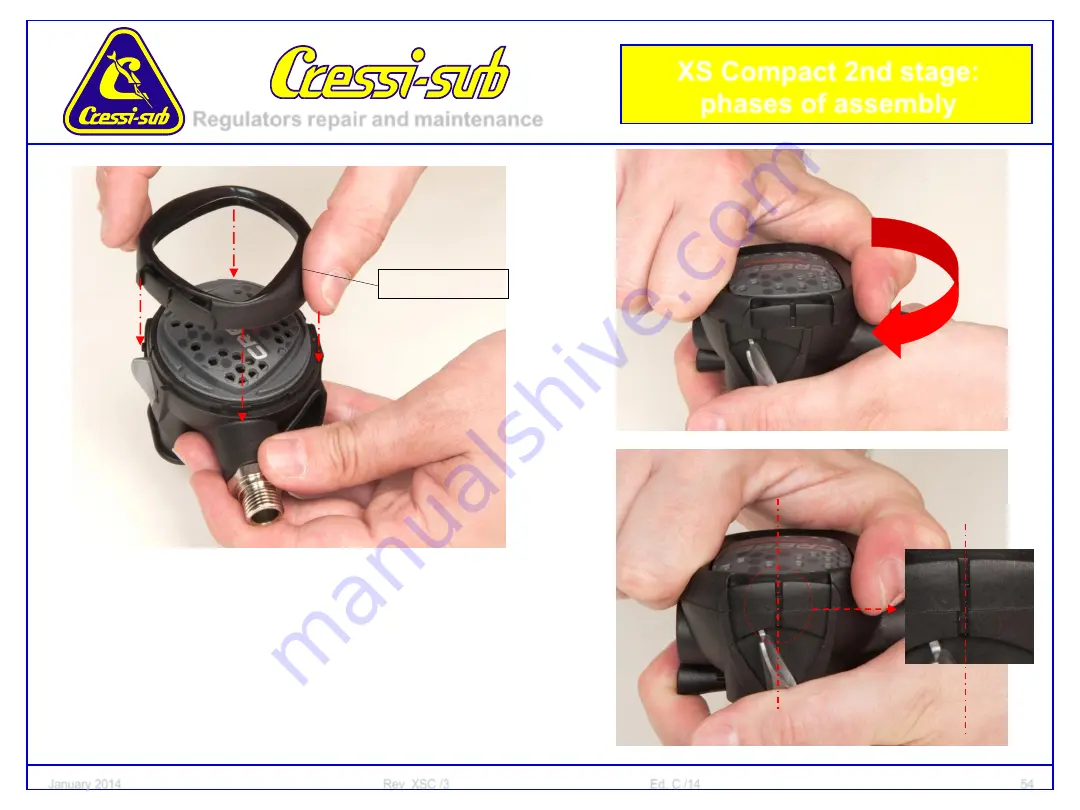
• Place the dome on the button,

and then screw it on all the way

so that the dome lock lines up

with the corresponding one on

the case.

27 = HZ 780062 

Содержание XS Compact

Страница 1: ...Regulators repair and maintenance January 2014 Rev XSC 3 Ed C 14 1 XS Compact 2nd stage ...

Страница 2: ...e operations Users must never perform maintenance themselves all maintenance must be performed EXCLUSIVELY by an authorized Cressi Sub center If the information provided in this document is unclear or not fully intelligible please contact Cressi sub before proceeding with any disassembly or maintenance procedures Before proceeding Cressi sub recommends that you read the following document carefull...

Страница 3: ...ecial attention to the recommendations provided in the margin of the figures that show the various sequences of equipment maintenance and or repair in order to avoid any problems that could result in an accident The document below in no way replaces the equipment s instruction manual The procedures described in this document are pertinent to and intended only for the disassembly maintenance and as...

Страница 4: ...Regulators repair and maintenance January 2014 Rev XSC C Ed C 14 4 XS Compact 2nd stage spare parts exploded diagram XSCOMPACT 2nd STAGE HZ 780060 ANNUAL REPLACEMENT KIT CHART Real Size ...

Страница 5: ...Compact 2nd stage Use only original Cressi sub replacement parts Note we recommend that complete maintenance be performed on the regulator at least once a year or more frequently if used intensively XS Compact 2nd stage service kit Real Size Real Size Go back to HZ 780060 ...

Страница 6: ...e of this equipment are illustrated on page 8 of this document Metal parts must be washed with hot water and neutral detergent and rinsed in fresh water Any concretions must be removed using ultrasound cleaning or with diluted acid solutions always followed by long and thorough rinsing under running water Do not use acids or solvents on rubber components The new ORs must be greased with a thin lay...

Страница 7: ...pertinent to and intended only for the disassembly maintenance and assembly of equipment meant for use with air 21 oxygen 79 nitrogen Users must never perform maintenance themselves all maintenance must be performed EXCLUSIVELY by an authorized Cressi Sub center You can find your authorized Cressi Sub center by asking your dealer or Cressi Sub S p A itself by sending an e mail to info cressi sub i...

Страница 8: ...Regulators repair and maintenance January 2014 Rev XSC C Ed C 14 8 XS Compact 2nd stage Special tools ...

Страница 9: ...emove the O Rings use a plastic tool or a metal one but with a rounded tip in order to avoid damaging the gasket seat To replace the gaskets correctly press on the sides of the O Rings to create a protuberance under which you can insert the tool with the rounded tip used for removing O Rings as shown in the figure Important ONLY USE ORIGINAL CRESSI SUB GASKETS ...

Страница 10: ...ps in disassembly Place a 19 mm wrench on the 2nd stage valve seat nut and at the same time unscrew and remove the low pressure hose with a 17 mm wrench as shown in the figure Check that the low pressure hose shows no clear signs of wear cuts or scrapes especially near the threaded connections ...

Страница 11: ...v XSC C Ed C 14 11 XS Compact 2nd stage steps in disassembly In the annual overhaul the O Rings inside the hose must be replaced and check that the low pressure hose shows no clear signs of wear cuts or scrapes especially near the threaded connections ...

Страница 12: ...ulators repair and maintenance January 2014 Rev XSC C Ed C 14 12 XS Compact 2nd stage steps in disassembly Lever the dome lock retainer and pull it out of the 2nd stage as shown in the figure 26 HZ 780063 ...

Страница 13: ...Regulators repair and maintenance January 2014 Rev XSC C Ed C 14 13 XS Compact 2nd stage steps in disassembly Unscrew the dome as shown in the figure ...

Страница 14: ...Regulators repair and maintenance January 2014 Rev XSC C Ed C 14 14 XS Compact 2nd stage steps in disassembly Remove the dome the button and the button ring from the housing ...

Страница 15: ... 2014 Rev XSC C Ed C 14 15 XS Compact 2nd stage steps in disassembly 27 HZ 780062 26 780063 23 HZ 780069 24 HZ 780068 25 HZ 780067 Grigio Gray 25 HZ 780065 Rosa Pink 25 HZ 780064 Bianco White 25 HZ 780066 Giallo Yellow 25 HZ 780049 Lilla Lilac ...

Страница 16: ...Regulators repair and maintenance January 2014 Rev XSC C Ed C 14 16 XS Compact 2nd stage steps in disassembly Remove the diaphragm from the 2nd stage case 23 HZ 780069 ...

Страница 17: ...intenance January 2014 Rev XSC C Ed C 14 17 XS Compact 2nd stage steps in disassembly Push up on the end of the 2nd stage case side cap fastening tab while simultaneously pushing it out of the regulator as shown in the figure ...

Страница 18: ...aintenance January 2014 Rev XSC C Ed C 14 18 XS Compact 2nd stage steps in disassembly Once the side cap is removed fully unscrew the 5 5 mm nut using the socket screwdriver inserting it through the hole in the case HZ 709009 ...

Страница 19: ...Regulators repair and maintenance January 2014 Rev XSC C Ed C 14 19 XS Compact 2nd stage steps in disassembly Then remove the lever the washer and the nut from the 2nd stage ...

Страница 20: ...Regulators repair and maintenance January 2014 Rev XSC C Ed C 14 20 XS Compact 2nd stage steps in disassembly HZ 709009 11K HZ 746094 12 HZ 780074 ...

Страница 21: ...or case on the work surface and loosen the adjustable nozzle unit with a 19 mm wrench as shown in the figure Note avoid forcing this motion if it proves difficult Instead it can be helpful to tap along the edge of the area to be unscrewed with a hammer made of synthetic material This will free the threads and make removal easier ...

Страница 22: ...Erogatori January 2014 Rev XSC C Ed C 14 22 XS Compact 2nd stage steps in disassembly Then unscrew the adjustable nozzle assembly and remove the valve spindle and the spring from the 2nd stage as shown in the figures 8 HZ 730207 ...

Страница 23: ...Manutenzione Erogatori January 2014 Rev XSC C Ed C 14 23 XS Compact 2nd stage steps in disassembly Replacing the 2nd stage poppet seat is very easy simply slide the spindle bushing removing the seat from its housing ...

Страница 24: ...ri January 2014 Rev XSC C Ed C 14 24 XS Compact 2nd stage steps in disassembly Using the plastic universal extractor tool push and extract the valve body and the injector removing both from the 2nd stage as shown in the figure HZ 739001 ...

Страница 25: ...Regulators repair and maintenance January 2014 Rev XSC C Ed C 14 25 XS Compact 2nd stage steps in disassembly Use a flathead screwdriver to fully unscrew the adjustable nozzle from its housing ...

Страница 26: ... the plastic universal spring pusher into the side opposite the air intake for the nozzle unit This tool is specially designed to avoid damaging the sharp edge of the nozzle NOTE you need to push firmly to exceed the friction exerted by the O Ring on the wall of the body before you can push the nozzle fully out of the nozzle unit HZ709011 ...

Страница 27: ...uary 2014 Rev XSC C Ed C 14 27 XS Compact 2nd stage steps in disassembly Remove the deflector from the regulator case by pushing on the sides as shown in the figure then pull out the discharge valve from its housing 28 HZ 780061 19 HZ 782097 ...

Страница 28: ... maintenance January 2014 Rev XSC C Ed C 14 28 XS Compact 2nd stage steps in disassembly Using a flat tipped tool remove the flow deviator clip ring pushing outward Then pull the flow deviator from its housing 15 HZ 810080 ...

Страница 29: ...ng Movable nozzle unit O Ring Spindle seat Valve spindle assembly Valve spring Valve body Side cap O Ring Nut and washer 2nd stage cap 2nd stage button 2nd stage button ring 2nd stage diaphragm 2nd stage lever Exhaust valve 2nd stage deflector Injector 2nd stage case Flow deviator assembly Dome lock retainer ...

Страница 30: ...XS Compact 2nd stage phases of assembly Insert the flow deviator in its housing after lubricating the O Ring While doing so be careful to line up the hole in the end of the flow deviator with the corresponding pin located inside the 2nd stage case as shown in the figure ...

Страница 31: ...tors repair and maintenance January 2014 Rev XSC C Ed C 14 31 XS Compact 2nd stage phases of assembly Push the flow deviator clip ring into place with one hand and finish with a flat tipped tool 15 HZ 810080 ...

Страница 32: ...2 XS Compact 2nd stage phases of assembly Insert the discharge valve into the 2nd stage checking that it lies against the case with no obstructions for a perfect seal The correct position of the valve stem inside the regulator is shown in the small photo 19 HZ 782097 ...

Страница 33: ...s of assembly First assemble the regulator valve reinserting the seat that was just removed in the seat holder bushing of the valve spindle Note the purpose of using the old seat as we will see is to prevent the new one from getting nicked in this step by the sharp edge of the nozzle 4 HZ 742013 ...

Страница 34: ...r and maintenance January 2014 Rev XSC C Ed C 14 34 XS Compact 2nd stage phases of assembly Insert the spring into the valve body making sure that it inserts properly into its housing inside the valve body 8 HZ 730207 ...

Страница 35: ...pair and maintenance January 2014 Rev XSC C Ed C 14 35 XS Compact 2nd stage phases of assembly Insert the spindle assembly with the old seat into the spring inside the valve body as shown in the figure 7K HZ 780077 ...

Страница 36: ...repair and maintenance January 2014 Rev XSC C Ed C 14 36 XS Compact 2nd stage phases of assembly Screw the two assembled components all the way to the end of the thread without tightening 3 HZ 780080 10 HZ 780075 ...

Страница 37: ...ases of assembly Secure the plastic universal tool in a clamp as shown in the figure to make this operation easier Then insert the end of the spring pusher into the nozzle seat to properly push out the squared section of the valve spindle in the corresponding square section of the valve body ...

Страница 38: ...tenance January 2014 Rev XSC C Ed C 14 38 XS Compact 2nd stage phases of assembly HZ 739001 If no clamp is available these same operations can still be performed using the HZ 739001 plastic universal tool as shown in the figure ...

Страница 39: ...ge phases of assembly Note to make this operation easier it can be helpful to rotate the end of the valve spindle so that its square section visible through the air exhaust hole of the valve body is lined up with the corresponding square section of the valve body in the outward direction ...

Страница 40: ...S Compact 2nd stage phases of assembly Once you have checked the alignment push the valve assembly on the spring pusher in the vise until the square section of the valve spindle comes fully out of the corresponding square section of the valve body as shown in the figure ...

Страница 41: ...ompact 2nd stage phases of assembly Then in sequence insert the lever the washer and the nut as in the figure Note make sure to insert the lever in the correct direction with respect to the valve body using air exhaust hole for reference as shown in the figure 12 HZ 780074 ...

Страница 42: ... 14 42 XS Compact 2nd stage phases of assembly Then screw down the nut with a 5 5 mm socket screwdriver by a few threads enough to hold the lever in the up position while awaiting the proper calibration that will be performed on the assembled regulator HZ 709009 ...

Страница 43: ...014 Rev XSC C Ed C 14 43 XS Compact 2nd stage phases of assembly Check that the valve functions properly by running through the full range of the lever corresponding to the spindle square exiting completely with respect to the valve body square ...

Страница 44: ...Regulators repair and maintenance January 2014 Rev XSC C Ed C 14 44 XS Compact 2nd stage phases of assembly Fully unscrew the movable nozzle unit from the valve body ...

Страница 45: ...r and maintenance January 2014 Rev XSC C Ed C 14 45 XS Compact 2nd stage phases of assembly Remove the old seat from the valve spindle and replace it with the new one contained in the annual maintenance kit 4 HZ 742013 ...

Страница 46: ... Rings insert and push the movable nozzle into its seat to the beginning of the thread following the direction of insertion shown in the figure Screw the nozzle a few turns in its housing but not too far to prevent the sharp edge of the nozzle from nicking the seat during assembly with the valve body Correct calibration will be done when the regulator is assembled ...

Страница 47: ...C C Ed C 14 47 XS Compact 2nd stage phases of assembly Push the valve body complete with lever placing it inside the corresponding hexagonal seat of the injector making sure that the air exhaust hole lines up with the injector hole as shown in the figure ...

Страница 48: ... XSC C Ed C 14 48 XS Compact 2nd stage phases of assembly Push the injector complete with valve body and lever placing it into the hexagonal set of the 2nd stage case The correct insertion direction and placement of the assembly is shown in the figure ...

Страница 49: ...zzle unit to the valve body with a 19 mm wrench taking care to hold down the lever so that the seat does not accidentally touch the sharp edge of the nozzle as shown in the figure Check for correct insertion of the walls of the injector on the corresponding stops of the 2nd stage case which ensure the proper placement of the lever with respect to the diaphragm ...

Страница 50: ...pair and maintenance January 2014 Rev XSC C Ed C 14 50 XS Compact 2nd stage phases of assembly Fasten the deflector to the 2nd stage case sliding it against the appropriate stops as shown in the figure 28 HZ 780061 ...

Страница 51: ... 11 51 XS Compact 2nd stage phases of assembly Place the diaphragm in the 2nd stage case as shown in the figure Then carefully ensure that the outer edges of the diaphragm are seated perfectly in the regulator case 23 HZ 780069 January 2014 Rev XSC C ...

Страница 52: ... Insert the button into the groove provided on the button ring as shown in the figure This combination serves to center and anchor the diaphragm in its working seat inside the 2nd stage case groove 25 HZ 780066 Giallo Yellow 24 HZ 780068 25 HZ 780067 Grigio Gray 25 HZ 780064 Bianco White 25 HZ 780065 Rosa Pink ...

Страница 53: ...3 Ed C 14 53 53 XS Compact 2nd stage phases of assembly Insert the button and diaphragm centering ring assembly rotated slightly so that space A on the button is positioned near B end of dome travel on the case as shown in the enlargement of the figure A B ...

Страница 54: ...ntenance January 2014 Rev XSC 3 Ed C 14 54 XS Compact 2nd stage phases of assembly Place the dome on the button and then screw it on all the way so that the dome lock lines up with the corresponding one on the case 27 HZ 780062 ...

Страница 55: ...January 2014 Rev XSC 3 Ed C 14 55 XS Compact 2nd stage phases of assembly Rotate the flow deviator all the way to make this step easier and then insert the dome lock retainer pushing it into its seat on the case as shown in the figures ...

Страница 56: ... XSC 3 Ed C 14 56 XS Compact 2nd stage phases of assembly Once in the correct position press on the sides of the dome lock retainer until you hear a small click which indicates that is has fitted perfectly with the 2nd stage case as shown in the figure ...

Страница 57: ... stage on a tank filled to 200 bar or on a test bench with similar pressure and then slowly open the air valve while simultaneously pushing the 2nd stage purge button If the regulator releases slowly press and simultaneously rotate the calibration gauge ring HZ 710011 clockwise until flow ceases this way the sharp valve edge should just rest against the closing seat ensuring proper operation Next ...

Страница 58: ...zzle adjustment N B Be careful not to screw the valve nozzle too far or the closing seat could cut be pressed into significantly resulting in inhalation effort due to excessive compression of the valve spring What s more excessive compression of the valve spring will change the correct height of the lever compromising the regulator s breathing performance ...

Страница 59: ...Regulators repair and maintenance January 2014 Rev XSC 3 Ed C 14 59 XS Compact 2nd stage calibration steps HZ 710011 Calibrating the XS Compact second stage valve nozzle adjustment ...

Страница 60: ...h an intermediate pressure hose Insert a 5 5 mm socket screwdriver HZ 709009 into the side opening and rotate the valve nut clockwise until the regulator starts flowing gently Then rotate the calibration nut counter clockwise until flow stops and then continue a bit further to ensure short length of idle travel for the lever Correct calibration of the XS Compact stage is achieved when with the reg...

Страница 61: ...Regulators repair and maintenance January 2014 Rev XSC 3 Ed C 14 61 XS Compact 2nd stage calibration steps HZ 710011 HZ 709009 Calibrating the XS Compact second stage lever height adjustment ...

Страница 62: ...e phases of assembly Once the 2nd stage has been correctly calibrated insert the side cap making sure to insert it in the right direction as shown in the figure The correct direction to insert the cap is shown in the figure Note check the O Ring of the side cap and replace it if necessary ...

Страница 63: ...ter from the mouthpiece After about 5 cm of water the regulator should start to release air until the second stage free flows completely Then check the proper operation of the Venturi flow deviator swiveling the lever to the position the continuous flow must cease Completely immerse the regulator in water with the flow deviator in the pre dive position Wait about a minute and then check that there...

Страница 64: ...Regulators repair and maintenance January 2014 Rev XSC 3 Ed C 14 64 XS Compact 2nd stage overhaul sheet Download Tab ...

Страница 65: ...Regulators repair and maintenance January 2014 Rev XSC 3 Ed C 14 65 XS Compact 2nd stage service records Download Tab Maintenance Service Record ...

Отзывы: