background image

Содержание Lotem 800 II Series

Страница 1: ...www creo com User Guide English Lotem 800 II Family with Spectrum 399Z3R873B...

Страница 2: ......

Страница 3: ...Lotem 800 II Family with Spectrum User Guide...

Страница 4: ......

Страница 5: ...or registered trademarks of Microsoft Corp Xerox is a registered trademark of Xerox Corp Other brand or product names are the trademarks or registered trademarks of their respective owners FCC Compli...

Страница 6: ...58 5 367 360 5 384 648 5 384 899 5 412 491 5 412 737 5 420 702 5 420 722 5 459 505 5 473 733 5 481 379 5 488 906 5 497 252 5 508 828 5 509 561 5 517 359 5 519 852 5 526 143 5 532 728 5 561 691 5 568 5...

Страница 7: ...e Carrier 13 Holding the Carrier 14 Using the Dual Loading Cassette DLC 15 Proofing Workflow with the DLC 16 Arranging Media on the Proofing Tray first generation 16 Arranging Media on the Proofing Tr...

Страница 8: ......

Страница 9: ...Using This Manual Who Should Use This Manual viii...

Страница 10: ...manual assumes that All the hardware software and network components of your Creo system are installed configured and operating correctly Files submitted to the Creo system are free of common errors u...

Страница 11: ...ing Media Overview 2 PC Controller Buttons 3 Configuring New Types of Media 5 Configuring a New Media Group 8 Resetting the Device 10 Handling the Carrier 11 Using the Dual Loading Cassette DLC 15 Usi...

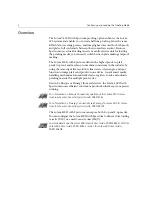
Страница 12: ...image plates and proofs on one device An advanced media handling mechanism automatically cleans registers loads and unloads proofing material for multiple proof cycles Driven by Brisque or Prinergy fr...

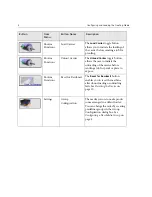
Страница 13: ...on Name Description Routine Functions Loading System This button opens a submenu of options including Unload Media Restart Plate State Load Unload carrier and Reset for Resubmit Routine Functions Unlo...

Страница 14: ...carrier before sending a job for proof or plate to expose Routine Functions Reset for Resubmit The Reset for Resubmit button enables you to reset the machine after donor loading or unloading fails See...

Страница 15: ...initions The Lotem 800 II with Spectrum supports both 8 up and 4 up media Proof specifications for the Lotem 800 II with Spectrum platesetters To define media 1 From the Settings menu select Media Def...

Страница 16: ...n ImationBlack 6 From the Sep Name drop down menu select a color or type a spot color 7 From the Manufacturer drop down menu select the manufacturer name 8 From the Type drop down menu select Negative...

Страница 17: ...d to use To modify the parameters of existing media 1 From the Media List select the media whose parameters you want to edit You can edit all parameters except Name 2 Edit the parameters as explained...

Страница 18: ...ct Group Configuration The Group Configuration dialog box appears Media that have been defined are listed under the Media List 2 Below the Group List box click New 3 In the Group List box type the nam...

Страница 19: ...4 Click Save to save the new media parameters To delete a media group from the Group List Select the requested media group and click Delete Important The order of the media in the Media in Group is si...

Страница 20: ...g window appears 4 From the drop down menu select the next donor you want to load The machine is automatically set to the correct settings Carrier On Receiver On Media to Load the selected donor 5 You...

Страница 21: ...e it as explained in the following procedures Unpacking the Carrier To unpack the carrier from its original packaging 1 Stand the cardboard box in an upright position against a wall Figure 1 Cardboard...

Страница 22: ...ier from the cardboard by peeling off the tape 5 Use a cloth with alcohol to clean the area of the carrier that had tape on it 6 Take the black file and stand it in an upright position againt the wall...

Страница 23: ...should be stored flat in a separate drawer in the media cabinet File Carrier Important Handle carriers carefully Replace a carrier with any dents scratches or kinks as they can cause image defects Ne...

Страница 24: ...he Proofing Media Holding the Carrier Hold the carrier straight as shown in the Figure 5 Do not bend the carrier as shown in Figure 6 Figure 5 Holding the carrier correctly straight Figure 6 Holding t...

Страница 25: ...fs only in the upper tray The DLC is shown below Only one of the compartments can be activated at a time When the upper tray is activated it acts as the main compartment The DLC can load from three fi...

Страница 26: ...then place the proofing tray on the upper tray of the DLC Separators determine the order in which you place the media onto the proofing tray The separators are pre arranged in default order so you on...

Страница 27: ...black tape outline on the separator to center the receiver on the tray 6 When done place the proofing tray on the upper tray of the DLC Changing the Separator Order If you want to change the order of...

Страница 28: ...age 16 for details This is not necessary in the second generation trays To load media in the proofing tray 1 Place the donors on the bottom of the proofing tray It is recommended that the colors be ar...

Страница 29: ...you send a job for proofing To position the carrier in the DLC 1 Place the carrier facing down in the DLC Figure 10 Placing the carrier facing downwards on the DLC 2 Push the carrier forward to the e...

Страница 30: ...to the platesetter 3 From Routine Function select Loading System and click Load Carrier The carrier is loaded onto the drum To load the carrier after submitting a job for proof 1 When a message is dis...

Страница 31: ...Using the Dual Loading Cassette DLC 21 Figure 12 DLC upper tray inserted into platesetter...

Страница 32: ...n the upper tray 1 Place the proofing tray directly on the upper tray of the DLC Figure 13 Proofing tray on DLC 2 Center the proofing tray with the side centering slides of the upper tray until the tw...

Страница 33: ...Using the Dual Loading Cassette DLC 23 Figure 14 Adjustment block Adjustment Block Upper Tray Hole for Adjustment Block...

Страница 34: ...box 2 Select Media Group in Cassette with which you want to work A list you already defined exists in the Media Group dialog box 3 In the Quantity box select the number of media groups in the proofin...

Страница 35: ...Tray To remove the proofing tray 1 Press the knob on the top of the tray to release it There is no need to release the side tray holders Figure 15 Proofing tray knob 2 Align the media notches with the...

Страница 36: ...lide the tray off the DLC 5 Stand the tray upright on the floor Put the tray on a table when not in use Note Make sure the tray stands upright and not on its side so that the weight of the media does...

Страница 37: ...nually do the following To unload the carrier before submitting a job for plate expose From Routine Functions menu select Loading System and click Unload Carrier The carrier is unloaded To unloading t...

Страница 38: ...he MCU only one pre defined cassette can be used for proofing The defined cassette may also be used for exposing plates The proofing tray can hold up to 15 sets of CMYK media The carrier and proofing...

Страница 39: ...the MCU The following general steps are involved in exposing a proof with the MCU To expose proofing media using the MCU 1 Arrange the media on the proofing tray See Arranging Media on the Proofing Tr...

Страница 40: ...proofing tray inside the cassette Figure 19 Carrier on proofing tray Figure 20 Front left side centering block Note The front edge of the carrier should be attached to the front side centering blocks...

Страница 41: ...igure 21 Rear knob 3 Define the carrier and the media group in the Current Cassette dialog box See Current Cassette on page 24 4 Go to Brisque and send a job see the Brisque to Lotem 800 II Lotem Quan...

Страница 42: ......

Страница 43: ...g a job for proof 20 before submitting a job for proof 20 M MCU expose proof 29 Media changing order of separators 17 loading media in profing tray 16 18 loading proofing tray 16 18 removing proofing...

Отзывы: