background image

Inserting and Ejecting a Memory Card

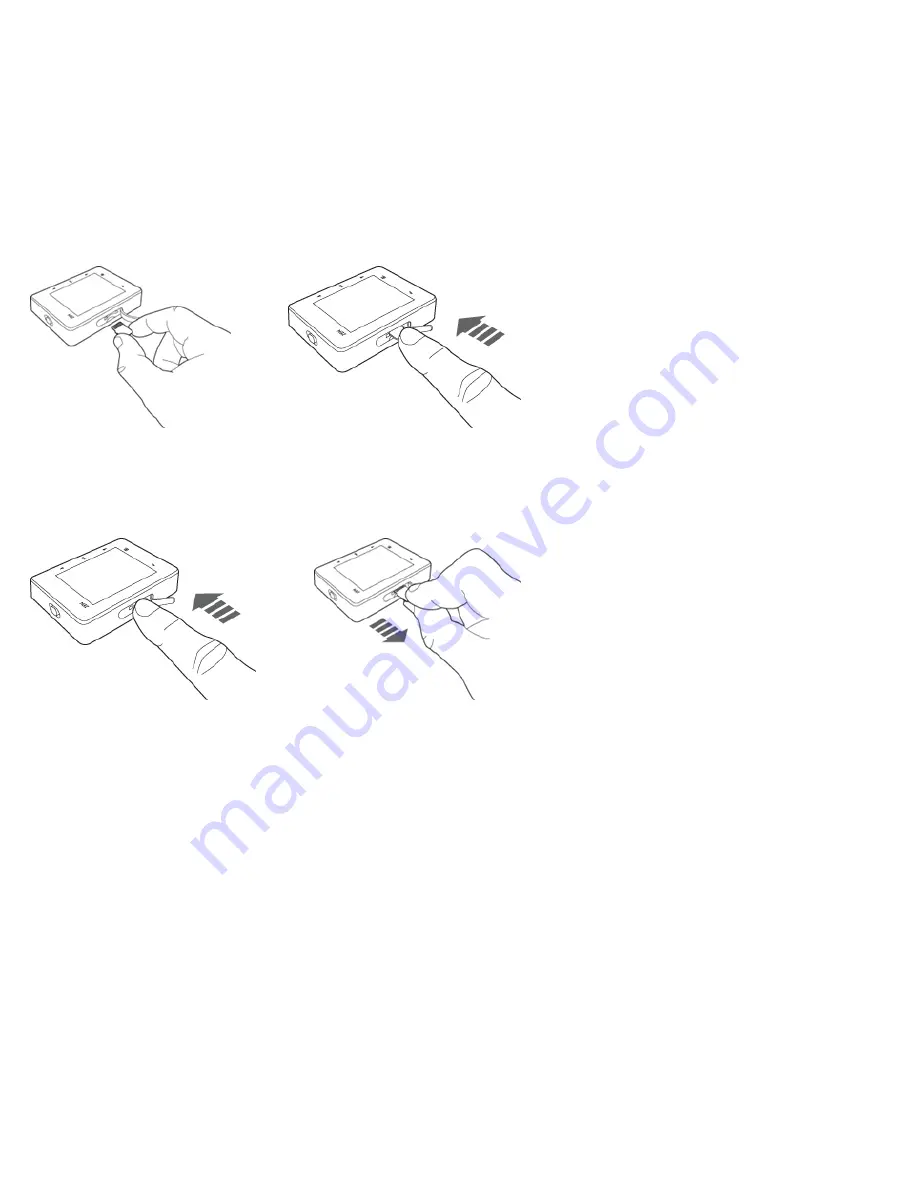
Inserting a Memory Card Correctly

Gently pull the rubber cover that is covering the slot.

Make sure that the memory card is properly aligned with the slot, then gently push to lock it in place.

Ejecting a Memory Card Correctly

Push to eject the memory card, then gently pull it out from the slot.

Warning

To avoid damage to your memory card:

l

Do not force the memory card in the slot. If it does not fit properly, gently remove and try again.

l

Do not shake the memory card when removing.

l

Remove the memory card only when your player displays the main menu or when your player is turned off.

l

If your player is connected to your computer, do not insert or eject the memory card from your player.

Содержание ZEN X-FI3 -

Страница 1: ...Fi3 Creative ZEN X Fi3 is a music and video player voice recorder and FM radio all rolled into one It can also stream music output to Bluetooth compatible devices For setup and installation instructi...

Страница 2: ...Your Player at a Glance This section introduces your player and its parts Click the numbered labels for more information...

Страница 3: ...nd Off To turn on your player n Slide the Power Lock switch to and hold for a few seconds The display screen lights up To turn off your player n Slide the Power Lock switch to and hold until the Shutt...

Страница 4: ...egories of content or player information Examples of menus are Music and System Options are actions you can perform on a menu item Examples of options are EQ and Delete When you turn on your player yo...

Страница 5: ...Options At any menu press to view the available options To exit press...

Страница 6: ...Selecting an item 1 Press or to highlight a menu or option item 2 Press to select...

Страница 7: ...cking your player is useful when you do not want to acci dentally activate functions on your player such as when your player is in your pocket or bag To lock your player n Slide the Power Lock switch...

Страница 8: ...hen you rip music you convert music tracks often from CDs into a format suitable for playback on your computer You can rip music using applications such as Windows Media Player For more information re...

Страница 9: ...with the application Warning Please ensure that you do not disconnect your player from your computer during file transfer To disconnect click Safely Remove Hardware Safely Remove USB Mass Storage Devi...

Страница 10: ...n also search your tracks by playlist To play a music track 1 On the main menu select Music 2 Select a category such as Albums Artists or Genres If you want to search by track title select All Tracks...

Страница 11: ...Adjusting Volume While a song or video is playing press the or button at the right hand side of the player to increase or decrease the volume...

Страница 12: ...owing options l Normal Plays your selected tracks in sequential order l Track Once Stops playing after the current track ends l Repeat Track Repeats the current track l Shuffle Repeat Plays and repeat...

Страница 13: ...delete a track from the player 1 In the Music view select Albums Artists Genres or All Tracks to locate the song you would like to delete 2 Press and select Delete 3 Press 4 Press or to highlight Yes...

Страница 14: ...e main menu select DJ 2 Select one of the following l Album of the Day Plays any album l Random Play All Plays all tracks including your recorded tracks in random order l Most Popular Plays frequently...

Страница 15: ...shown 3 Use the or key to choose the song you would like to add to the current list Press to confirm selection and the selected song will be highlighted Repeat this action until you have chosen all t...

Страница 16: ...st view press and select Edit 2 Once in the All Tracks menu a list of all the songs available will be shown 3 Use or to go to the highlighted song you want to remove Press the to unhighlight to remove...

Страница 17: ...y from your ears giving you a more acoustically natural sound staging in headphone audio X Fi Expand works best with your earphones or headphones 1 On the main menu press to select X Fi Use the or key...

Страница 18: ...Feature You can stream music from your player to Bluetooth compatible speakers or headphones l Turning on Bluetooth l Pairing with a Bluetooth Device l Streaming Music to a Bluetooth Device l Clearin...

Страница 19: ...Turning on Bluetooth 1 On the main menu select Bluetooth Bluetooth OFF 2 Press to switch to Bluetooth ON...

Страница 20: ...devices appears 2 Press to select the desired Bluetooth device 3 If you are prompted to enter a 4 digit code from compatible speakers and headphones please key in the code using the or buttons to scr...

Страница 21: ...the Now Playing Audible FM or Videos menu press 2 Use the or key to go to Headphone 3 Press to toggle Headphone Speaker BT Stream 4 When BT Stream is selected the audio output will now come out from t...

Страница 22: ...Clearing the Bluetooth Device List 1 On the Bluetooth menu select Clear ALL 2 Press to clear the device list...

Страница 23: ...udible files appears 2 Select the file you want and press 3 To delete a file press in the file list view and select Delete l For content purchased from audible com please use Audible Manager to manage...

Страница 24: ...stening to the Radio Your player saves FM radio stations as presets The FM frequency range on your player is set to International by default Most regions in the world receive FM broadcasts in this ran...

Страница 25: ...hones act as an antenna and must be connected to your player for radio reception 2 On the main menu select FM Radio 3 Press and select Autoscan 4 When prompted to start autoscan select Yes You will be...

Страница 26: ...Press and then press to switch from Preset Tuning to Manual Tuning On your display the word preset disappears 4 Press and hold or to scan for the next available radio station Press or to fine tune th...

Страница 27: ...Deleting Radio Presets 1 On the main menu select FM Radio 2 Select a preset 3 Press and select Delete Preset...

Страница 28: ...Viewing Your Presets 1 On the main menu select FM Radio 2 Press The list of presets appears...

Страница 29: ...and go to the main menu press l The player automatically saves the recorded file into the Recordings folder as a track named MIC followed by the date and time of the recording YYYY MM DD HH MM SS For...

Страница 30: ...Playing Recordings 1 On the main menu select Recordings 2 Select the track you want The track plays automatically 3 Press to go to Recordings screen to select other recordings...

Страница 31: ...on to navigate and press to select The photo appears in full screen 3 You can do several things while viewing photos Press and select one of the following l AV Out to view the photos on the TV screen...

Страница 32: ...layer for eg Windows Media Video 320x240 format You can transfer videos to your player by simply drag and drop Grab your desired video file from Windows Explorer and drop it to the My Videos folder on...

Страница 33: ...r Release the buttons to resume playback 6 While playing the video you can adjust the volume 7 You are able to do several things while playing videos Press and select one of the following l AV Out to...

Страница 34: ...Deleting a Video 1 On the main menu select Videos 2 Select a video 3 Press and select Delete 4 Press to select Yes...

Страница 35: ...l cable cable sold separately For more information on the cable and other accessories visit www creative com 1 Connect the player to your TV via the cable 2 On the player s menu select Videos 3 Select...

Страница 36: ...Customizing Your Player Setting the Menu Language 1 On the main menu select System Language 2 Select the language that you want...

Страница 37: ...s You can select an equal izer preset to suit the genre or style of your music To select an equalizer preset 1 On the main menu select Music Now Playing 2 Press and select EQ 3 Press repeatedly to cyc...

Страница 38: ...Setting the Display Brightness 1 On the main menu select System Brightness 2 Select the setting that you want...

Страница 39: ...Setting the Backlight Duration 1 On the main menu select System Backlight Time 2 Select the length of time that you want your player s backlight to be on before it dims...

Страница 40: ...wn Time You can specify how long your player can remain inactive before it automatically shuts down This feature helps you save battery power 1 On the main menu select System Idle Shutdown 2 Select th...

Страница 41: ...Using the Clock To display the time select Time on the main menu To set the date and time see Setting the Date and Time To set the alarm see Setting the Alarm...

Страница 42: ...the main menu select Time The current date and time are displayed 2 Press and select Set Time or Set Date 3 Press or to change the value of the field 4 Press to set the value The cursor will move to...

Страница 43: ...option and press 5 Use the or button to change the alarm time and also the to change between Hour Minutes and AM PM settings To exit press 6 Go to the schedule and use the to toggle the schedule you r...

Страница 44: ...Resetting Your Player You can reset your player to its original settings On the main menu select System Reset Settings...

Страница 45: ...Using a Memory Card Inserting and Ejecting a Memory Card Playing Media from a Memory Card Transferring Files to and from Your Memory Card...

Страница 46: ...ush to eject the memory card then gently pull it out from the slot Warning To avoid damage to your memory card l Do not force the memory card in the slot If it does not fit properly gently remove and...

Страница 47: ...in the player s internal memory upon startup Once integrated you can search for music tracks by album artist or genre Alternatively you can also play media contents from the microSD memory card On th...

Страница 48: ...onnect your player or attempt to remove the memory card during file transfer l To disconnect click Safely Remove Hardware Safely Remove USB Mass Storage Device from the taskbar l If your player is con...

Страница 49: ...eiving antenna l Increase the separation between the equipment and receiver l Connect the equipment into an outlet on a circuit different from that to which the receiver is connected l Consult the dea...

Страница 50: ...oducts the exposure may be below the Proposition 65 level of concern or could even be zero However out of an abundance of caution Creative has elected to place the Proposition 65 warning on its produc...

Страница 51: ...ppareil peut entra ner l annulation du droit de l uti lisateur utiliser l appareil European Compliance This product conforms to the following EMC Directive 2004 108 EC Mains operated products for the...

Страница 52: ...TERY This product contains a Lithium ion polymer battery that should only be removed by an authorized recycling centre By recy cling this product at your local authorized recycling centre or the place...

Страница 53: ...positivo sem fio est em conformidade com os requisitos essenciais e com outras cl usulas relevantes da Diretiva 1999 5 EC SV H rmed intygar Creative Technology Ltd att denna tr dl sa enhet st r i vere...

Страница 54: ...edia K K customer support at http jp creative com support contact in Japanese l For recycling of replaceable removable lithium rechargeable batteries o It is recommended to remove the rechargeable bat...

Страница 55: ...tout accident de le circulation En outre il est interdit dans certains pays d utiliser un casque ou des couteurs en con duisant Il peut tre galement dangereux d couter volume lev tout en marchant sp c...

Страница 56: ...road especially in heavy traffic or in any other traf fic condition where such use will hinder safe travel on the roads We recommend that consumers be extremely cautious when using this device on the...

Страница 57: ...demarks of Creative Technology Ltd in the United States and or other countries The Bluetooth word mark and logos are owned by the Bluetooth SIG Inc and any use of such marks by Creative Technology Ltd...

Отзывы: