background image

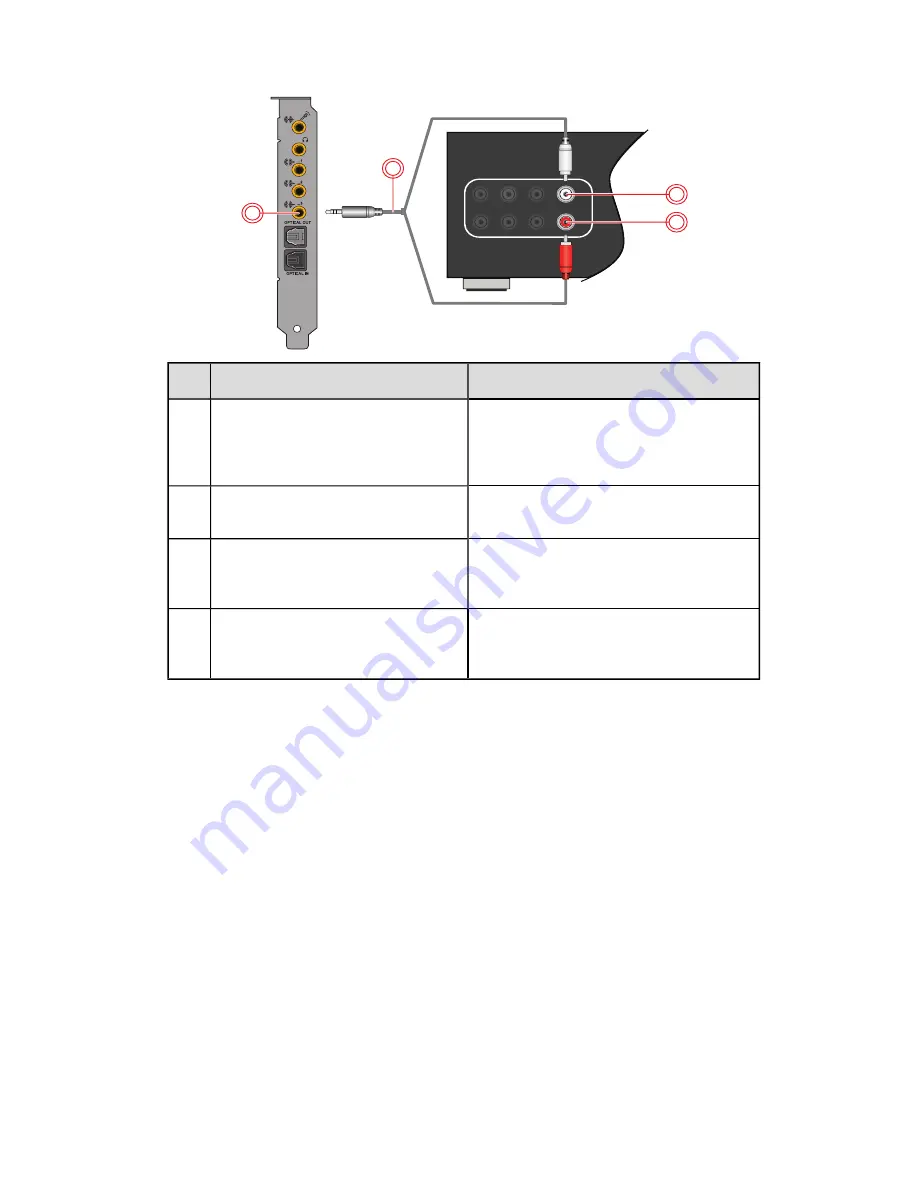
Connect Line Out 3 (Center/Subwoofer)

1

2

3

4

Jack, Connector or Cable

Description

1.

Line Out 3 jack (Center/Subwoofer)

Connects to the Center and Subwoofer
jacks on your A/V receiver, using a 3.5mm
(1/8-inch) stereo-to-RCA cable (available
separately

2.

3.5mm (1/8-inch) stereo-to-
RCA cable (available separately)

Connects your audio card and A/V receiver.

3.

Subwoofer jack

Connects to the Line Out 3 jack on your
audio card, using a 3.5mm (1/8-inch)
stereo-to-RCA cable (available separately).

4.

Center jack

Connects to the Line Out 3 jack on your
audio card, using a 3.5mm (1/8-inch)
stereo-to-RCA cable (available separately).

Connecting Speakers and Headphones 15

Содержание SB1500

Страница 1: ...User s Guide SB1500 SB1502 SB1506 ...

Страница 2: ... 32 bit or 64 bit Windows 7 32 bit or 64 bit l 1 GB RAM l 600 MB of free hard disk space l Available PCI Express slot l CD or DVD drive for software installation l High quality headphones or powered amplified speakers available separately Additional Requirements where applicable DVD Video l 6x or faster DVD drive l DVD player software such as InterVideo WinDVD or CyberLink PowerDVD latest version ...

Страница 3: ...system OS language and Creative products are installed in your system After the online analysis you will be able to select from a list of only the most relevant software and driver updates The files will then be retrieved and installed on your system for you To learn more about Creative Software AutoUpdate visit www soundblaster com support Notes l First time users of Creative Software AutoUpdate ...

Страница 4: ...wing sections l Your Sound Blaster Z Series Audio card l Audio Control Module Notes Actual products may differ slightly from those shown in this chapter Your Sound Blaster Z Series Audio card Your Sound Blaster Z Series audio card has the jacks and connectors below to enable the attachment of a wide variety of devices SB1502 1 2 3 4 5 6 7 8 SB1500 SB1506 1 2 3 4 5 6 7 8 About Your Hardware 3 ...

Страница 5: ...ered analog speakers or an A V receiver 6 Optical S PDIF Out jack Connects to recording devices with optical connectors for example Digital Audio Tape recorders MiniDisc recorders or external hard disk recorders 7 Optical S PDIF In jack Connects to playback devices with optical connectors for example Digital Audio Tape players MiniDisc players or DVD players 8 Front Panel Header Audio connector Co...

Страница 6: ... 6 3 5mm Headphone jack Connects to stereo headphones or head sets with a 3 5mm 1 8 inch plug Note The 6 3mm Microphone In jack takes priority over the 3 5mm Microphone In jack When connected to the Sound Blaster Z Series the built in beamforming microphone features CrystalVoice technologies which is designed to deliver crystal clear vocal fidelity in multiplayer games online chats and video confe...

Страница 7: ...he audio level from your games or music Note The ACM Volume Control Knob allows you to adjust headphone levels conveniently based on the maximum level set by your computer s master volume control We recommend that you determine the desired maximum volume on your computer before using the ACM About Your Hardware 6 ...

Страница 8: ...onnecting Headphones and Headsets l Connecting Audio Control Module For tips on how to arrange your speakers consult Positioning Your Speakers For a list of supported Creative speaker systems or interactive help on speaker connectivity visit www soundblaster com Note l Actual products may differ slightly from those shown in this chapter l Select the correct speaker setup or headphone option in the...

Страница 9: ...anced listening experience Below are our recommendation for 5 1 channel speakers For detailed speaker placement tips consult the documentation of your speaker system For 5 1 channel speakers 1 5 6 2 4 3 Speaker Component 1 Subwoofer 2 Front left 3 Front Center 4 Front Right 5 Rear Right 6 Rear Left Connecting Speakers and Headphones 8 ...

Страница 10: ...rent channel speaker systems consult the following sections l 2 1 channel analog speakers l 5 1 channel analog speakers 2 1 channel analog speakers audio inputs speakers audio inputs 1 2 3 Jack Connector or Cable 1 Line Out 1 jack Front L R 2 2 channel audio cable available separately 3 Audio Input jack Connecting Speakers and Headphones 9 ...

Страница 11: ...enter subwoofer audio inputs 2 3 1 4 7 5 6 Jack Connector or Cable 1 Line Out 1 jack Front L R 2 Line Out 2 jack Rear L R 3 Line Out 3 jack Center Subwoofer 4 5 1 channel audio cable available separately 5 Front Audio Input jack 6 Rear Audio Input jack 7 Center Subwoofer Audio Input jack Connecting Speakers and Headphones 10 ...

Страница 12: ...eaker system Connecting your digital speakers to the Sound Blaster Z Series 1 OPTICAL COAXIAL REAR 16V AC IN FRONT CENTRE SUBWOOFER REAR CENTER AUDIO OUTPUTS AUDIO INPUTS ANALOG LEFT RIGHT 1 2 3 1 2 3 SPEAKER CONFIGURATION 6 1 7 1 5 1 MASTER CENTER SIDE REAR SUB TREBLE 5 1 6 1 7 1 7 1 UPMIX MIN MAX M PORT STANDBY POWER VOLUME SELECT UPMIX STANDBY POWER CENTERREAR TREBLE SUB SIDE MUTE UPMIX VOL 2 3...

Страница 13: ...r For more information on your A V receiver s speaker connections consult the documentation of your A V receiver Connecting your A V receiver to the Sound Blaster Z Series 1 BASS TREBLE BALANCE VOL POWER INPUT MODE PROGRAM INPUT SELECTOR VIDEO L R EFFECT PHONE 2 3 Jack Connector or Cable 1 Optical S PDIF Out jack 2 Optical cable available separately 3 Optical S PDIF In jack Connecting Speakers and...

Страница 14: ... Connects to the Front left and Front Right jacks on your A V receiver using a 3 5mm 1 8 inch stereo to RCA cable available separately 2 3 5mm 1 8 inch stereo to RCA cable available separately Connects your audio card and A V receiver 3 Front Right jack Connects to the Line Out 1 jack on your audio card using a 3 5mm 1 8 inch stereo to RCA cable available separately 4 Front Left jack Connects to t...

Страница 15: ...ble separately 2 3 5mm 1 8 inch stereo to RCA cable available separately Connects your audio card and A V receiver 3 Rear Right jack Connects to the Line Out 2 jack on your audio card using a 3 5mm 1 8 inch stereo to RCA cable available separately 4 Rear Left jack Connects to the Line Out 2 jack on your audio card using a 3 5mm 1 8 inch stereo to RCA cable available separately Connecting Speakers ...

Страница 16: ...e available separately 2 3 5mm 1 8 inch stereo to RCA cable available separately Connects your audio card and A V receiver 3 Subwoofer jack Connects to the Line Out 3 jack on your audio card using a 3 5mm 1 8 inch stereo to RCA cable available separately 4 Center jack Connects to the Line Out 3 jack on your audio card using a 3 5mm 1 8 inch stereo to RCA cable available separately Connecting Speak...

Страница 17: ...e Sound Blaster Z Series For headphones 1 Jack Connector or Cable Description 1 Headphone jack Connects to stereo headphones with a 3 5mm 1 8 inch plug For headsets 1 2 Jack Connector or Cable Description 1 Line In Microphone In jack Connects to the 3 5mm 1 8 inch micro phone plug of your headset 2 Headphone jack Connects to stereo headphones with a 3 5mm 1 8 inch plug Connecting Speakers and Head...

Страница 18: ...only Connecting your ACM to the Sound Blaster Z Series 1 2 Jack Connector or Cable Description 1 Line In Microphone In jack Connects to the 3 5mm 1 8 inch microphone plug of your ACM 2 Headphone jack Connects to your ACM with a 3 5mm 1 8 inch plug Connecting Speakers and Headphones 17 ...

Страница 19: ... able to hear both headphones with the same output However the Microphone In jacks on the ACM follow the below priority sequence l Priority 1 6 3mm Microphone In jack l Priority 2 3 5mm Microphone In jack l Priority 3 Built in Beamforming Microphone For example when user plugs in external microphones to both 6 3mm and 3 5mm Microphone In jacks the 6 3mm Microphone In jack will take priority over t...

Страница 20: ...ialog box appears click the Continue button 4 Click the Yes button 5 When prompted restart your computer For Windows 8 1 At the right toolbar click Settings Control Panel Uninstall a Program 2 Select the Sound Blaster Z Series entry 3 Click the Uninstall button or option 4 Click the Yes button 5 When prompted restart your computer To complete the uninstallation you will also need to remove the fol...

Страница 21: ...r option When the Confirm Uninstall dialog box appears click the OK button For Windows 8 1 At the right toolbar click Settings Control Panel Uninstall a Program 2 Select the DTS Connect entry 3 Click the Uninstall button or option After you have completed the steps above you can install the original or updated device drivers and applications for Sound Blaster Z Series For instructions on installin...

Страница 22: ... To complete the installation follow the instructions on the screen If you encounter the following message click Install 3 When prompted restart your computer For Windows 8 1 Insert the Installation CD into your CD or DVD drive 2 In a short while a drive icon will be displayed Click on the icon and then choose Run setup exe If you do not see the drive icon follow the steps below i Right click on t...

Страница 23: ... precise environment settings applied to them to create a life like environment and heighten the sense of realism Each effect is also accurately positioned in its 3D environment allowing you to tell where it is coming from relative to your location and you will be able to discern where your teammates and enemies are using only these audio cues EAX ADVANCED HD is a weapon that will give you the com...

Страница 24: ...n your 5 1 speaker systems Decoding with a software DVD player You can use a software DVD player to decode Dolby Digital or DTS encoded signals from your DVDs and output multi channel audio through your audio card to your speakers To do so you need to install a software DVD player such as PowerDVD or WinDVD latest version recommended Decoding with an external decoder You can pass Dolby Digital or ...

Страница 25: ...onnector or Cable Description 1 Optical S PDIF Out jack Connects to recording devices with optical connectors for example DAT recorders MD recorders or external hard disk recorders 2 Optical S PDIF In jack Connects to playback devices with optical connectors for example DAT players MiniDisc players or DVD players 3 Optical cable available separately Connects the playback or recording device to you...

Страница 26: ...aster Z Series 1 Jack Connector or Cable Description 1 Line In Microphone In jack Connects to line level sources for example MP3 players or microphones with a 3 5mm 1 8 inch plug Chatting Gaming Your Sound Blaster Z Series can also be connected to hands free microphones or the Sound Blaster Beamforming Microphone making over the Net chatting a hassle free affair Now you can enjoy clear voice chat ...

Страница 27: ...ive Software AutoUpdate l Creative Host OpenAL EAX5 0 HD l Creative Product Registration l Creative Diagnostics l Dolby Digital Live encoder l DTS Connect encoder l Sound Blaster Speaker Setup Various other bonus Creative applications are also compatible for your audio card Visit www creative com support and navigate to the relevant product page to view and download these applications Note l The a...

Страница 28: ...profile Click to delete the active profile Sharing Profiles You can export your custom settings and share them with others or import other gamers custom settings Customizing Your Avatar You can customize the avatar for each profile Double click the current avatar to open the selection window You can either select an avatar from the list or click to select your own image file to be used as the avat...

Страница 29: ... their default values You can also check for software updates Click and configure various options from the list that displays including l Options Enable the system to automatically check for software updates when your computer is online l Select whether the Sound Blaster Z Series Control Panel is activated when Windows starts l Restore default settings l Select the audio playback device l Select t...

Страница 30: ... unbelievably true to life audio experience whether it s over stereo speakers or headphones l SBX Pro Studio Crystalizer restores the dynamic range that is lost when iTunes and MP3 music gets compressed This makes the music sound as good as the artist originally intended and adds an enhanced level of realism for movies and games l SBX Pro Studio Bass fills in the low frequency tones and gives the ...

Страница 31: ...es it convenient for the speaker to converse normally regardless of whether the speaker is close to or far away from the microphone l CrystalVoice Noise Reduction enables the speaker to be heard clearly over background noise by constantly monitoring the environment and eliminate the unwanted noise that interferes with the conversation l CrystalVoice Acoustic Echo Cancellation eliminates echoes and...

Страница 32: ...bles you to hear your opponents from further away giving you a distinct tactical advantage in combat 1 Scout mode Select to turn on or off Scout mode Click to configure hotkeys for turning on and turning off Scout mode Using the Creative Software Suite 31 ...

Страница 33: ...r direct playback to stereo speaker channel sampled at 192kHz The following features will not be applied to this playback l SBX Pro Studio suite of audio enhancements l DTS Connect l Dolby Digital Live l Equalizer Testing Your Audio Playback Select the appropriate configuration based on your setup then click to hear a sample audio clip being played back through your setup Using the Creative Softwa...

Страница 34: ...ital Live or DTS Connect to turn on the respective encoders Setting up DTS Connect Under DTS Connect select or unselect the option DTS Neo PC and configure its various settings according to your audio playback needs To learn more about DTS Connect please visit www dts com Using the Creative Software Suite 33 ...

Страница 35: ...lowing analog sources Front Microphone Rear Micro phone or Rear Line in Only one source can be active at any one time Adjusting Your Mixer Settings Slide the volume level sliders right to increase and left to decrease Click the icon to mute unmute the input output You can click the icon to adjust the settings for your input output Using the Creative Software Suite 34 ...

Страница 36: ...e Input Device configuration allows you to specify the input source you wish to activate Step 1 Launch the Sound Blaster Z Series Control Panel from your Windows start menu Step 2 Select Mixer to view the Mixer configuration interface Step 3 Click the Input Device button and select the appropriate input source For example if you would like to record from a microphone connected to the Intel HD Fron...

Страница 37: ...ure then click the EQ drop down arrow and select a preset from the list Selecting a preset will move the EQ sliders to the appropriate values You can then adjust the equalizer setting by dragging the sliders up or down to the desired level Click to save the new configuration as a new preset Note The list of default EQ presets cannot be deleted or overwritten Using the Creative Software Suite 36 ...

Страница 38: ...o digital output Select the checkbox to down mix the audio with its effects to a stereo PCM stream to be channeled to digital output Note You must first select Speaker as the playback device to use this feature Using the Creative Software Suite 37 ...

Страница 39: ...the Compatibility tab and select the Compatibility Mode checkbox 4 Click the Compatibility Mode drop down arrow and select Windows XP Service Pack 2 then click OK Enable the Game in Creative ALchemy For Windows 7 1 Click Start Programs or All Programs Creative ALchemy Creative ALchemy 2 The game should be detected automatically and appear in the left column 3 Select the game and click to move it t...

Страница 40: ...erformance in popular VoIP applications like Ventrilo and TeamSpeak Hear and be heard clearly by teammates during multi player games to get the tactical edge You can enhance such voice communications using CrystalVoice enhancements For more details please refer to CrystalVoice Settings Using the Creative Software Suite 39 ...

Страница 41: ...ound Blaster Z Series audio card comes bundled with the Sound Blaster Speaker Setup application Simply launch this application from the Sound Blaster Z Series Control Panel icon found in Speakers Headphones settings or your Windows start menu and adjust the settings to create a virtual speaker placement Speaker Configuration Here you can configure your current speaker system and also conduct sound...

Страница 42: ...nd follow the on screen procedure to check your the speaker wiring Speaker Position This tab helps you to maximize your speakers audio performance when you are unable to optimize your speaker positioning due to physical space constraints You will need to specify l the distance between the ideal listening position and each of your speakers l the angle of your speakers l position of the Front Center...

Страница 43: ... to achieve a balanced level for each speaker Speaker level is affected mainly by the distance between the speaker and the listener Click the Level Test button and adjust the speaker level for each speaker accordingly Using the Creative Software Suite 42 ...

Страница 44: ...nterface S PDIF format of up to 24 bit 96 kHz quality l S PDIF output at selectable sampling rate of 44 1 48 or 96 kHz from Microsoft Control Panel l S PDIF output not available during playback of protected digital audio content authored with DRM Digital Rights Management technology Note Depending on your system configuration output sampling frequencies may be available at 48 and 96 kHz Flexible M...

Страница 45: ...io Connector Connection Compatibility l Intel HD Front Panel Audio standard only Not compatible with AC97 or Intel compatible HD Front Panel Audio Pin Configuration Pin Signal Name Description 1 PORT 1L Analog Port 1 left channel Microphone 2 GND Ground 3 PORT 1R Analog Port 1 right channel Microphone 4 PRESENCE Active low signal that signals BIOS that an Intel HD Audio dongle is connected to the ...

Страница 46: ...el in the list right click and select Properties 4 Click the Advanced Settings tab and select the Enable DMA checkbox 5 Click the OK button For Windows 8 1 At the right toolbar click Settings Control Panel Hardware and Sound Device Manager If the User Acocunt Control dialog box appears click the Continue button 2 Double click the IDE ATA ATAPI Controllers icon 3 For each ATA Channel in the list ri...

Страница 47: ...card a message box recommending that you completely uninstall and remove the older audio device will appear Click the Yes button to continue with the installation of the audio card After the installation of the audio card completely uninstall the existing card and remove the audio card from your computer If the system has an onboard audio chipset Disable your computer s onboard audio chipset Consu...

Страница 48: ...dismantle or attempt to repair your product Refer all servicing to authorized repair agents l Do not expose your product to temperatures outside the range of 0 C to 45 C 32 F to 113 F l Do not pierce crush or set fire to your product l Keep your product away from strong magnetic objects l Do not subject your product to excessive force or impact l Do not expose your product to water or moisture If ...

Страница 49: ...dio and the SBX logo are trademarks or registered trademarks of Creative Technology Ltd in the United States and or other countries Manufactured under the license from Dolby Laboratories Dolby and the double D symbol are trademarks of Dolby Laboratories All other trademarks are properties of their respective owners All specifications are subject to change without prior notice Use of this product i...

Отзывы: