Copyright © 2006 Creative Technology Ltd. All rights reserved. The Creative logo is a registered trademark of
Creative Technology Ltd. Windows is a registered trademark of Microsoft Corporation. All rights reserved. All
other logos, brand or product names are trademarks or registered trademarks of their respective holders and
are hereby recognised as such. All specifications are subject to change without notice. Actual contents may
differ slightly from those pictured.
The use of the WEEE Symbol indicates that this product may not be treated as
household waste. By ensuring this product is disposed of correctly, you will
help protect the environment. For more detailed information about the
recycling of this product, please contact your local authority, your household
waste disposal service provider or the shop where you purchased the product.
PN 0300000000339 Rev.A
Resolve and troubleshoot technical queries at Creative's 24-hour self-help
Knowledge Base.
Go to
www.creative.com
, select your region and then select
Support
.
Creative Knowledge Base
Customer Support Services & Warranty
Product Registration
Registering your product ensures you receive the most appropriate service and
product support available. You can register your product during installation or at
www.creative.com/register
.
Please note that your warranty rights are not dependent on registration.
You can find Customer Support Services, Warranty and other information in the
Installation CD.
Customer Support Services
d:\support\<region>\<language>\support.chm
Warranty
d:\warranty\<region>\<language>\warranty.chm
Please keep your Proof of Purchase for the duration
of the warranty period.
(replace
d:\
with the drive letter of your CD-ROM/DVD-ROM drive,
<region>
with the
region that you are in, and
<language>
with the language that your document is in)
Keep this document for future reference.
QUICK START
The use of the WEEE Symbol indicates that this
product may not be treated as household waste. By
ensuring this product is disposed of correctly, you
will help protect the environment. For more detailed
information about the recycling of this product,
please contact your local authority, your household
waste disposal service provider or the shop where
you purchased the product.
You need to install the software in the Installation CD
to configure the buttons on your Creative Mouse
Gamer HD7600L.
Windows 98 and 98 SE users may be prompted by an
Add
New Hardware Wizard
dialog box when Windows detects
your USB device. Follow the instructions on the screen. You
may need to insert the Windows Installation CD into the
CD-ROM drive during installation. Some computers may be
supplied without the Windows CD, but have the necessary
files stored in
c:\windows\options\cab
s (replace
c:
\ with the
drive letter your Windows has been installed on).
1. Insert the Creative Mouse Gamer HD7600L
Installation CD into your CD-ROM/DVD-ROM
drive. Your CD should start automatically.
If it does not, follow the steps below:
i.
Double-click
the
My Computer
icon.
Alternatively,
click
Start
→
My Computer
.
ii. Right-click the CD-ROM/DVD-ROM drive icon,
and then click
Autoplay
.
2. Follow the instructions on the screen to install
your Creative Mouse Gamer HD7600L.
3. When prompted, restart your computer to
complete the installation.
It is recommended that you uninstall any previously
installed mouse software, before installing the Creative
Mouse Gamer HD7600L software.
a. Connect the USB connector to the USB port on
your computer.
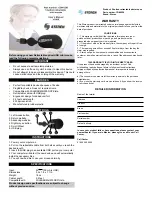
a. Right mouse button
b. Scroll wheel / button
c. DPI Resolution Dial
d. DPI Resolution LED
e. Game-On Cover
f. Thumb
button
1
g. Thumb button 2
h. Left mouse button
i. USB
connector
Overview
Connecting Your Mouse
Installing Device Drivers and
Software
Resolve and troubleshoot technical queries at Creative's
24-hour self-help Knowledge Base.
Go to
www.creative.com
, select your region and then
select
Support
.
Creative Knowledge Base
Customer Support Services &
Warranty
Product Registration
Registering your product ensures you receive the most
appropriate service and product support available. You
can register your product during installation or at
www.creative.com/register
.
Please note that your warranty rights are not dependent
on registration.
You can find Customer Support Services, Warranty and
other information in the Installation CD.
Customer
d:\support\<region>\
Support
<language>\support.chm
Services
Warranty
d:\warranty\<region>\
<language>\warranty.chm
Please keep your Proof of Purchase for the
duration of the warranty period.
Keep this document for future reference.
(replace
d:\
with the drive letter of your CD-ROM/DVD-ROM
drive,
<region>
with the region that you are in, and
<language>
with the language that your document is in)
The use of the WEEE Symbol indicates that this
product may not be treated as household waste. By
ensuring this product is disposed of correctly, you
will help protect the environment. For more detailed
information about the recycling of this product,
please contact your local authority, your household
waste disposal service provider or the shop where
you purchased the product.
You need to install the software in the Installation CD
to configure the buttons on your Creative Mouse
Gamer HD7600L.
Windows 98 and 98 SE users may be prompted by an
Add
New Hardware Wizard
dialog box when Windows detects
your USB device. Follow the instructions on the screen. You
may need to insert the Windows Installation CD into the
CD-ROM drive during installation. Some computers may be
supplied without the Windows CD, but have the necessary
files stored in
c:\windows\options\cab
s (replace
c:
\ with the
drive letter your Windows has been installed on).
1. Insert the Creative Mouse Gamer HD7600L
Installation CD into your CD-ROM/DVD-ROM
drive. Your CD should start automatically.
If it does not, follow the steps below:
i.
Double-click
the
My Computer
icon.
Alternatively,
click
Start
→
My Computer
.
ii. Right-click the CD-ROM/DVD-ROM drive icon,
and then click
Autoplay
.
2. Follow the instructions on the screen to install
your Creative Mouse Gamer HD7600L.
3. When prompted, restart your computer to
complete the installation.
It is recommended that you uninstall any previously
installed mouse software, before installing the Creative
Mouse Gamer HD7600L software.
a. Connect the USB connector to the USB port on
your computer.
a. Right mouse button
b. Scroll wheel / button
c. DPI Resolution Dial
d. DPI Resolution LED
e. Game-On Cover
f. Thumb button 1
g. Thumb button 2
h. Left mouse button
i. USB
connector
Overview
Connecting Your Mouse
Installing Device Drivers and
Software
Resolve and troubleshoot technical queries at Creative's
24-hour self-help Knowledge Base.
Go to
www.creative.com
, select your region and then
select
Support
.
Creative Knowledge Base
Customer Support Services &
Warranty
Product Registration
Registering your product ensures you receive the most
appropriate service and product support available. You
can register your product during installation or at
www.creative.com/register
.
Please note that your warranty rights are not dependent
on registration.
You can find Customer Support Services, Warranty and
other information in the Installation CD.
Customer
d:\support\<region>\
Support
<language>\support.chm
Services
Warranty
d:\warranty\<region>\
<language>\warranty.chm
Please keep your Proof of Purchase for the
duration of the warranty period.
Keep this document for future reference.
(replace
d:\
with the drive letter of your CD-ROM/DVD-ROM
drive,
<region>
with the region that you are in, and
<language>
with the language that your document is in)
The use of the WEEE Symbol indicates that this
product may not be treated as household waste. By
ensuring this product is disposed of correctly, you
will help protect the environment. For more detailed
information about the recycling of this product,
please contact your local authority, your household
waste disposal service provider or the shop where
you purchased the product.
You need to install the software in the Installation CD
to configure the buttons on your Creative Mouse
Gamer HD7600L.
Windows 98 and 98 SE users may be prompted by an
Add
New Hardware Wizard
dialog box when Windows detects
your USB device. Follow the instructions on the screen. You
may need to insert the Windows Installation CD into the
CD-ROM drive during installation. Some computers may be
supplied without the Windows CD, but have the necessary
files stored in
c:\windows\options\cab
s (replace
c:
\ with the
drive letter your Windows has been installed on).
1. Insert the Creative Mouse Gamer HD7600L
Installation CD into your CD-ROM/DVD-ROM
drive. Your CD should start automatically.
If it does not, follow the steps below:
i.
Double-click
the
My Computer
icon.
Alternatively,
click
Start
→
My Computer
.
ii. Right-click the CD-ROM/DVD-ROM drive icon,
and then click
Autoplay
.
2. Follow the instructions on the screen to install
your Creative Mouse Gamer HD7600L.
3. When prompted, restart your computer to
complete the installation.
It is recommended that you uninstall any previously
installed mouse software, before installing the Creative
Mouse Gamer HD7600L software.
a. Connect the USB connector to the USB port on
your computer.
a. Right mouse button
b. Scroll wheel / button
c. DPI Resolution Dial
d. DPI Resolution LED
e. Game-On Cover
f. Thumb
button
1
g. Thumb button 2
h. Left mouse button
i. USB
connector
Overview
Connecting Your Mouse
Installing Device Drivers and
Software
Resolve and troubleshoot technical queries at Creative's
24-hour self-help Knowledge Base.
Go to
www.creative.com
, select your region and then
select
Support
.
Creative Knowledge Base
Customer Support Services &
Warranty
Product Registration
Registering your product ensures you receive the most
appropriate service and product support available. You
can register your product during installation or at
www.creative.com/register
.
Please note that your warranty rights are not dependent
on registration.
You can find Customer Support Services, Warranty and
other information in the Installation CD.
Customer
d:\support\<region>\
Support
<language>\support.chm
Services
Warranty
d:\warranty\<region>\
<language>\warranty.chm
Please keep your Proof of Purchase for the
duration of the warranty period.
Keep this document for future reference.
(replace
d:\
with the drive letter of your CD-ROM/DVD-ROM
drive,
<region>
with the region that you are in, and
<language>
with the language that your document is in)
The use of the WEEE Symbol indicates that this
product may not be treated as household waste. By
ensuring this product is disposed of correctly, you
will help protect the environment. For more detailed
information about the recycling of this product,
please contact your local authority, your household
waste disposal service provider or the shop where
you purchased the product.
You need to install the software in the Installation CD
to configure the buttons on your Creative Mouse
Gamer HD7600L.
Windows 98 and 98 SE users may be prompted by an
Add
New Hardware Wizard
dialog box when Windows detects
your USB device. Follow the instructions on the screen. You
may need to insert the Windows Installation CD into the
CD-ROM drive during installation. Some computers may be
supplied without the Windows CD, but have the necessary
files stored in
c:\windows\options\cab
s (replace
c:
\ with the
drive letter your Windows has been installed on).
1. Insert the Creative Mouse Gamer HD7600L
Installation CD into your CD-ROM/DVD-ROM
drive. Your CD should start automatically.
If it does not, follow the steps below:
i.
Double-click
the
My Computer
icon.
Alternatively,
click
Start
→
My Computer
.
ii. Right-click the CD-ROM/DVD-ROM drive icon,
and then click
Autoplay
.
2. Follow the instructions on the screen to install
your Creative Mouse Gamer HD7600L.
3. When prompted, restart your computer to
complete the installation.
It is recommended that you uninstall any previously
installed mouse software, before installing the Creative
Mouse Gamer HD7600L software.
a. Connect the USB connector to the USB port on
your computer.
a. Right mouse button
b. Scroll wheel / button
c. DPI Resolution Dial
d. DPI Resolution LED
e. Game-On Cover
f. Thumb button 1
g. Thumb button 2
h. Left mouse button
i. USB
connector
Overview
Connecting Your Mouse
Installing Device Drivers and
Software
Resolve and troubleshoot technical queries at Creative's
24-hour self-help Knowledge Base.
Go to
www.creative.com
, select your region and then
select
Support
.
Creative Knowledge Base
Customer Support Services &
Warranty
Product Registration
Registering your product ensures you receive the most
appropriate service and product support available. You
can register your product during installation or at
www.creative.com/register
.
Please note that your warranty rights are not dependent
on registration.
You can find Customer Support Services, Warranty and
other information in the Installation CD.
Customer
d:\support\<region>\
Support
<language>\support.chm
Services
Warranty
d:\warranty\<region>\
<language>\warranty.chm
Please keep your Proof of Purchase for the
duration of the warranty period.
Keep this document for future reference.
(replace
d:\
with the drive letter of your CD-ROM/DVD-ROM
drive,
<region>
with the region that you are in, and
<language>
with the language that your document is in)
The use of the WEEE Symbol indicates that this
product may not be treated as household waste. By
ensuring this product is disposed of correctly, you
will help protect the environment. For more detailed
information about the recycling of this product,
please contact your local authority, your household
waste disposal service provider or the shop where
you purchased the product.
You need to install the software in the Installation CD
to configure the buttons on your Creative Mouse
Gamer HD7600L.
Windows 98 and 98 SE users may be prompted by an
Add
New Hardware Wizard
dialog box when Windows detects
your USB device. Follow the instructions on the screen. You
may need to insert the Windows Installation CD into the
CD-ROM drive during installation. Some computers may be
supplied without the Windows CD, but have the necessary
files stored in
c:\windows\options\cab
s (replace
c:
\ with the
drive letter your Windows has been installed on).
1. Insert the Creative Mouse Gamer HD7600L
Installation CD into your CD-ROM/DVD-ROM
drive. Your CD should start automatically.
If it does not, follow the steps below:
i.
Double-click
the
My Computer
icon.
Alternatively,
click
Start
→
My Computer
.
ii. Right-click the CD-ROM/DVD-ROM drive icon,
and then click
Autoplay
.
2. Follow the instructions on the screen to install
your Creative Mouse Gamer HD7600L.
3. When prompted, restart your computer to
complete the installation.
It is recommended that you uninstall any previously
installed mouse software, before installing the Creative
Mouse Gamer HD7600L software.
a. Connect the USB connector to the USB port on
your computer.
a. Right mouse button
b. Scroll wheel / button
c. DPI Resolution Dial
d. DPI Resolution LED
e. Game-On Cover
f. Thumb button 1
g. Thumb button 2
h. Left mouse button
i. USB
connector
Overview
Connecting Your Mouse
Installing Device Drivers and
Software
Resolve and troubleshoot technical queries at Creative's
24-hour self-help Knowledge Base.
Go to
www.creative.com
, select your region and then
select
Support
.
Creative Knowledge Base
Customer Support Services &
Warranty
Product Registration
Registering your product ensures you receive the most
appropriate service and product support available. You
can register your product during installation or at
www.creative.com/register
.
Please note that your warranty rights are not dependent
on registration.
You can find Customer Support Services, Warranty and
other information in the Installation CD.
Customer
d:\support\<region>\
Support
<language>\support.chm
Services
Warranty
d:\warranty\<region>\
<language>\warranty.chm
Please keep your Proof of Purchase for the
duration of the warranty period.
Keep this document for future reference.
(replace
d:\
with the drive letter of your CD-ROM/DVD-ROM
drive,
<region>
with the region that you are in, and
<language>
with the language that your document is in)
ES
c. DPI Resolution Dial
You need to install the software in the Installation CD to configure the
buttons on your Creative Mouse Gamer HD7600L.
Windows 98 and 98 SE users may be prompted by an
Add New Hardware
Wizard
dialog box when Windows detects your USB device. Follow the
instructions on the screen. You may need to insert the Windows Installation CD
into the CD-ROM drive during installation. Some computers may be supplied
without the Windows CD, but have the necessary files stored in
c:\windows\options\cab
s (replace
c:
\ with the drive letter your Windows has
been installed on).
1. Insert the Creative Mouse Gamer HD7600L Installation CD into your
CD-ROM/DVD-ROM drive. Your CD should start automatically.
If it does not, follow the steps below:
i. Double-click
the
My Computer
icon.
Alternatively,
click
Start
→
My Computer
.
ii. Right-click the CD-ROM/DVD-ROM drive icon, and then click
Autoplay
.
2. Follow the instructions on the screen to install your Creative Mouse Gamer
HD7600L.
3. When prompted, restart your computer to complete the installation.
It is recommended that you uninstall any previously installed mouse
software, before installing the Creative Mouse Gamer HD7600L software.
d. DPI Resolution LED
OVERVIEW
CONNECTING YOUR MOUSE
1
INSTALLING DEVICE DRIVERS
AND SOFTWARE
2
a.
b. Scroll wheel / button
a. Right mouse button
e. Game-On Cover
f. Thumb
button
1
g. Thumb button 2
a. Connect the USB connector to the
USB port on your computer.
h. Left mouse button
i. USB
connector
WARNING:
The cord(s) included with this product may contain chemicals known to the State
of California to cause cancer and birth defects or other reproductive harm.
Wash hands after handling.
MOUSE GAMER HD7600L
QUICK START
QUICK START
FR
IT
NL
DE
DA
SV
NO
FI
CZ
PL
RU
EL
HU
The use of the WEEE Symbol indicates that this
product may not be treated as household waste. By
ensuring this product is disposed of correctly, you
will help protect the environment. For more detailed
information about the recycling of this product,
please contact your local authority, your household
waste disposal service provider or the shop where
you purchased the product.
You need to install the software in the Installation CD
to configure the buttons on your Creative Mouse
Gamer HD7600L.
Windows 98 and 98 SE users may be prompted by an
Add
New Hardware Wizard
dialog box when Windows detects
your USB device. Follow the instructions on the screen. You
may need to insert the Windows Installation CD into the
CD-ROM drive during installation. Some computers may be
supplied without the Windows CD, but have the necessary
files stored in
c:\windows\options\cab
s (replace
c:
\ with the
drive letter your Windows has been installed on).
1. Insert the Creative Mouse Gamer HD7600L
Installation CD into your CD-ROM/DVD-ROM
drive. Your CD should start automatically.
If it does not, follow the steps below:
i.
Double-click
the
My Computer
icon.
Alternatively,
click
Start
→
My Computer
.
ii. Right-click the CD-ROM/DVD-ROM drive icon,
and then click
Autoplay
.
2. Follow the instructions on the screen to install
your Creative Mouse Gamer HD7600L.
3. When prompted, restart your computer to
complete the installation.
It is recommended that you uninstall any previously
installed mouse software, before installing the Creative
Mouse Gamer HD7600L software.
a. Connect the USB connector to the USB port on
your computer.
a. Right mouse button
b. Scroll wheel / button
c. DPI Resolution Dial
d. DPI Resolution LED
e. Game-On Cover
f. Thumb
button
1
g. Thumb button 2
h. Left mouse button
i. USB
connector
Overview
Connecting Your Mouse
Installing Device Drivers and
Software
Resolve and troubleshoot technical queries at Creative's
24-hour self-help Knowledge Base.
Go to
www.creative.com
, select your region and then
select
Support
.
Creative Knowledge Base
Customer Support Services &
Warranty
Product Registration
Registering your product ensures you receive the most
appropriate service and product support available. You
can register your product during installation or at
www.creative.com/register
.
Please note that your warranty rights are not dependent
on registration.
You can find Customer Support Services, Warranty and
other information in the Installation CD.
Customer
d:\support\<region>\
Support
<language>\support.chm
Services
Warranty
d:\warranty\<region>\
<language>\warranty.chm
Please keep your Proof of Purchase for the
duration of the warranty period.
Keep this document for future reference.
(replace
d:\
with the drive letter of your CD-ROM/DVD-ROM
drive,
<region>
with the region that you are in, and
<language>
with the language that your document is in)
SK
PT
LT