

30
o
7
3
5
3
Using Your Live! Cam
Copyright © 2010 Creative Technology Ltd. All rights reserved. The Creative logo and Live! are registered trademarks of Creative Technology
Ltd. in the United States and/or other countries. Microsoft, Windows and the Windows logo are registered trademarks of Microsoft
Corporation.
Product Registration
Registering your product ensures you receive the most appropriate service and
product support available. You can register your product during installation or at
www.creative.com/register
.
Please note that your warranty rights are not dependent on registration.
Creative Knowledge Base
Resolve and troubleshoot technical queries at Creative's 24-hour self-help
Knowledge Base. Go to
www.creative.com
, select your region and then select
Support
.
Installation CD
Warranty
d:\warranty\<region>\<language>\warranty.chm
Please keep your Proof of Purchase for the duration of the warranty period.
Safety
d:\notices\<language>\safety.chm
Regulatory
d:\fcc\<model number>\doc.chm
Your webcam is Plug & Chat capable, so no software installation is needed.
However, installing software will enable you to completely experience all
your webcam's features.
Keep this document for future reference.
2
• To launch Live! Central 3
Double-click the Live! Central 3 icon on your taskbar. Alternatively, from your desktop,
click Start All Programs Creative Creative Live! Cam Live! Central 3.
1
More Information
Learn how to make full use of your Live! Cam by visiting
www.mylivecam.com
.
You can get the lastest tips and tricks, as well as tutorials on how to use the many
software features.
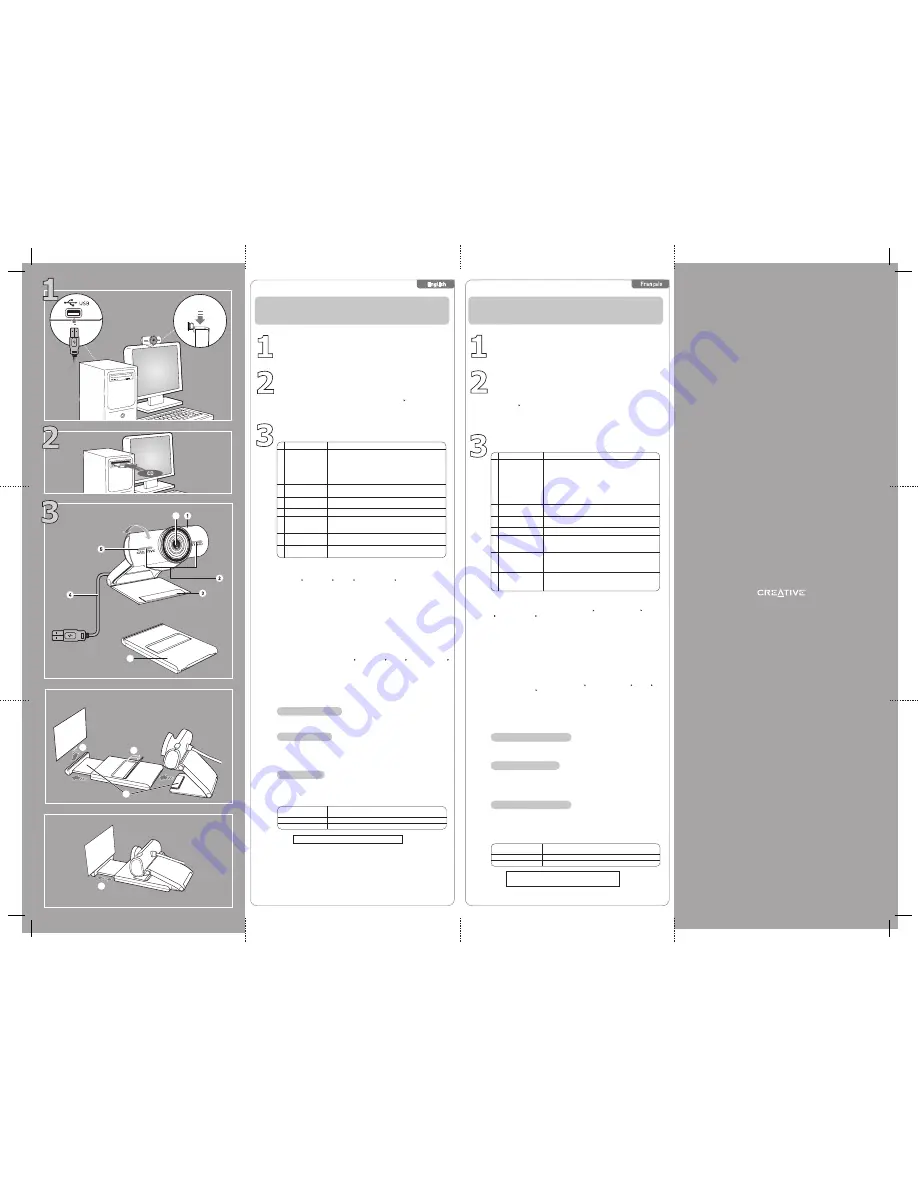
Connect your webcam's USB cable to your computer.
Install software and drivers
Insert the Installation CD into your CD-ROM/DVD-ROM drive. Your CD should start
automatically. If it does not, follow the steps below:
1) Double-click the
My Computer
icon. Alternatively, click
Start My Computer
.
2) Right-click the CD-ROM/DVD-ROM drive icon, and then click
AutoPlay
.
Follow the rest of the instructions on the screen to complete the installation.
Using your card scanning module
1) Extend the extension arm completely, then insert the hinged lever of the Live! Cam
into the docking slot.
2) Raise the support flap on the card scanning module and lower the Live! Cam onto it.
3) Insert the business card into the card slot.
4
Using the Live! Scan software
1) Launch Live! Scan by clicking Start All Programs Creative Creative Live! Cam
Live! Scan.
2) Click the
Scan
button.
3) Adjust the extension arm of the scanning module until the business card fills the
capture screen.
4) Click the
Capture
button, then click
OK
.
The image and contact details from the business card will be captured.
5) Click on a specific contact information to edit it, which will be saved automatically.
5
Snapshot/Live!
Contacts button
Red Power LED
Hinged lever
USB cable
Dual stereo
microphones
• Capture still pictures and start/stop video recording.
• Launch your online contact list
(Windows Live Messenger only).
• To remove flickering from your video, press and hold while
connecting your webcam to your computer. When the power
LED lights up, release the button. The flickering will be
removed automatically.
Lights up when powered on and turns off after five seconds
when not in use. Also lights up when performing video or
audio streaming/recording.
Mounts your Live! Cam securely on desktop and notebook
LCD displays.
Connect to your computer’s USB port.
Captures audio clearly during video chats.
Positions the business card correctly when scanning.
1
2
3
4
5
Component
Description
Card scanning
module
7
6
3
Utilisation de votre Live! Cam
Copyright © 2010 Creative Technology Ltd. Tous droits réservés. Le logo Creative et Live! sont des marques déposées de Creative Technology
Ltd. aux États-Unis et/ou dans d'autres pays. Microsoft, Windows et le logo Windows sont des marques déposées de Microsoft Corporation.
Enregistrement du produit
L'enregistrement de votre produit vous garantit de profiter d'un service et d'une
assistance produit appropriés. Vous pouvez enregistrer votre produit lors de
l'installation ou à l'adresse
www.creative.com/register
.
Veuillez noter que vos droits de recours à la garantie ne dépendent en aucun cas de
l'enregistrement.
Base de connaissances Creative
Utilisez la base de connaissances d'auto-assistance 24 heures Creative pour
diagnostiquer et résoudre vos problèmes techniques. Visitez le site
www.creative.com
,
sélectionnez votre région, puis
Support
.
CD d'installation
Garantie
d:\warranty\<région>\<langue>\warranty.chm
Veuillez conserver votre preuve d'achat pendant toute la durée de la garantie.
Sécurité
d:\notices\<langue>\safety.chm
Informations réglementaires
d:\fcc\<model number>\doc.chm
Votre webcam est un périphérique Plug & Chat, vous n'avez donc pas besoin
d'installer de logiciel. Toutefois, l'installation d'un logiciel vous permettra de
profiter pleinement de toutes les fonctionnalités de votre webcam.
Conservez ce document pour pouvoir vous
y référer ultérieurement.
2
• Pour lancer Live! Central 3
Double-cliquez sur l'icône Live! Central 3 dans votre barre des tâches. Vous pouvez
également cliquer depuis le bureau sur Démarrer Tous les programmes Creative
Creative Live! Cam Live! Central 3.
1
Informations complémentaires
Découvrez comment utiliser pleinement votre Live! Cam en consultant
www.mylivecam.com
.
Vous pouvez obtenir les derniers conseils et astuces, ainsi que des tutoriels sur
l'utilisation d'un grand nombre de fonctionnalités logicielles.
Connectez le câble USB de votre webcam à l'ordinateur.
Installez le logiciel et les pilotes
Insérez le CD d’installation dans votre lecteur de CD-ROM/DVD-ROM. Votre CD devrait
démarrer automatiquement. Dans le cas contraire, effectuez les étapes suivantes :
1) Double-cliquez sur l'icône
Poste de travail
. Vous pouvez également cliquer sur
Démarrer
Poste de travail
.
2) Cliquez avec le bouton droit sur l'icône du lecteur de CD-ROM/DVD-ROM, puis
choisissez
Exécution automatique
.
Suivez les instructions à l'écran pour terminer l'installation.
Utilisation de votre module de numérisation de cartes
1) Déployez complètement le bras d'extension, puis insérez la fixation à charnière de
la Live! Cam dans la fente d'ancrage.
2) Levez le rabat de support du module de numérisation de cartes et abaissez la Live!
Cam dessus.
3) Insérez la carte de visite dans la fente de cartes.
4
Utilisation du logiciel Live! Scan
1) Lancez Live! Scan en cliquant sur Démarrer Tous les programmes Creative
Creative Live! Cam Live! Scan
2) Cliquez sur le bouton
Numériser
.
3) Réglez le bras d'extension du module de numérisation de cartes jusqu'à ce que la
carte de visite remplisse l'écran de capture.
4) Cliquez sur le bouton
Capturer
, puis sur
OK
.
Les informations sur l'image et le contact de la carte de visite seront capturées.
5) Cliquez sur des informations de contact spécifiques pour les modifier ; elles seront
ensuite automatiquement enregistrées.
5
Bouton de contacts
Instantané/Live!
Voyant d'alimentation
rouge
Levier à détente
Câble USB
Microphones
stéréo doubles
• Capturez des images fixes et démarrez/arrêtez l'enregistrement
vidéo.
• Lancez votre liste de contacts en ligne
(uniquement Windows Live Messenger).
• Pour éliminer le scintillement de votre vidéo, appuyez sur le
bouton et maintenez-le enfoncé lorsque vous connectez votre
webcam à l'ordinateur. Lorsque le voyant d'alimentation s'allume,
relâchez le bouton. Le scintillement est automatiquement
supprimé.
S'allume lorsqu'il est mis sous tension et se met hors tension
après cinq secondes d'inutilisation. S'allume également lors
d'une diffusion/d'un enregistrement vidéo ou audio.
Permet de monter votre Live! Cam en toute sécurité sur les
écrans LCD de votre ordinateur de bureau ou portable.
Se connecte au port USB de votre ordinateur
Capture un son clair pendant les conversations vidéo.
Positionne correctement la carte de visite lors de la numérisation.
1
2
3
4
5
Composant
Description
Module de
numérisation de
cartes
7
6
Wide-angle,
Autofocus lens
Capture 25% more of the scene and keep images and videos sharp
automatically.
Lentille grand angle,
mise au point
automatique
Capture 25 % du paysage en plus et conserve automatiquement la
netteté des images et des vidéos.
2
3
4
1
6


