background image

Reviewing Your Pictures and Videos

38

NOTE:

1.     The erased images can not be recovered.

2.     “Erase All” can not erase protected images.

Protecting Pictures against Deletion

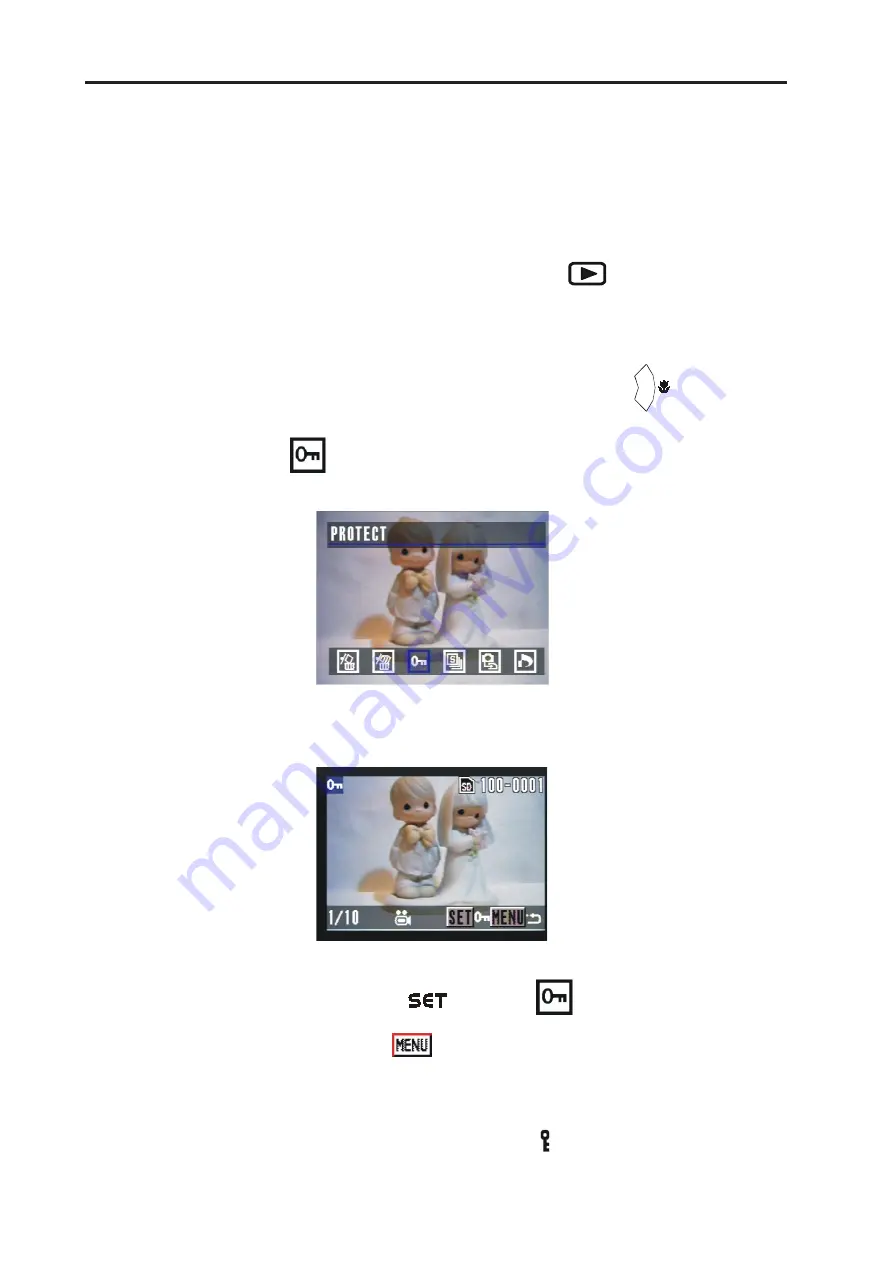
Protect or unprotect a single image.

1.

Select Mode dial to Playback mode(

).

2.

Follow “Viewing Pictures” procedure to the pictures you want

protect.

3.

Press MENU button and use RIGHT button (

) to PROTECT

(

) function.

4.

Press SET button to enter PROTECT menu.

5.

Use Set button (

) to protect(

) this picture or “MENU” but-

ton to cancel (

)  this protection and return to the main menu.

NOTE:

1.

Be sure that the PROTECT icon ( ) appears after your setting.

Содержание DC-CAM 3000Z

Страница 1: ......

Страница 2: ...nce and Advisory 2 Camera Nomenclature 3 Accessory Set up 4 Preparing to Take Pictures 6 Battery Installation 6 Turning the Power On 8 Date and Time Set Up 9 Beep Sound Set Up 10 LCD Confirm Set Up 10 Auto Power Off Settings 11 TV Out Signal Set Up 12 Language Set Up 13 Returning to Default Settings 14 ...

Страница 3: ...icture 20 Changing the Picture Resolution and Quality 22 Adjusting the Exposure 24 Setting the White Balance 25 Changing the ISO Speed 26 Setting the Slow Shutter Mode 27 Setting the Flash 28 Using the Macro mode 28 Setting the Self Timer 29 Recording Video images 30 Functions Available in Each Shooting Mode 32 Reviewing Your Pictures and Videos 33 Viewing Pictures 33 ...

Страница 4: ...lash Memory Images to a Memory Card 40 Formatting Memory Card or On board memory 41 Setting Your Camera for Printing 43 Folders and Files 43 File Number Reset 44 DPOF Print Settings 45 PRINT Image Matching 47 Connecting your camera 48 Viewing Images on a TV Set 48 Downloading Images to a Computer 48 About the memory storage you using in this camera 51 Installing the Software 52 Downloading Picture...

Страница 5: ...Installing MGI PhotoSuite 4 SE 53 Using MGI PhotoSuite 4 SE 55 Indicator Lamp Reference 56 Troubleshooting 56 Default Setting in Each Camera Working Mode 58 Specification 59 ...

Страница 6: ... System Requirements For Windows PC with processor better than MMX Pentium 233MHz Windows 98 98se 2000 ME XP Minimum 32MB RAM USB Port CD ROM drive 800x600 pixels 16 bit color display compatible monitor For Macintosh Power Mac G3 or later Mac OS 9 0 9 1 9 2 and OS X Minimum 64MB RAM USB Port CD ROM drive 800x600 pixels 16 bit color display compatible monitor Specifications are subject to change wi...

Страница 7: ...ce must accept any interference received including interference that may cause undesired operation This equipment has been tested and found to comply with the limits for a Class B peripheral pursuant to Part 15 of the FCC Rules These limits are designed to provide reasonable protection against harmful interference in a residential installation This equipment generates uses and can radiate radio fr...

Страница 8: ...duct they must be used in order to ensure compliance with FCC regulation Camera Nomenclature Front Microphone Self timer lamp Flash Viewfinder Lens Exposure sensor Back Viewfinder Operation lamp button Flash Up button Macro Right button Battery cover Replay Down button LCD Monitor screen Self timer Left button Play Pause button Zoom In button Zoom Out button button ...

Страница 9: ... Video out terminal Battery cover Top Mode dial Shutter button Power button Accessory Set up Attaching the Wrist Strap Follow illustrations to add the wrist strap NOTE When carrying the camera by the strap please don t swing the camera on the strap ...

Страница 10: ...Getting Started 5 Using the Soft Case Keep the camera in it s soft case while it is not in use Be sure to insert the camera into the case with the monitor screen facing down ...

Страница 11: ...er to the camera You can use batteries AA Alkaline or CR V3 or alternatively you can use an AC adapter DC3 3V 2 0A If using Batteries 1 Open the battery cover by pushing and sliding into the side 2 Check inscription on battery chamber for correct negative positive installation 3 Install 2 AA alkaline batteries ...

Страница 12: ...or screen Power is running out change the battery NOTE Never use manganese batteries as they cannot sup ply sufficient power to support the camera s operations Replace all batteries at the same time to ensure a properly working camera never mix old and new batteries Remove batteries from the camera if you do not plan on using it for more than two weeks ...

Страница 13: ...sconnecting the Adaptor The camera automatically switches over to AC adap tor powered operation whenever the AC adapter is plugged into the camera Recommend using the AC adaptor to power the cam era whenever connected to a computer Turning the Power On 1 Press the POWER button until the green indicator begins flashing 2 It takes about 3 seconds to power on the camera NOTE When you turn on the came...

Страница 14: ...e Date Time icon is highlighted 3 Then press SET button to DATE TIME menu 4 PressUP DOWN toadjustthevalueofyoursetting 5 Press LEFT RIGHT button to advance to the next Use UP DOWN button to change the display of date A Y M D B M D Y C D M Y 6 Press SET button when the OK is highlighed to com plete your setting ...

Страница 15: ...ET 2 Press DOWN button until the BEEP icon is highlighted 3 Then press LEFT RIGHT button to select ON OFF to complete your setting Note The default setting is On LCD Confirm Set Up You can view the picture immediately on the LCD screen right after it is taken by setting the LCD Confirm functionn in SET mode 1 Set the mode dial to SET ...

Страница 16: ...button to select the ON OFF of LCD CON FIRM setting Auto Power Off Settings You may perform auto power off settings at SET mode 1 Turn the mode dial to SET 2 Press DOWN button until the AUTO POWER OFF icon is highlighted 3 Then press LEFT RIGHT button to select OFF 1 MIN 3MIN 5MIN to complete your setting ...

Страница 17: ...he Power bottom in order to turn on the camera again Off This camera will not perform the power saving function When use DC adapter to power on camera system will ignore the Auto Power Off setting and not to power off camera automatically TV Out Signal Set Up This camera can connect directly to a TV set Please refer to Page 48 of Viewing images on a TV set It allows you to use the TV screen as you...

Страница 18: ...ton to select NTSC PAL to complete your setting Language Set Up Use this feature to select the language for the LCD screen You may perform the language setting at SET mode 1 Turn the mode dial to SET 2 Press DOWN button until the LANGUAGE icon is highlighted ...

Страница 19: ...ngs You can easily change all the settings you made back to their initail setting 1 Turn the mode dial to SET 2 Press DOWN button until the DEFAULT SETTING is highlighted 3 Press RIGHT button to enter the the setting 4 To return to default setting use RIGHT button to select YES 5 Press SET button to complete the setting ...

Страница 20: ... page 6 2 You will see the card slot next to the battery house 3 InserttheSDcardintotheslotinthedirectionshownillustration Removing a SD memory card 1 Press the memory card into the camera and then quickly re lease it That will make the card to come partially out of the camera 2 Pull the memory card out of the slot 3 Close the battery card cover please refer to page 7 ...

Страница 21: ...your shooting environment Manual Photo Mode You can manually set the exposure and white balance before shooting Playback Mode Replay or delete images from the camera memory storage Video Mode Use this mode to record movies You can also manually set the white balance before recording the video Set Mode By setting each item on the Set up menu to your preference you can customized your camera Note Do...

Страница 22: ...ng ON the LED indicators next to the Viewfinder will flash in Green 3 The live image will automatically show out on the LCD screen with information display Turn off the previewing LCD screen You can turn on off the previewing LCD screen by pressing DISP button at any Mode dial 1 Press the DISP button one time to turn off the information display OSD 2 Press the DISP button twice to turn off the LCD...

Страница 23: ... ImageOnly Show image and OSD After 3 sec turn off OSD LCD Off Show OSD only for 3 sec and then turn off LCD NOTE You can not turn off the TV Out display but you can change the TV Out display mode between Auto and Image Only Using the Auto Focus Indicator When recording with the LCD screen align the Auto Foucs Indicator in the center of the screen with the subject AF Indicator Turn off the Auto Fo...

Страница 24: ...ting AF Indicator if OFF Using the Zoom feature You can zoom in the subject for a telephoto shot or zoom out for a wide angle shot P ress this button to zoom in for a telephoto shot subject appears closer P ress this button to zoom out for a wide angle shot subject appears farther NOTE The lens portion moves during zoom operation Be careful not to touch the lens protion while it is operating ...

Страница 25: ...rent environment condition If you don t insert the SD card into the camera you can take the pictures and storage them into the on board memory If you insert the SD card into the camera you can access the SD card only You can t access the SD card and the on board memory at the same time Taking a Picture in Auto Mode 1 Select the Mode dial to Auto 2 Press the POWER button to power on the camera 3 Pr...

Страница 26: ...ht warning For example shutter 1 30 sec and Flash force off While pressing the shutter button half way down you can also check if there is proper exposure value subject to your current light condition for capturing If the focus indicator on the LCD screen turn into green color it means the camera has automatically lock the exposure white balance and focuses successfully If the focus indicator on L...

Страница 27: ...ion Quality Display Icon 2048 x 1536 Fine 2048 x 1536 Normal 1600 x 1200 Fine 1600 x 1200 Normal 640 x 480 1024 x 768 Normal Normal Taking a Picture in Manual Mode 1 Select the Mode dial to Manual 2 Press the POWER button to power on the camera 3 The shooting procedures are the same as Taking a picture in Auto Mode Changing the Picture Resolution and Quality You can change the resolution of images...

Страница 28: ...to complete the setting or RIGHT LEFT button to the next setting After setting the resolution and quality the following information icons will appear on the LCD screen Resolution Display Icon 2048 x 1536 1600 x 1200 1024 x 768 640 x 480 Change the Picture Quality Compression 1 Select the Mode dial to Manual 2 Press MENU button 3 Press RIGHT button and select to COMPRESSION ...

Страница 29: ...following information icons will appear on the LCD screen Icon Display Quality Normal Fine Adjusting the Exposure You can manually set the exposure value EV value to compen sate for lighting conditions This setting is used to obtain better results when shooting backlighting indirect indoors lighting or a dark background 1 Set the Mode dial to Manual 2 Press MENU button 3 Press RIGHT button and sel...

Страница 30: ...or RIGHT LEFT button to the next setting EV Value 2 0 1 7 1 3 1 0 0 7 0 3 0 0 0 3 0 7 1 0 1 3 1 7 2 0 Setting the White Balance Youcansetthewhitebalancemodetomatchdifferenttypeoflightsource 1 Set the Mode dial to Manual 2 Press MENU and select to WHITE BALANCE 3 Use UP DOWN button to set the white balance mode ...

Страница 31: ... icons will be shown in the LCD screen AUTO Normal conditions camera adjusts white balance automatically Outdoor daylight Cloudy TUNGSTEN Indoors illuminated by tungsten lighting FLUORESCENT Indoors illuminated by fluorescent lighting Changing the ISO Speed You can change the camera s sensitivity to light by selecting the ISO value 1 Set the Mode dial to Manual 2 Press MENU and select to ISO SETTI...

Страница 32: ...ill be 4 Press MENU button to complete the setting or RIGHT LEFT button to the next setting After you manually set the IS O S peed in Manual capturing mode the IS O value will be shown in the LC D screen Setting the Slow Shutter Mode The normal shutter speed ranges between 1 2000 to one of a second but by setting the slow shutter mode you can set the slow shutter speed to 1 sec 2 sec 4 sec 8 sec m...

Страница 33: ...er button halfway and the subject is focused NOTE Recommending to use a tripod to keep the camera steady when you set the manual capturing mode in slow shutter speed mode Setting the Flash Press the button to select the flash mode Auto Manual Mode Video Available X X X X Not Available X Using the Macro mode Press the MACRO button to record subjects at the distance of 10 cm to infinity when at the ...

Страница 34: ...en you use the self timer function the subject is recorded about 2 or 10 seconds upon your setting after you press the shutter button 1 Set Mode dial to Auto or Manual 2 Press the Self Timer button Self Timer Options OFF Turns self timer off 2 SEC Press Self Timer one time Indicates a countdown of two seconds 10 SEC Indicates a countdown of ten seconds 3 Be sure that the 2 sec or 10 sec appear on ...

Страница 35: ...function Press the self timer again Recording Video images This camera performs video recording function 1 Set the Mode dial to Video 2 Press the shutter button to start video recording Recording length Sec This green spot flashes while recording ...

Страница 36: ...cally Adjusting the white balance before recording Please refer to page 25 NOTE In Video mode the resolution is set to 320x240 pixels Be careful not to touch the microphone while recording The maximum length of individual video recording will depend on the memory space The recording will end automatically when the storage memory becomes full ...

Страница 37: ...lf Timer Zoom Mode Exposure Compensation Valve 2 0 2 0 AUTO DAYLIGHT CLOUDY TUNGSTEN FLUORESCENT 2048 X 1536 1600 X 1200 FINE NORMAL Auto Red Eye Reduction Off Fill X X X X X X X X X X X X X X X X 640 X 480 1024 X 768 ISO SLOW SHUTTER 100 200 400 AUTO X X 1sec 2sec 4sec 8sec X X OPTICAL ZOOM ONLY X Functions Available in Each Shooting Mode ...

Страница 38: ...nformation will not be shown on the LCD screen if you press DISP button When viewing the video you can use SET button to start the video playing and use SET button again to pause the video playing Press RIGHT LEFT button to stop video playing and move to the next image When a video has finished palying it will display the first frame Replaying the Last Image Quickly In each capturing mode you can ...

Страница 39: ... Select Mode dial to Playback mode 2 The LCD screen displays the last recorded image 3 Press ZOOM OUT button the thumbnail images will display on the LCD screen 4 The thumbnail display will highlight the image that had been show ing at the time the thumbnail mode was selected 4 In the thumbnail display mode you can use four way arrow director to select the image you want to review 5 When the selec...

Страница 40: ...M OUT button to zoom backs the original full sized image If an image is magnified the scale drawing and ratio indicator will display on the left down side of the LC D screen Slide the magnified image in four ways 1 Use four way arrow directors to slide the magnified image 2 The portion of image you slide to will display on the scale drawing NOTE To return to the normal size press MENU button twice...

Страница 41: ...ress MENU button 3 Press SET button to enter the ERASE ONE menu Press MENU button to return to the main menu Press Set button to confirm the erase 4 Use RIGHT LEFT button to confirm YES deleting this picture or NO cancelling this deleting and returnning to the main menu Erasing All Unprotected Images ...

Страница 42: ...de 2 Press MENU button and use RIGHT button to ERASE ALL 3 Press SET button to enter ERASE ALL menu 4 When it asks for confirmation using RIGHT LEFT button to confirm YES or NO After you confirm to erase all images the NO IMAGE information will be display on the LCD screen ...

Страница 43: ...gle image 1 Select Mode dial to Playback mode 2 Follow Viewing Pictures procedure to the pictures you want protect 3 Press MENU button and use RIGHT button to PROTECT function 4 Press SET button to enter PROTECT menu 5 Use Set button to protect this picture or MENU but ton to cancel this protection and return to the main menu NOTE 1 Be sure that the PROTECT icon appears after your setting ...

Страница 44: ... Play View your pictures on the camera LCD screen by using the Slide Show Auto Play feature The pictures appear for a period of 3 seconds 1 Select the Mode dial to Playback mode 2 The last picture taken appears on the LCD screen 3 Press MENU button and use RIGHT button to Slide Show 4 The slide show will automatically run from the fist picture taken af ter you press the SET button NOTE 1 You may p...

Страница 45: ...ng Flash Memory Images to a Memory Card Copy single or all images currently in the camera s built in flash memory to a memory card 1 Select Mode dial to Playback mode 2 Press MENU button and use RIGHT button to select to COPY TO CARD 3 Press SET button to enter COPY TO CARD menu 4 Use RIGHT LEFT button to select ONE or ALL units to copy ONE An single selected image storaged in camera s built in fl...

Страница 46: ...n thumbnail mode and copied one by one This starts the copy operation NOTE 1 You can not copy the images from the memory card to the cameras built in memory 2 While Copy to Card is in process it will pause if you press SET or MENU button 3 The file system will create a new folder for images copied from the internal memory Formatting Memory Card or On board memory 1 Select Mode dial toSET mode ...

Страница 47: ...rm your selection YES Formats the memory card This starts the FORMATTING operation After the memory storage is formatted the message NO IM AGE appears on the camera LCD screen in Playback mode NO Cancels formatting operation NOTE The data deleted by a format operation can not be recovered Make sure that you do not need any data currently stored on a memory card before you format it ...

Страница 48: ...r number is 999 4 If the max folder number is 999 and max file number overs 0999 camera will display the warning message File Number Over 5 If File Number Over happens you have only 2 methods to clear it i Format the storage memory directly The folder number and the file number will be initialized and counted from 100 and 0001 respectively ii Turn on File Number Reset and plug in new memory card F...

Страница 49: ...ne ON The camera assigns all subsequent file numbers sequentially in ascending order starting from the last number used If a new card in serted in the camera the image file number will continue from the last number used OFF When this option is selected the camera does not store the last file number used When another memory card is inserted or a new folder is created the image file number starts fr...

Страница 50: ...y print service SD Card DPOF The letters DPOF stand for Digital Print Order Format which is a format for recording on a memory card or other medium which digital camera images should be printed and how many copies of the image should be printed Then you can print on a DPOF compatible printer or at a professional print service from the memory card in accordance with the file name and number of copi...

Страница 51: ...t the print ing order 3 Press Menu button 4 Press RIGHT button to PRINT SETTING 5 Press SET button to enter the SETTING MODE SETTING Modes Print Setting Video AVI file is not available for this feature In SET setting mode press SET button to confirm the printing setting of this displaying picture Once this picture is set the tick sign appears in box ...

Страница 52: ...de information about the mode setting camera setup etc When you print an im age on a printer that supports PRINT Image Matching the printer reads this data and adjust the printed image accordingly so your image come out just the way you intended when you recorded them See the documentation that came with your printer for full details about PRINT Image Matching PRINT Image Matching is a term for th...

Страница 53: ...ns off automatically during video output Selecting the Video Output Signal Mode Your camera supports both NTSC used in U S Japan and other countries and PAL used in Europe and other areas video output signal systems The video sysetem you should use depend on the contry of origitn of the equopment you are connecting to the camera s VIDEO OUT terminal Please refer to page 12 to select the video outp...

Страница 54: ... card adapter optional and then insert the PC card adapter into the computer s PC card reader 2 Double click the icon of the drive with the SD card 3 Copy images from the card into a folder of your choice on the hard disk Connecting the Camera to a Computer via USB Cable 1 Make sure that you install the USB driver that comes on the bundled CD ROM first 2 Connect the supplied USB cable to the compu...

Страница 55: ...le the camera is on the camera will automatically turn off It s recommended to power the camera from a household power outlet with the optional AC Adapter If you are in the first time to connect the camera to a PC in Windows98 operation system via USB cable the computer will detect the camera as Unknow device and then automatically complete the camera installation ...

Страница 56: ...tored in camera on board memory If you insert a SD card into the camera the images taken will be stored in the SD card Memory Card Data Images recorded with this camera and other datat are stored on the memory card using DCF Design rule for Camera File system protocol DCF protocol is designed for image an other data exchange between digital cameras and other devices DCF Protocol DCF Protocol defin...

Страница 57: ...vers If operating system is Windows 98 98SE Insert CD into your PC cd rom drive Program should install automatically Follow on screen instructions NOTE If your system requires a manual installation Click Run type the CD ROM drive install exe then click OK Restarting your computer is recommended ...

Страница 58: ...system is Windows 98 98SE 2000 ME XP 1 Insert CD into your PC cd rom drive 2 Program should install automatically 3 Follow on screen instructions 1 Click the MGI PhotoSuite 4 SE menu on autorun frame 2 A Welcome window will be displayed Click Next to move to the next step ...

Страница 59: ...w will be displayed If you agree to this click YES the window will then move to the next step If you disagree click NO and the install program will be canceled 4 Select Destination Location 5 Start Copying Files window will displayed Click Next to start installation ...

Страница 60: ... a manual installation Click Run type the CD ROM drive install exe then click OK Restarting your computer is recommended Using MGI PhotoSuite 4 SE 1 Click Start Programs MGI PhotoSuite 4 MGI PhotoSuite 4 2 This will open the MGI PhotoSuite software to edit crop and print your pictures ...

Страница 61: ... to Card Copying Self time Capture 10sec Still AF AE AWB Lock Saving Image Self time Capture 10sec 2sec With Flash Without Flash With Flash Without Flash 1 4 sec 5 8 sec 9 10 sec Green Green Red Red Green Green Green Self timer 130 130 130 130 130 130 500 500 130 130 125 125 500 500 250 250 125 125 130 130 130 130 130 130 Green Stand by Busy Red 130 130 Green 5 Capture Still Image 130 130 Troubles...

Страница 62: ...ew ones non DCF images except Off to the TV correctly PAL for your TV complete the save operation is Camera power down before A memory card with non DCF images recorded with another camera is loaded in the camera The flash mode is set to Off There is a problem with the camera TV connection Incorrect video system setting Images are blurry or unfocused Image is not recorded when the shutter release ...

Страница 63: ...play Image and Information Manual Photo Mode Flash Quality Size Force Off Normal 2048x1536 ISO Speed White Balance AUTO AUTO 0 0 Exposure Compesation PreView Disp Mode Display Image and Information Video Recording Mode PreView Disp Mode White Balance Display Image and Information AUTO Language TV Out LCD Confirm Auto Power Off Focus Indicator Setup Mode Date Style Beep ENGLISH NTSC ON 3 Min ON YMD...

Страница 64: ...echanical Shutter With CCD variable electronic shutter Shutter Speed 1 2000 8 sec Digital Zoom Preview Mode up to 2X continuous Playback Mode up to 8X scollable Image File Format EXIF 2 1 compatible format JPEG Compression DCF compatible Support DPOF PIM White Balance Auto Manual 5 modes in manual selection day light cloudy tungsten fluorescent black white Picture Storage On board flash memory 16M...

Отзывы: