

SELF-MEASURING FLOOR GUIDE:
To save time, the cutter also has a floor guide that can be
set for self-measuring cuts. To use, lower the floor guide
and set it directly against the edge of the last full field tile.
NOTE: extend the floor guide far enough to lift the casters
out of any glue on the floor. Place the tile to be cut
upside
down
in the cutter, and up against the wall. Push the handle
down to make a cut. (See figure 4.)
HOW THE FLOOR GUIDE WORKS:
With the floor guide against the last field tile, and the tile
slid all the way against the wall, a cut piece (dimension"A")
should be equal to the space to be filled (dimension "B").
(See figure 5.)
FEATURES:
r 5XP
3
/
4
" blades that will cut an 18" tile straight or a
12" x 12" tile diagonally.
r #VJMUJOMPXQSPàMFCMBEFIFJHIUBEKVTUNFOULOPCT
r 5XPCFENPVOUFEUJMFHVJEFT TUSBJHIUBOEEJBHPOBMXJUI
precision scale (ruler) in both inches and centimeters.
r 4FMGNFBTVSJOHáPPSHVJEFGPSSFQFBUDVUTBUXBMMT
MATERIALS THAT CAN BE CUT:
This tool cuts most resilient vinyl floor tiles.
TOP BLADE ADJUSTMENT:
This cutter is factory calibrated to "shear-cut". A properly
set shear-cut ensures an easy and accurate cut.
To set the proper shear-cut in the field, first, swing the
handle to an upward position. Next, place a sample tile to
be cut under the top blade of the cutter. Turn the left hand
CMBEFIFJHIUBEKVTUNFOULOPCVOUJMUIFUPQCMBEFJTBMNPTU
touching the tile. Lastly, turn the right hand blade height
BEKVTUNFOULOPCVOUJMUIFSFJTBHBQPOUIFSJHIUTJEFUIBUJT
2 times wider than on the left side. (See figure 1.)
Example:
If the tile to be cut is
1
/
8
" thick, then the gap on
the left side will be slightly more than
1
/
8
", and the gap on
the right side should be about
1
/
4
".
Figure 2
Figure 3
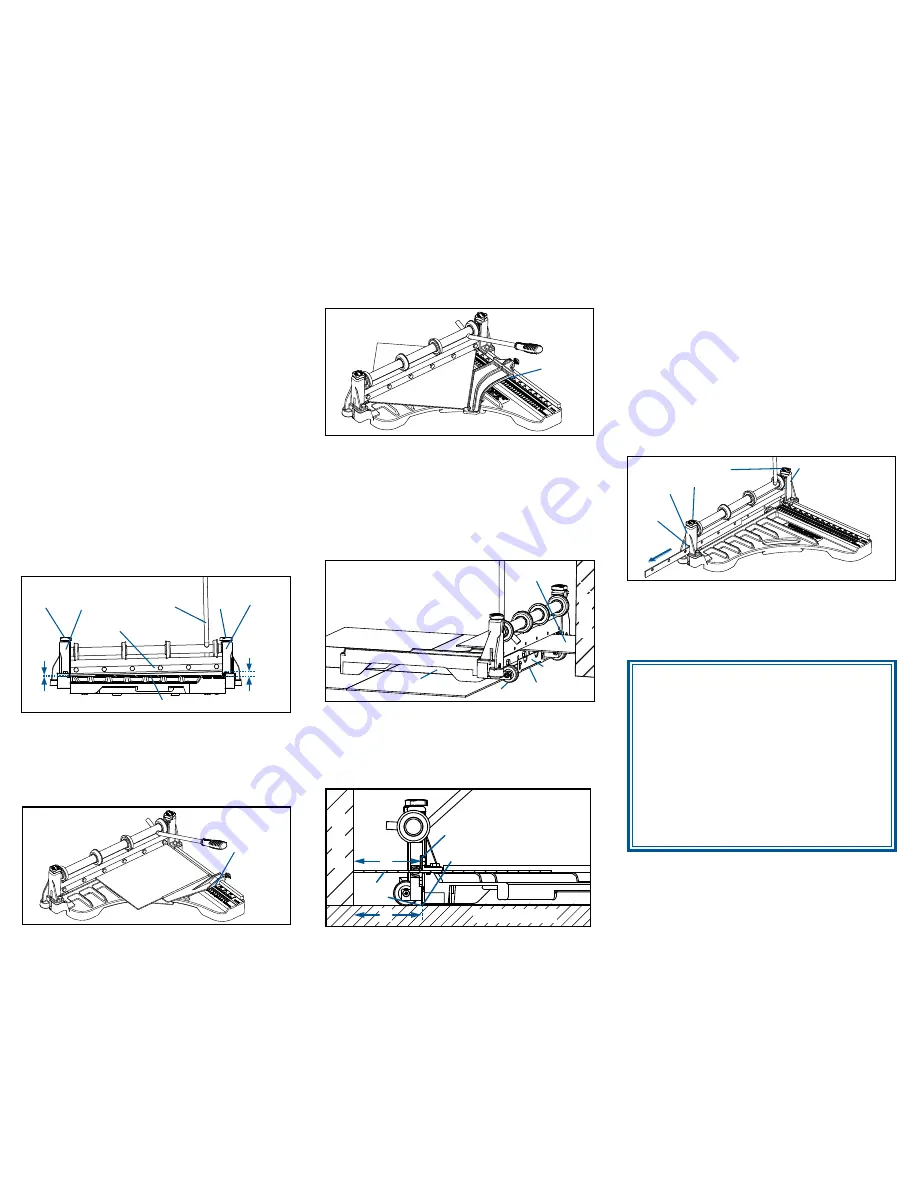
BED-MOUNTED TILE GUIDES:
A bed-mounted tile guide can be set relative to the scale
for repeat straight cuts at a desired length. The portion of
the tile remaining on the bed of the cutter after the cut will
equal the length setting on the scale. The straight guide is
shown mounted on the bed of the cutter in figure 2.
BED-MOUNTED TILE GUIDES, Continued:
The diagonal guide is shown mounted on the bed of the
cutter in figure 3.
LEFT SIDE:
BLADE GAP
IS SLIGHTLY
ABOVE THE
TILE THICK-
NESS
LEFT HAND
BLADE HEIGHT
ADJUSTMENT
KNOB
RIGHT HAND
BLADE HEIGHT
ADJUSTMENT
KNOB
LEFT
HAND
STANDARD
TOP BLADE
UPWARD
HANDLE
POSITION
RIGHT HAND
STANDARD
RIGHT SIDE:
THE GAP SHOULD
BE 2 TIMES
WIDER THAN ON
THE LEFT SIDE
TILE THICKNESS
Figure 4
Figure 1
W
A
L
L
SUB-FLOOR
B
A
TOP BLADE
POSITION
FIELD TILE
EDGE
GUIDE
FILL
W
A
L
L
LAST FULL
FIELD TILE
CASTER
FLOOR
GUIDE
EDGE OF LAST
FULL FIELD TILE
FILL TILE TO BE CUT:
SLIDE AGAINST WALL
BLADE
REMOVAL
SLOT
Figure 6
TOP BLADE
ADJUSTMENT
KNOBS - LOOSEN TO
REMOVE BLADE
LEFT
HAND
STANDARD
RIGHT
HAND
STANDARD
BLADE CHANGING:
BOTTOM BLADE:
This blade can be removed easily by
loosening the 6 hex-head bolts on the rear of the cutter.
TOP BLADE:
Before removing the top blade, the left and
SJHIUBEKVTUNFOULOPCTNVTUCFUVSOFEGPSNBYJNVNIFJHIU
Next, swing the handle to upward position. Remove the 6
hex-head bolts holding the top blade. The top blade should
then be loose. Slide the top blade through the blade removal
slot on either the left or right hand standard, and remove it.
(See figure 6.) Reverse this order for installation.
Note:
Occasionally, the top blade will stick inside the slot
of the standards. If this is the case, use a flat screw driver
and tap the blade at a screw hole to push it out of the slot.
GUARANTEE
This TILE CUTTER is guaranteed to be free of defects
in workmanship or quality of materials for a period
of 1 year.
"OZQBSUTPGUIJTUPPMGPVOEEFGFDUJWFTVCKFDUUPUIF
guarantee will be replaced at no charge. Credit in full
or part cannot be extended by the distributor, nor will
new tools be given as replacements or loaners.
5PPMTTVCKFDUUPUIJTXBSSBOUZNVTUCFBDDPNQBOJFE
by same, returned freight PREPAID to Milpitas, CA,
and must be in assembled condition.
Figure 5
SCALE
SETTING
SCALE
SETTING