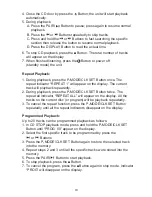
background image

OPERATION

GENERAL OPERATION:

ACTUAL TIME SETTINGS:

8

1. Connected the unit to AC power as instructed earlier. The Red  


  Indicator will illuminate.

2. Press the   Button on the unit or Remote Control to power on the   

  unit from standby mode. The Red Indicator will not light and the LCD  

  Display will illuminate.

3. Press the FUNCTION Button on the unit or Remote Control    


  repeatedly to select the playback source.

4. Press the VOL +/- Buttons on the unit or the VOL DN/UP Buttons on the 


  Remote Control to adjust volume level as desire.

5. When finished listening, press the   Button on the unit or Remote  

  Control to turn off (standby) the unit. The Red Indicator will illuminate. 

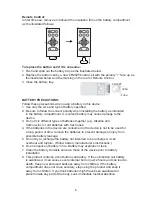
To set or reset the actual time:

1. In power off (Standby) mode. Press and hold the P-MODE/CLK SET   

  Button on the unit or Remote Control approximate 2 seconds until the  

  digit of Hour on the LCD Display is blinking. 

2. Press the   or   Button on the unit or Remote Control repeatedly to    

  set hour. (Make sure the PM Indicator appear on the display if the    

  time is PM and the AM Indicator is appear on the display if the time is  

  AM).

3. Press the P-MODE/CLK SET Button again, the digit of Minute will    

  blink.

4. Press the   or   Button repeatedly to set minute.

5. When finished, press the P-MODE/CLK SET Button to save the  


  settings and exit. The display will stop blinking.

BT (BLUE TOOTH)

In first time use or re-pairing to a new BT Device, pairing it as below:

1. In standby mode, press the   Button to power on the unit.

2. Press the FUNCTION Button repeatedly until the indicator


display and blink. 

3. Power on the external BT Device and enter to BT searching mode. Start  

  pairing as the on screen instructions on the external BT Device. After  

  paired, the indicator

           will stop blinking. (For details pairing   


  procedures, please refer to the user’s manual of your BT Device.).

4. Plays the music in the paired BT Device as usual.

appear on the 

Содержание CKR1307

Страница 1: ...READ BEFORE OPERATING THIS EQUIPMENT Owner s Manual UNDERCABINET CD PLAYER with AM FM Alarm Clock Radio and Bluetooth Wireless Technology UNDERCABINET CD PLAYER with AM FM Alarm Clock Radio and Bluetooth Wireless Technology ...

Страница 2: ...must be installed to provide a separation distance of at least 20 cm from all persons and must not be co located or operating in conjunction with any other antenna or transmitter End users and installers must be provided with antenna installation instructions and transmitter operating conditions for satisfying RF exposure compliance ...

Страница 3: ...2 ...

Страница 4: ...3 ...

Страница 5: ...not try to defeat this safety feature by using a non polarized adaptor or by filling the wider blade to make it fit into your outlet If this plug does not fit into your outlet you should contact a qualified licensed electrician to replace your obsolete outlet If the AC power failure this electronic clock is designed to continue operat ing internally without showing the time on the Clock Display wi...

Страница 6: ...e used for a long period of time remove the batteries to prevent damage or injury from possible battery leakage 5 Do not try to recharge the battery not intended to be recharged it can overheat and rupture Follow battery manufacturer s instructions 6 Do not dispose of battery in fire Battery may explodes or leak 7 Clean the battery contacts and also those of the device prior to battery installatio...

Страница 7: ...on Fast Search Forward Skip PAIR Play Pause BT Pair Button Fast Search Backward Skip Backward Stop Button Remote SENSOR VOL Volume down Button VOL Volume up Button Battery Compartment AC Cord FM Antenna 1 CD Door OPEN CLOSE Button 2 STANDBY Button 3 FUNCTION Button 4 ALARM Button 5 DISPLAY Button 6 CLK SET P MODE Clock set Program Mode Button 7 PAIR Play Pause BT Pair Button 8 Fast Search Forward ...

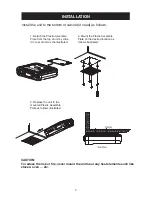
Страница 8: ...op of unit by slide it to rear of unit as the illustrated 2 Mount the Plastic Assemble Plate on the desired location as follows illustrated 3 Replace the unit to the mounted Plastic Assemble Plate as follows illustrated CAUTION To reduce the risk of fire never mount the unit near any heat elements such like stoves oven etc ...

Страница 9: ...of Hour on the LCD Display is blinking 2 Press the or Button on the unit or Remote Control repeatedly to set hour Make sure the PM Indicator appear on the display if the time is PM and the AM Indicator is appear on the display if the time is AM 3 Press the P MODE CLK SET Button again the digit of Minute will blink 4 Press the or Button repeatedly to set minute 5 When finished press the P MODE CLK ...

Страница 10: ...as usual 5 During playback 1 In standby mode press the Button to power on the unit 2 Press the FUNCTION Button repeatedly until or no No Disc appear on the display 3 Press the Button to open the CD door then place a CD disc on the tray with the printed label side up If the unit already paired to an external BT Device and you wants to pair the unit to another new external BT Device in BT paired mod...

Страница 11: ...atedly 2 During playback press the P MODE CLK SET Button twice The repeat all indicator REPEAT ALL will appear on the display All the tracks on the current disc or program will be playback repeatedly 3 To cancel the repeat function press the P MODE CLK SET Button repeatedly until all the repeat indicators disappear on the display Programmed Playback Up to 20 tracks can be programmed playback as fo...

Страница 12: ...provides adequate reception in most areas If reception is weak reassemble the unit to other location to improve reception FM The FM Antenna Wire on the rear of unit is for FM reception only If reception is weak unwind it to full length and or relocation AUX IN Listen music from the external Audio Player as follows 1 Connected the external Audio Player by an audio connection cable with 3 5mm stereo...

Страница 13: ...en finished setting press ALARM Button again to save the settings and exit The actual time will appear on the display and the indicator TIMER will stop blinking Cd CD Mode FM rd FM Radio AM rd AM Radio bu Buzzer If radio AM FM was selected as the weak up mode received the desired radio station before activate alarm Otherwise when Alarm goes off no sound output from the speaker or sound weak If CD ...

Страница 14: ...13 CARE AND MAINTENANCE ...

Страница 15: ...c distortion Possible Cause Solution TROUBLE SHOOTING GUIDE 14 Plug from AC Power Cord had not inserted to AC wall outlet Station not tuned properly Retune the radio station The location not good for radio reception Volume at minimum The BT Device had not paired to the unit The BT Device too far from the unit Paired the BT Device to the unit as page 8 9 Place the BT Device close to the unit Unwind...

Страница 16: ...1 2 W RMS x 2 Impendence of Speakers 8 Ohm 2W Radio Band Coverage AM 520 1710 kHz FM 87 5 108 MHz BT Version 2 1 EDR BT Effective Range 32 feet in open area ACCESSORY 1 x User s Manual 4 X Assembly screws 3 x 18 SPECIFICATIONS AND ACCESSORY ARE SUBJECT TO CHANGE WITHOUT NOTICE GENERAL SPECIFICATIONS 15 ...

Страница 17: ......
Отзывы: