background image

Содержание WEEDWACKER

Страница 1: ... E A S E with MAXFIRE IGNITION _ CAUTION Before using this product read this manual and follow all safety rules and operating instructions SAFETY ASSEMBLY o OPERATION MAINTENANCE PARTS LIST ESPANOL R 17 Sears Roebuck and Co Hoffman Estates IL 60179 U S A Visit our website www sears corn craftsman 769 03539 ...

Страница 2: ...d become dangerous projectiles Be aware of risk of injury to the head hands and feet Clear the area to be cut before each use Remove rocks broken glass nails wire string and other objects which may be thrown or become entangled in the cutting attachment Clear the area of children bystanders and pets keep them outside a 50 foot 15 m radius at a minimum Even then they are still at risk from thrown o...

Страница 3: ...ansporting Be sure to secure the unit while transporting Store the unit in a dry area locked up or up high to prevent unauthorized use or damage out of the reach of children Never douse or squirt the unit with water or any other liquid Keep handles dry clean and free from debris Clean after each use see Cleaning and Storage Instructions Keep these instructions Refer to them often and use them to i...

Страница 4: ...e That s when having aRepair Protection Agreement cansave youmoney and aggravation Here s whattheRepair Protection Agreement includes Expert service byour10 000 professional repair specialists Unlimited service andnocharge forparts andlabor onallcovered repairs Product replacement upto 1500 ifyour covered product can tbefixed Discount of10 from regular price ofservice andrelated installed parts no...

Страница 5: ...arge Flat head or T 25 Torx screwdriver Do not tighten until the handle is adjusted To Adjust 3 While holding the unit in the operating position Fig 2 postion the D handle to the location that provides you the best grip 4 Tighten the clamp screws evenly until the D handle is secure iNSTALL LiNE TRIMMER ATTACHMENT NOTE To make installation easier place the unit on the ground or on a workbench Fig 2...

Страница 6: ... In order to avoid damage to the unit do not mix oil with gasoline Definition of Blended Fuels Today s fuels are often a blend of gasoline and oxygenates such as ethanol methanol or MTBE ether Alcohol blended fuel absorbs water As little as 1 water in the fuel can form acids when stored Use fresh fuel less than 60 days old when using alcohol blended fuel Using Blended Fuels If you choose to use a ...

Страница 7: ... can see fuel in it With the unit in the starting position do not squeeze the throttle control Fig 8 Pull the starter rope out a short distance until you feel some resistance This is usually around 2 4 inches Then pull the rope smoothly and briskly Repeat this 5 times The engine should start IF ENGINE STARTS AND WEATHER IS COLD below 40 F flip the Cold Weather Start Lever back up to the run open p...

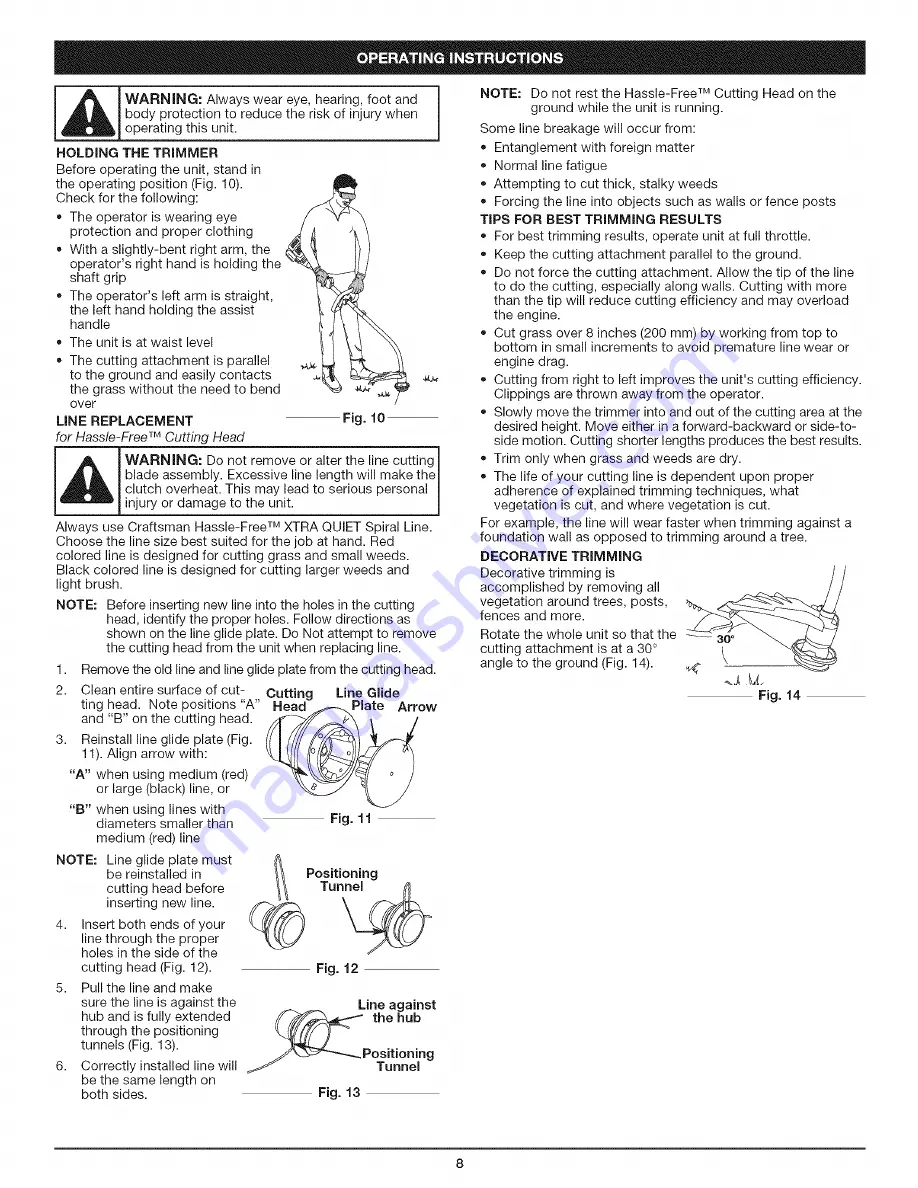
Страница 8: ...nsert both ends of your line through the proper holes in the side of the cutting head Fig 12 5 Pull the line and make sure the line is against the hub and is fully extended through the positioning tunnels Fig 13 6 Correctly installed line will be the same length on both sides Positioning Tunnel Fig t2 Line against the hub Positioning Tunnel Fig t3 NOTE Do not rest the Hassle Free TM Cutting Head o...

Страница 9: ...ry or damage to the unit The coupler allows you to convert this unit for use with the following add on attachments Cultivator Blade Edger Blower Brush Cutter Pruner To Install Attachments CAUTION Before operating this unit be sure that the release button is fully snapped into the I primary hole Fig 16 and that the knob Fig 17 is securely tightened NOTE To make installation easier place the unit on...

Страница 10: ...eck oil before each use 1 Stop the engine and allow oil to drain into the crankcase 2 Place the engine on an elevated level surface with the cutting head shield hanging off the surface to get a proper oil level reading Fig 18 L Fig t8 3 Keep dirt grass clippings and other debris out of the engine Clean the area around the dipstick before removing it 4 Remove the oil fill plug 5 Look into the oil f...

Страница 11: ... injury 1 make sure the cutting attachment has stopped rotating before you turn it off and set it down Fig 23 Tab 2 Remove the air filter Fig 23 _ j 3 Wash the filter in detergent and water Fig 24 Rinse the filter thoroughly and allow it to dry 4 Apply enough clean SAE 30 motor oil to lightly coat the filter Fig 25 5 Squeeze the filter to spread and remove excess oil Fig 26 6 Replace the filter Fi...

Страница 12: ... feeler gauge after the first 10 hours of operation and every 25 hours of operation The engine must be cold when checking or adjusting the valve clearance This task should be performed inside in a clean dust free area 1 Remove the six 6 screws on the back of the engine cover with a Flat head or T 25 Torx screwdriver Fig 30 View Of The Rear Engine Cover Remove Screws 2 3 I I I I cz_ c_ Remove Screw...

Страница 13: ...estor diverter out of the muffler Remove the spark arrestor diverter 4 Remove the spark arrestor screen from the spark arrestor diverter 5 Clean the spark arrestor screen with a wire brush or replace it 6 Reinstall the spark arrestor screen spark arrestor diverter and screws CLEANING _l WARNING To avoid serious personal injury always turn your unit off and allow it to cool before you clean or serv...

Страница 14: ...ond theminor adjustments listed above contact your nearest Sears Parts Repair center 1 800 4 MY HOME c_ orother qualified service dealer Engine Type Air Cooled 4 Cycle Displacement 1 8 cu in 29cc Operating RPM 6 800 rpm IdleSpeed RPM 2 800 3 600 rpm Ignition Type Electronic MAX FIRE IGNITION TM Ignition Switch Rocker Switch Valve clearance 0 003 0 006 in 0 076 0 152 mm Spark Plug Champion Spark Pl...

Страница 15: ... Warranty Coverage The warranty period begins on the date the engine or equipment is delivered to the retail purchaser The manufacturer warrants to the initial owner and each subsequent purchaser that the engine is free from defects in material and workmanship which cause the failure of a warranted part for a period of two years Repair or replacement of warranted part will be performed at no charg...

Страница 16: ...be interpreted as follows 1 Any warranted part that is not scheduled for replacement as required maintenance in the written instructions must be warranted for the warranty period defined in subsection b 2 Ifany such part fails during the period of warranty coverage it must be repaired or replaced by Sears Any such part repaired or replaced under the warranty must be warranted for a time not less t...

Страница 17: ... A S E with MAXFIRE_flGNITION _ PRECAUCION Antes de utilizar este producto lea este manual y siga todas las reglas de seguridad y las instrucciones de funcionamiento SEGURIDAD MONTAJE OPERACION MANTENIMIENTO LISTA DE PARTES Sears Roebuck and Co Hoffman Estates IL 60179 U S A Visit our website www sears com craftsman 769 03539 ...

Страница 18: ...os objetos como rocas vidrios rotos clavos alambre o cuerda los cuales pueden ser despedidos o enredarse en el accesorio de corte Aleje a todos los nidos espectadores y animales domesticos Mantenga todos los nidos espectadores y animales dom6sticos a un radio de por Io menos 15 m 50 pies aLin asf puede existir un riesgo de objetos despedidos contra los espectadores Los espectadores deben usar prot...

Страница 19: ...da_e fuera del alcance de los ni_os Nunca moje ni rode la unidad con agua ni con ningOn otro Ifquido Mantenga las manijas secas limpias y sin residuos Limpie la unidad luego de cada uso lea las instrucciones de Limpieza y Almacenamiento o Guarde estas instrucciones ConsQItelas con frecuencia y utilicelas para ense_ar a otros usuarios Si le presta esta unidad a alguien pr_stele tambien estas instru...

Страница 20: ...oblemas Esto es Io que incluye el Convenio de Protecci6n de Reparaci6n Servicio experto de nuestros 10 000 especialistas profesionales en reparaciones Servicio ilimitado y sin costo alguno pot piezas y mano de obra en todas las reparaciones cubiertas Reemplazo del producto pot un valor de hasta 1500 si el producto cubierto no se puede reparar Descuento del 10 en el precio regular del servicio asi ...

Страница 21: ... el hueco de la abrazadera inferior con un dedo Inicie los tornillos con un destornillador grande de pala o Torx 25 No los apriete hasta ajustar la manija Ajuste 3 Mientras sostiene la unidad en posici6n de operaci6n Fig 2 coloque la manija en Den la posici6n que le brinde el mejor agarre 4 Ajuste los tornillos de la abrazadera en forma pareja hasta que la manija en D este firme INSTALACION DEL AC...

Страница 22: ...uales con frecuencia son una mezcla de gasolina y uno o mas oxigenantes como el etano el metanol o el MTBE eter El combustible con mezcla de alcohol absorbe agua Un porcentaje de agua tan pequeno como el 1 en el combustible puede hacer que el combustible y el aceite se separen Se forman acidos mientras esta guardado Cuando use combustible con mezcla de alcohol use combustible nuevo almacenado dura...

Страница 23: ...ble en el cebador yen las tubeffas de alimentaci6n de combustible Fig 7 Si no puede ver el combustible en el cebador oprimalo y sueltelo tantas veces como sea necesario hasta que vea combustible en el mismo ii ii 5 ii Sl Soporte en la posici6n de arranque y no apriete el control de regulador Fig 8 Tire bruscamente del cord6n de arranque hasta 5 a 10 veces SI EL MOTOR ARRANCA Y HACE FRJO menos de 4...

Страница 24: ...to de la Linea Flecha Fig 11 Tunel de Posicionamiento Fig 12 4 Inserte ambos extremes de su linea a traves de los agujeros adecuados en el lade de la cabeza de corte Fig 12 5 Hale la linea y cerci6rese Linea contra de que la linea este contra el eubo el cubo y que este totalmente extendida a traves de los tuneles de Tr_nel de posicionamiento Fig 13 Posicionamiento 6 La linea que este Fig 13 instal...

Страница 25: ...ted convierta esta unidad para use con los accesorios adicionales siguientes Cultivador Recortador de bordes Soplador Cortamalezas Podador de arboles para instalar accesorios Instalaci6n del accesorio de corte u otros accesorios PRECAUCK N Antes de operar esta unidad cerci6rese de que el bot6n de liberar este I completamente trabado en el agujero primario Fig 16 y que la perilla Fig 17 este bien a...

Страница 26: ...lvula y ajuste Page E12 Cada 25 horas Verifique la condici6n y separaci6n de la bujia de encendido Page E13 iNSPECCION DEL NIVEL DE ACEITE No podemos exagerar la importancia de verificar y mantener el nivel correcto de aceite en el carter del cigOefial Inspeccione el nivel de aceite antes de cada uso 1 Apague el motor y permita que el aceite drene dentro del carter del cigOefial 2 Coloque el motor...

Страница 27: ... filtro de mire Fig 23 3 Lave el filtro con agua y detergente Fig 24 Enjuague bien el filtro y dejelo secar 4 Aplique suficiente aceite limpio de motor SAE 30 para recubrir ligeramente el filtro Fig 25 5 Apriete el filtro para esparcir y retirar el exceso de aceite Fig 26 6 Vuelva a colocar el filtro Fig 23 NOTA Si opera la unidad sin el filtro de mire su garantia 7 sera ANULADA Instale de nuevo l...

Страница 28: ...a Esta tarea debe set realizada en interiores en un area limpia y libre de polvo 1 Quite los dos 6 Tornillos de encima de la tapa del motor con un destornillador de pala o Torx 25 Fig 30 6 piano o con una broca Torx T 25 Fig 31 Saque la cubierta y la junta del brazo oscilante Tire lentamente de la cuerda de arranque para traer el pist6n hacia la parte superior de su recorrido conocido como punto m...

Страница 29: ...de chispas y el tomillo LIMPIEZA _ DVERTENClA Para evitar graves lesiones I personales apague siempre su recortador y espere que se enfrie antes de limpiarlo o realizar cualquier tipo de mantenimiento Use un cepillo pequefio para limpiar la parte exterior de la unidad No use detergentes fuertes Los limpiadores domesticos que contienen aceites aromaticos como pino y lim6n y con solventes como el qu...

Страница 30: ...ujia de encendido Limpie o cambie el parachispas NOTA Para reparaciones mas alia de los peque_os aiustes recien mencionados comuniquese con su centro de Piezas y Reparaciones de Sears mas cercano 1 800 4 MY HOME u otra agencia de servicio calificada Tipo de motor Enfriado por aire 4 ciclos Desplazamiento 29 cc 1 8 pulgadas cubicas R P M de operaci6n 7 2004 r p m R P M de velocidad mfnima 2 800 3 6...

Страница 31: ...s derechos y responsabilidades de acuerdo con su garantia debera Ilamar al 1 800 4 MY HOME Cobertura de la Garantia del Fabricante El periodo de garant a comienza en la fecha en que se entrega el motor o el equipo al comprador del minorista El fabricante garantiza al propietario inicial y a cada comprador subsiguiente per un periodo de dos afros que el motor no tiene defectos en los materiales ni ...

Страница 32: ...s relacionadas con las emisiones evaporativas ser interpretada como sigue 1 Cualquier pieza garantizada que no este programada para reemplazo segL_nrequiere el mantenimiento en las instrucciones por escrito debe estar garantizada por el periodo de garantia definido en la subsecci6n b 2 Si alguna de esas piezas falla durante el periodo de cobertura de la garantfa debe ser reparada o reemplazada per...

Страница 33: ...REPLACEMENT PARTS MODEL 316 791940 4 CYCLE GAS TRIMMER E17 ...

Страница 34: ...ug O Ring 41 753 05832 Starter Assembly includes 42 13 753 05237 Crankcase Cover 42 791 613103 Rope 14 753 05238 Crankcase Cover O ring 43 753 04286 Recoil Spring 15 753 05325 Crankcase Assembly includes 9 10 14 44 753 05011 Handle 16 753 05240 Flywheel Assembly 45 791 611061 Rope Guide 17 753 05241 Cam Bracket Assembly includes 18 46 753 05833 Starter Housing Assembly includes 3 37 45 18 753 0524...

Страница 35: ...6 753 05038 Description Throttle Housing Assembly includes 2 4 Throttle Trigger Throttle Trigger Spring Switch Assembly Throttle Cable Assembly Upper Drive Shaft Housing Deluxe D Handle Assembly includes 8 10 Screw D Handle D Handle Base Click Link Coupler includes 12 15 Bolt Screw Adjustment Knob includes 15 Nut Lower Drive Shaft Housing includes 17 Lower Flexible Drive Shaft Shield Mount Hardwar...

Страница 36: ... Home For repair of carry in items like vacuums lawn equipment and electronics call anytime for the location of your nearest Sears Parts Repair Service Center 1 800 488 1222 U S A 1 800 469 4663 Canada www sears com www sears ca To purchase a protection agreement on a product serviced by Sears 1 800 827 6655 U S A Para pedir servicio de reparacion a domicilio y para ordenar piezas 1 888 SU HOGAR 1...

Отзывы: