background image

6

SAFETY SYMBOLS

Symbol

Description

READ THE OPERATOR’S MANUAL(S) 
Read, understand, and follow all instructions in the manual(s) before attempting to assemble and 
operate.

WARNING— ROTATING BLADES 
Keep hands out of inlet and discharge openings while  machine is running. There are rotating blades 
inside.

WARNING— ROTATING BLADES 
Keep hands out of inlet and discharge openings while  machine is running. There are rotating blades 
inside.

WARNING— ROTATING AUGER 
Do not put hands or feet near rotating parts, in the auger/impeller housing or chute assembly. Contact 
with the rotating parts can amputate hands and feet.

WARNING—THROWN OBJECTS 
This machine may pick up and throw and objects which can cause serious personal injury.

WARNING—GASOLINE IS FLAMMABLE 
Allow the engine to cool at least two minutes before refueling.

WARNING— CARBON MONOXIDE
Never run an engine indoors or in a poorly ventilated area. Engine exhaust contains carbon monoxide, 
an odorless and deadly gas.

WARNING— ELECTRICAL SHOCK 
Do not use the engine’s electric starter in the rain.

This page depicts and describes safety symbols that may appear on this product.  Read, understand, and follow all instructions on the machine 
before attempting to assemble and operate.

Содержание C459-52832

Страница 1: ...low all safety rules and operating instructions Operator s Manual SAFETY ASSEMBLY OPERATION MAINTENANCE PARTS LIST SEARS CANADA 222 Jarvis St Toronto On M5B 2B8 Visit our website sears ca 7 15 2008 FORM NO 769 04221 28 Steerable Snowthrower Model No C459 52832 ...

Страница 2: ...2 199260 07 21 05 BY Printed in U S A 02488 ...

Страница 3: ...ng normal use such as belts spark plugs air cleaners and shear pins as well damage to the 2 engine resulting from operating snow thrower with insufficient oil Repairs necessary because of operator abuse or negligence including the failure to operate and maintain 3 the equipment according to the instructions contained in the Owner s Manual 4 Tire replacement or repair caused by punctures from outsi...

Страница 4: ...ne is extremely flammable and the vapors are explosive Serious personal injury can occur when gasoline is spilled on yourself or your clothes which can ignite Wash your skin and change clothes immediately a Use only an approved gasoline container b Extinguish all cigarettes cigars pipes and other sources of ignition c Never fuel machine indoors d Never remove gas cap or add fuel while the engine i...

Страница 5: ...red in this manual use care and good judgment Contact your Sears Service Center for assistance Maintenance Storage 1 Never tamper with safety devices Check their proper operation regularly Refer to the maintenance and adjustment sections of this manual 2 Before cleaning repairing or inspecting machine disengage all control levers and stop the engine Wait until the auger impeller come to a complete...

Страница 6: ... impeller housing or chute assembly Contact with the rotating parts can amputate hands and feet WARNING THROWN OBJECTS This machine may pick up and throw and objects which can cause serious personal injury WARNING GASOLINE IS FLAMMABLE Allow the engine to cool at least two minutes before refueling WARNING CARBON MONOXIDE Never run an engine indoors or in a poorly ventilated area Engine exhaust con...

Страница 7: ...NOTES 7 ...

Страница 8: ...ition the chute assembly forward facing over the chute base 3 Place the chute control lever in the centered position See Figure 3 4 Place chute assembly onto chute base and secure chute control assembly to chute support bracket with clevis pin and cotter pin removed earlier See Figure 4 5 Finish securing chute control assembly to chute support bracket with wing nut and hex screw removed earlier Se...

Страница 9: ...NG Never use your hands to clean snow and ice from the chute assembly or auger housing Skid Shoes Position the skid shoes based on surface conditions Adjust upward for hard packed snow Adjust downward when operating on gravel or crushed rock surfaces See Making Adjustment Section Tire Pressure The tires are over inflated for shipping purposes Check the tire pressure before operating the snow throw...

Страница 10: ...hecked and oil added through the oil fill Safety Key The safety key must be pushed in place in order for the engine to start Pull the safety key out to prevent unauthorized use of equipment Rocker Switch The rocker switch is used to stop the engine The switch must be in the ON position in order to start the engine Figure 8 Engine Controls Recoil Starter Handle Choke Control Electric Starter Outlet...

Страница 11: ...eze the left control to turn left NOTE Operate the snow thrower in open areas until you are familiar with these controls Four Way Chute Control The chute directional control is located on the left side of the dash panel To change the direction in which snow is thrown squeeze the button on the joy stick and pivot the joy stick to the right or to the left To change the angle distance which snow is t...

Страница 12: ... again 5 When disconnecting the extension cord always unplug the end at the three prong wall outlet before unplugging the opposite end from the snow thrower Recoil Starter 1 Grasp the recoil starter handle and slowly pull the rope out At the point where it becomes slightly harder to pull the rope slowly allow the rope to recoil 2 Pull the starter handle with a firm rapid stroke Do not release the ...

Страница 13: ...the operator s position behind the snow thrower engage the auger 4 Allow the auger to remain engaged for approximately ten 10 seconds before releasing the auger control Repeat this several times 5 With the auger control in the disengaged up position walk to the front of the machine 6 Confirm that the auger has completely stopped rotating and shows NO signs of motion If the auger shows ANY signs of...

Страница 14: ... cable loosen the top nut and tighten the bottom nut on the cable 2 Adjust equally on both sides by working on both cables See Figure 11 Drive Control Shift Lever When the drive control is released and in the disengaged up position the cable should have very little slack It should NOT be tight Check the adjustment of the drive control as follows 1 With the drive control released push the snow thro...

Страница 15: ...at you operate this snow thrower on gravel as loose gravel can be easily picked up and thrown by the auger causing personal injury or damage to the snow thrower If for some reason you have to operate the snow thrower on gravel keep the skid shoe in the highest position for maximum clearance between the ground and the shave plate The space between the skid shoes and the ground can be adjusted For c...

Страница 16: ...er housing 2 Remove the lower frame cover by removing the screws which secure it 3 Apply a light coating of an all weather multi purpose oil to the hex shaft See Figure 14 NOTE Avoid getting oil on rubber friction wheel and aluminum drive plate Wheels At least once a season remove both wheels Clean and coat the axles with a multipurpose automotive grease before reinstalling wheels Auger Shaft At l...

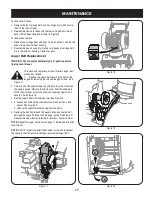
Страница 17: ...by removing the two self tapping screws See Figure 17 2 Carefully pivot the snow thrower up and forward so that it rests on the auger housing Remove the frame cover from the underside of the snow thrower by removing four self tapping screws which secure it See Figure 18 3 Roll the auger belt off the engine pulley See Figure 19 4 a Loosen and remove the shoulder screw which acts as a belt keeper Se...

Страница 18: ... required and several components must be removed and in order to replace the snow thrower s friction wheel rubber See an authorized Service Dealer to have the friction wheel rubber replaced or phone Customer Support as instructed on page 2 for information on ordering a Service Manual To inspect the friction wheel proceed as follows 1 Carefully pivot the snow thrower up and forward so that it rests...

Страница 19: ...ts 1 Contact Service Center 1 Carburetor not adjusted properly Loss of power 1 Connect and tighten spark plug wire 2 Remove ice and snow from gas cap Be certain vent is clear 3 Contact Service Center 1 Spark plug wire loose 2 Gas cap vent plugged 3 Exhaust port plugged Unit fails to propel itself 1 Adjust drive control cable Refer to Adjustments 2 Replace drive belt 3 Replace friciton wheel 1 Driv...

Страница 20: ...T PIÈCES DÉTACHÉES 21 36 52 21 17 37 29 54 2 33 47 49 62 40 32 A A 25 12 15 57 11 27 53 23 24 23 46 41 45 48 42 31 10 22 54 61 9 28 20 30 7 8 4 18 3 1 6 14 26 19 16 13 50 51 46 39 43 38 44 5 35 34 58 59 56 60 50 ...

Страница 21: ...6 04396 Selector Speed Cable Câble 30 736 0463 Flat Washer 25 ID x 63 OD x 0515 Rondelle plate 0 25 DI x 0 63 x 0 0515 31 710 0895 Hex Tapp Scr 1 4 x 75 Lg Vis taraudée à tête hex de 1 4 x 0 75 po de lg 32 710 0606 Hex Hd Cap Screw 1 4 20 x 1 5 Gr 5 Vis à tête hex 1 4 20 x 1 5 Qual 5 33 731 04425B Upper Chute Goulotte supérieur 34 790 00155A Joystick Bracket Support 35 710 04187 Hi Lo Screw 1 4 15...

Страница 22: ...0 16 44 7 65 7 9 17 13 4 19 15 32 33 53 57 48 55 49 60 50 51 46 47 58 54 42 45 28 52 59 56 31 29 31 33 33 41 32 27 27 27 11 11 34 27 29 29 29 20 20 34 33 41 40 NOTE Housing may not be exactly as shown REMARQUE L habitacle peut être légèrement différent 61 30 in po 7 39 64 62 63 26 38 7 4 9 ...

Страница 23: ... Pin 25 x 1 5 Gr 2 Goupille de cisaillement 0 25 x 1 5 po de lg 33 741 0493A Flange Bushing Collet à bride 34 790 00087A Bushing Housing Carter de la collet 790 00138A Bushing Housing w grease fitting hole Carter de la collet avec trou pour raccord de graissage 35 790 00118 Shave Plate Lame plate 38 790 00181 Drift Cutter Optional Virole de réglage en option 39 790 00091 Reversible Slide Shoe stee...

Страница 24: ...0 4 68 1 18B 12 25 23 12 70 23 9 24 44 22 25 8 40 5 41 1 A A 45 6 69 38 27 26 46 43 26 27 42 61 36 62 60 51 55 52 53 58 50 49 48 47 67 59 20 54 19 64 64 72 65 66 63 56 57 56 28 18A 14 16 43 42 42A 42E 42B 42C 42F 42D 42H 42G 43A 77 43B 43 71 74 76 73 39 13 82 75 Optional en option 81 80 30 1 83 35 21 79 2 ...

Страница 25: ...416A Hex Drive Shaft 500 Arbre d entraînement 500 42B 618 04284 Planetary Carrier Ass y Porte roue 42C 717 1209A Gear 12T Engrenage 12 dents 42D 736 0502 Flat Washer 58 x 1 12 x 02 Rondelle plate 0 58 x 1 12 x 0 02 42E 736 0336 Flat Washer 5 8 ID x 1 0 OD Rondelle plate 5 8 DI x 1 0 DE 42F 717 1210A Gear 18T Engrenage 18 dents 42G 618 04285 Ring Planetary Gear Ass y 500 Ensemble de l engrenage 500...

Страница 26: ...27 NOTES For parts and or accessories refer to customer support on page 2 Adressez vous au Service après vente à la page 2 pour ce qui concerne les pièces et ou accessoires ...

Страница 27: ...28 NOTES For parts and or accessories refer to customer support on page 2 Adressez vous au Service après vente à la page 2 pour ce qui concerne les pièces et ou accessoires ...

Страница 28: ...21 NOTES For parts and or accessories refer to customer support on page 2 Adressez vous au Service après vente à la page 2 pour ce qui concerne les pièces et ou accessoires ...

Страница 29: ... est mal réglé Moteur surchauffe Perte de puissance 1 Branchez et serrez le fil de la bougie 2 Dégagez la glace et la neige du chapeau Assurez vous de la propreté du trou d aération 3 Adressez vous à une station technique 1 Fil de la bougie desserré 2 Chapeau d échappement du trou d aération bouché 3 Le port déchappement est bouché La souffleuse n avance pas 1 Réglez le câble d entraînement Voir l...

Страница 30: ...re 18 2 Démontez le couvre châssis du dessous de la souffleuse en retirant les quatre vis auto taraudeuses qui le maintiennent en place Voir la Figure 18 3 Examinez soigneusement la roue de frottement pour détecter tout signe d usure ou de fendillement Voir la Figure 23 Instructions de remisage Si le moteur doit être entreposé pendant plus de 30 jours préparez le de la façon selon les instructions...

Страница 31: ...le couvre courroie en plastique sur le devant du moteur en enlevant les deux vis auto taraudeuses Voir la Figure 17 2 Basculez doucement la souffleuse vers l avant pour la faire reposer sur l habitacle de la tarière Voir la Figure 18 3 Démontez le couvre châssis du dessous de la souffleuse en retirant les quatre vis auto taraudeuses qui le maintiennent en place 4 a Dégagez la courroie de la tarièr...

Страница 32: ...ulons ordinaires et le contre écrous à embase qui la maintiennent ainsi que les patins sur la souffleuse 2 Installez la lame plate neuve en vérifiant que la tête des boulons ordinaires se trouve à l intérieur de l habitacle Serrez à fond Remplacement de la courroie de la tarière AVERTISSEMENT Laissez tourner le moteur jusqu à ce qu il tombe en panne d essence avant de faire basculer la souffleuse ...

Страница 33: ... basculer la souffleuse 1 Basculez doucement la souffleuse vers l avant pour la faire reposer sur l habitacle de la tarière 2 Enlevez le couvre châssis en enlevant les deux vis auto taraudeus es qui le maintient 3 Appliquez une légère couche d huile polyvalente toutes saison sur l arbre hex Voir la Figure 14 REMARQUE Évitez de renverser de l huile sur la roue de frottement en caoutchouc ou sur la ...

Страница 34: ...rrez l écrou à sic pans inférieur pour maintenir le support à la position correcte 5 Replacez le couvre châssis et redressez la souffleuse à la position de fonctionnement Patins L espace entre la lame plate et le sol peut être ajusté en ajustant les patins Pour déblayer complètement la neige placez les patins à la position plus haute sur l habitacle Utilisez les positions intermédiaire ou base lor...

Страница 35: ...ur serrer le câble desserrez l écrou supérieur et serrez l écrou inférieur sur le câble 2 Ajustez également des deux côtés en réglant les deux câbles de chaque pair Voir la Figure 11 Commande de la transmission et levier de vitesses Le câble doit présenter très peu de jeu quand la commande de la transmission est débrayée et en position relevée Le câble ne doit PAS être tendu Vérifiez l ajustement ...

Страница 36: ...endroit bien aéré et faites démarrer la souffleuse selon les instructions dans le paragraphe pour faire démarrer le moteur Vérifiez que l obturateur est réglé à la position rapide 3 Tenez vous à la position de conduite derrière la souffleuse et enclenchez la tarière 4 Attendez environ dix secondes avant de débrayer la tarière Répétez cette opération plusieurs fois 5 Avec la manette de commande de ...

Страница 37: ...eur démarre lâchez le bouton du démarreur immédiate ment 4 Au fur et à mesure que le moteur chauffe tournez lentement le bouton du volet de départ vers la position SANS VOLET Si le moteur hésite tournez à nouveau le bouton du volet de départ à la position VOLET PLEIN puis revenez lentement à la position SANS VOLET 5 Débranchez d abord le fil électrique de la prise de courant avant de débrancher l ...

Страница 38: ...he pour tourner vers la gauche REMARQUE Utilisez la souffleuse dans des espaces dégagés jusqu à ce que vous soyez plus habituéaux commandes Commande de la goulotte à 4 fonctions La commande d orientation de la goulotte se trouve sur la gauche du tableau de bord Pour modifier l orientation de la projection de la neige appuyez sur le bouton du levier de commande et tournez le levier vers la droite o...

Страница 39: ...rité doit être bien enfoncée pour que le moteur démarre Enlevez la clé de sécurité pour éviter toute utilisation non autorisée de l équipement Interrupteur à bascule Il sert à arrêter le moteur et doit se trouver à la position On pour la mise en marche du moteur Figure 8 Maintenant que votre souffleuse est prête à travailler il est temps de vous familiariser avec ses commandes et diverses caractér...

Страница 40: ...AVERTISSEMENT Ne dégagez jamais la neige ou la glace près de la tarière ou dans la goulotte à la main Patins Positionnez les patins en fonction de la surface de travail Redressez les si la neige est tassée et abaissez les pour travailler sur des surfaces recouvertes de gravier ou de pierre concassée Consultez le chapitre Réglages Pression des pneus Les pneus sont gonflés excessivement pour l expéd...

Страница 41: ... le support de la goulotte Voir la Figure 2 Positionnez la goulotte tournée vers l avant sur sa base 3 Placez la manette de commande de la goulotte à la position centrale Voir la Figure 3 4 Placez la goulotte sur sa base et attachez la sur son support en utilisant l axe de chape et la goupille fendue enlevés plus tôt Voir la Figure 4 5 Continuez l installation de la goulotte sur son support avec l...

Страница 42: ...NOTES 7 ...

Страница 43: ... pièces en mouvement de l habitacle des tarières de la turbine ou de la goulotte Les pièces en mouvement peuvent amputer mains et pieds AVERTISSEMENT OBJETS PROJETÉS Cette machine peut ramasser et projeter des objets ce qui peut causer des blessures graves AVERTISSEMENT L ESSENCE EST UN PRODUIT INFLAMMABLE Laissez le moteur refroidir pendant au moins deux minutes avant de refaire le plein AVERTISS...

Страница 44: ... situations qui n ont pas été abordées par cette notice d utilisation Contactez votre Centre de Service Sears pour assistance Entretien et Remisage 1 Ne modifiez jamais les dispositifs de sécurité Vérifiez souvent qu ils fonctionnent correctement Consultez les chapitres concernant l entretien et les réglages dans cette notice d utilisation 2 Avant de nettoyer de réparer ou d examiner la machine dé...

Страница 45: ...apeurs risquent d exploser Vous pouvez être grièvement blessé si des éclaboussures sur votre peau ou sur vos vêtements s enflammaient Rincez votre peau et changez immédiatement de vêtements a Remisez le carburant dans des bidons homologués seulement b Éteignez toute cigarette ou pipe tout cigare ou toute autre source incandescente c Ne faites jamais le plein à l intérieur d N enlevez jamais le cap...

Страница 46: ...male comme les courroies les bougies les filtres à air et les goupilles de cisaillement ainsi que tout dégât 2 au moteur résultant de l utilisation de la souffleuse avec une quantité d huile insuffisante Les réparations nécessaires en raison de l utilisation abusive ou négligente y compris l utilisation et l entretien de l équipement ne re 3 spectant pas les instructions fournies dans la notice d ...

Страница 47: ...s proche afin d apporter à l atelier des produits tels que des aspirateurs tondeuses à gazon ou appareils électroniques Pour connaître le no de téléphone du Service des pièces et de l entretien Sears afin de commander les pièces de rechange accessoires et manuels d instructions requis pour effectuer vous même les réparations www sears ca Pour acheter ou demander des renseignements sur un contrat d...

Страница 48: ...ca ATTENTION Lisez attentivement les régles de sécurité et les instructions avant de mettre en marche la machine Notice d utilisation SÉCURITÉ MONTAGE UTILISATION ENTRETIEN PIÈCES DÉTACHÉES Souffleuse à neige orientable de 28 po Modèle No C459 52832 7 15 2008 FORM NO 769 04221 ...

Отзывы: