background image

15

OPERATION

CLean-OUT TOOL

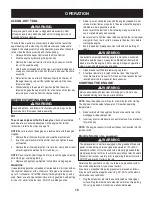
The chute clean-out tool is conveniently fastened to the rear of the 
auger housing with a mounting clip. Should snow and ice become 
lodged in the chute assembly during operation, proceed as follows to 
safely clean the chute assembly and chute opening:

Release both the Auger Control and the Drive Control.

1. 

Stop the engine by removing the ignition key. 

2. 

Remove the clean-out tool from the clip which secures it to the 

3. 

rear of the auger housing. 
Use the shovel-shaped end of the clean-out tool to dislodge and 

4. 

scoop any snow and ice which has formed in and near the chute 
assembly.
 Refasten the clean-out tool to the mounting clip on the rear of 

5. 

the auger housing, reinsert the ignition key and start the snow 
thrower’s engine.
While standing in the operator’s position (behind the snow 

6. 

thrower), engage the auger control for a few seconds to clear any 
remaining snow and ice from the chute assembly.

BefOre STarTIng engIne

Oil

The unit was shipped with oil in the engine. Check oil level before 
each operation to ensure adequate oil in the engine. For further 
instructions, refer to the steps on page 18.

NOTE: Be sure to check the engine on a level surface with the engine 
stopped.

Remove the oil filler cap/dipstick and wipe the dipstick clean.

1. 

Insert the cap/dipstick into the oil filler neck, and tighten the cap 

2. 

until seated.
Remove the oil filler cap/dipstick. If level is low, slowly add oil until 

3. 

oil level registers between high (H) and low (L)..

NOTE: Do not overfill. Overfilling with oil may result in engine smoking, 
hard starting or spark plug fouling.

Replace and tighten cap/dipstick firmly before starting engine.

4. 

gasoline

Use automotive gasoline (unleaded or low leaded to minimize combus-
tion chamber deposits) with a minimum of 87 octane. Gasoline with 
up to 10% ethanol or 15% MTBE (Methyl Tertiary Butyl Ether) can be 
used. Never use an oil/gasoline mixture or dirty gasoline. Avoid getting 
dirt, dust, or water in the fuel tank. DO NOT use E85 gasoline.

Refuel in a well-ventilated area with the engine stopped. Do not 

• 

smoke or allow flames or sparks in the area where the engine is 
refueled or where gasoline is stored.
Do not overfill the fuel tank. After refueling, make sure the tank 

• 

cap is closed properly and securely.
Be careful not to spill fuel when refueling. Spilled fuel or fuel vapor 

• 

may ignite. If any fuel is spilled, make sure the area is dry before 
starting the engine.
Avoid repeated or prolonged contact with skin or breathing of 

• 

vapor.

Clean around fuel fill before removing cap to fuel.

1. 

A fuel level indicator is located in the fuel tank. See Figure 19 

2. 

inset. Be careful not to overfill. Fill tank until fuel reaches the fuel 
level indicator to allow space for fuel expansion. 

STarTIng THe engIne

NOTE: Allow the engine to warm up for a few minutes after starting. 
The engine will not develop full power until it reaches operating 
temperatures.

Make certain both the auger control and drive control are in the 

1. 

disengaged (released) position.
Insert key into slot. Make sure it snaps into place. Do not attempt 

2. 

to turn the key.

NOTE: The engine cannot start without the key fully inserted into the 
ignition switch.

electric Starter 

(if so equipped)


Determine that your home’s wiring is a three-wire grounded system. 
Ask a licensed electrician if you are not certain. 
If you have a grounded three-prong receptacle, proceed as follows. 
If you do not have the proper house wiring, DO NOT use the electric 
starter under any conditions.

Plug the extension cord into the outlet located on the engine’s 

1. 

surface. Plug the other end of extension cord into a three-prong 
120-volt, grounded, AC outlet in a well-ventilated area. 

WarnIng

Read, understand, and follow all instructions and warnings on the 
machine and in this manual before operating.

WarnIng

Use extreme care when handling gasoline. Gasoline is extremely 
flammable and the vapors are explosive. 

Never

 fuel the machine 

indoors or while the engine is hot or running. Extinguish cigarettes, 
cigars, pipes and other sources of ignition.

WarnIng

Never use your hands to clear a clogged chute assembly. Shut 
off engine and remain behind handles until all moving parts have 
stopped before unclogging.

WarnIng

The optional electric starter is equipped with a grounded three-wire 
power cord and plug, and is designed to operate on 120 volt AC 
household current. It must be used with a properly grounded three-
prong receptacle at all times to avoid the possibility of electric shock. 
Follow all instructions carefully prior to operating the electric starter. 
DO NOT use electric starter in the rain.

WarnIng

Always keep hands and feet clear of moving parts. Do not use a 
pressurized starting fluid. Vapors are flammable.

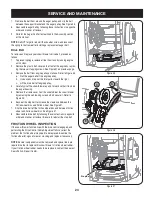
Содержание C459-52103

Страница 1: ... CAUTION Before using this product read this manual and follow all safety rules and operating instructions Operator s Manual TWO STAGE SNOW THROWERS Model Nos C459 52103 24 C459 52105 26 C459 52106 26 C459 52107 30 SAFETY ASSEMBLY OPERATION MAINTENANCE PARTS LIST 05 15 12 769 07198 ...

Страница 2: ...ion 13 Service Maintenance 18 Off Season Storage 24 Troubleshooting 25 Parts List 26 Warranty Statement 35 1 800 4 MY HOME 35 TABLE OF CONTENTS Model Number Serial Number Date of Purchase Record the model number serial number and date of purchase above MODEL NUMBER ...

Страница 3: ...ettes cigars pipes and other sources of ignition c Never fuel machine indoors d Never remove gas cap or add fuel while the engine is hot or running e Allow engine to cool at least two minutes before refueling f Never over fill fuel tank Fill tank to no more than inch below bottom of filler neck to provide space for fuel expansion g Replace gasoline cap and tighten securely h If gasoline is spilled...

Страница 4: ...ol levers and stop the engine Wait until the auger impeller come to a complete stop Disconnect the spark plug wire and ground against the engine to prevent unintended starting 3 Check bolts and screws for proper tightness at frequent intervals to keep the machine in safe working condition Also visually inspect machine for any damage 4 Do not change the engine governor setting or over speed the eng...

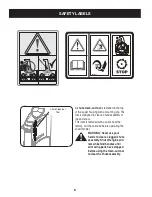
Страница 5: ... amputate hands and feet WARNING THROWN OBJECTS This machine may pick up and throw and objects which can cause serious personal injury WARNING GASOLINE IS FLAMMABLE Allow the engine to cool at least two minutes before refueling WARNING CARBON MONOXIDE Never run an engine indoors or in a poorly ventilated area Engine exhaust contains carbon monoxide an odorless and deadly gas WARNING ELECTRICAL SHO...

Страница 6: ...assembly of ice and snow This item is fastened with a cable tie at the factory Cut the cable tie before operating the snow thrower WARNING Never use your hands to clear a clogged chute assembly Shut off engine and remain behind handles until all moving parts have stopped before using the clean out tool to clear the chute assembly Chute Clean out Tool ...

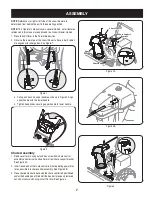
Страница 7: ...ure 2 Align upper handle with the lower handle b Tighten hand knobs securing upper handle to lower handle Chute Assembly 1 Remove cotter pin wing nut and hex screw from chute control assembly and clevis pin and cotter pin from chute support bracket See Figure 3A 2 Insert round end of the chute control rod hole pointing upward as far as possible into chute control assembly See Figure 3B 3 Place chu...

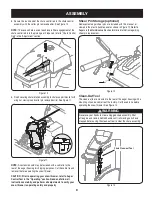
Страница 8: ...n the front of the unit below the control panel NOTE The joystick must be angled slightly to the right as shown Figure 6 and the arrow on the pinion gear at the top to ensure full chute rotation 6 It is important that all cables be routed through the cable guide and remain positioned on the left side of the chute control rod See Figure 8 7 While supporting the back of the pinion gear insert the he...

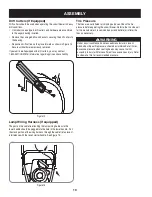
Страница 9: ... Auger Control Test in the Operating section Read and follow all instructions carefully and perform all adjustments to verify your snow thrower is operating safely and properly Shear Pin Storage optional Replacement auger shear pins are included with this manual or stowed in the plastic handle panel as shown in Figure 12 Refer to Augers in the Maintainance Section for more information regarding sh...

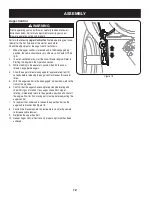
Страница 10: ...aching the lamp wiring harness to the lower handle should be plugged into the hole in the lower handle Pull the slack portion of the wiring harness through the cable tie to prevent interference with the recoil starter handle See Figure 15 Figure 14 Figure 15 Tire Pressure The tires are over inflated for shipping purposes Check the tire pressure before operating the snow thrower Refer to the tire s...

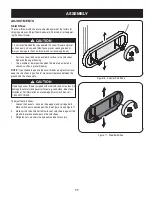
Страница 11: ... the hex nuts washers if equipped and carriage bolts 1 Move skid shoes to desired position See Figure 16 and Figure 17 Make certain the entire bottom surface of skid shoe is against the 2 ground to avoid uneven wear on the skid shoes Retighten nuts washers if equipped and bolts securely 3 Figure 16 Polymer Skid Shoe CAUTION It is not recommended that you operate this snow thrower on gravel as it c...

Страница 12: ...ing in the operator s position behind the snow 3 thrower engage the augers Allow the augers to remain engaged for approximately ten 10 4 seconds before releasing the auger control Repeat this several times With the auger control in the disengaged up position walk to the 5 front of the machine Confirm that the augers have completely stopped rotating and 6 show NO signs of motion If any auger shows ...

Страница 13: ...wnward when operating on gravel or crushed rock surfaces Key The key is a safety device It must be fully inserted in order for the engine to start Remove the key when the snow thrower is not in use NOTE Do not turn the key in an attempt to start the engine Doing so may cause it to break Choke Control The choke control is found on the rear of the engine and is activated by turning the rotary choke ...

Страница 14: ...as until you are familiar with these controls Auger Control The auger control is located on the left handle Squeeze the control grip against the handle to engage the auger and start snow throwing action Release to stop Drive Control Auger Control Lock The drive control is located on the right handle Squeeze the control grip against the handle to engage the wheel drive Release to stop The drive con...

Страница 15: ...and securely Be careful not to spill fuel when refueling Spilled fuel or fuel vapor may ignite If any fuel is spilled make sure the area is dry before starting the engine Avoid repeated or prolonged contact with skin or breathing of vapor Clean around fuel fill before removing cap to fuel 1 A fuel level indicator is located in the fuel tank See Figure 19 2 inset Be careful not to overfill Fill tan...

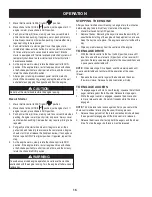
Страница 16: ... control to RUN 5 position If the engine falters restart engine and run with choke at half choke position for a short period of time and then slowly rotate the choke into RUN position Stopping The Engine After you have finished snow throwing run engine for a few minutes before stopping to help dry off any moisture on the engine Move throttle control to OFF position 1 Remove the key Removing the ke...

Страница 17: ...ll not turn check to see if the pins have sheared See Figure 20 WARNING Always turn off the snow thrower s engine and remove the key prior to replacing shear pins CAUTION NEVER replace the auger shear pins with anything other than Sears SKU 88389 OEM Part No 738 04124A replacement shear pins Any damage to the auger gearbox or other components as a result of failing to do so will NOT be covered by ...

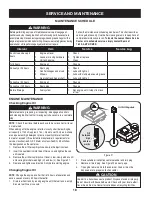
Страница 18: ...l 1 Loose or missing hardware 2 Unit and engine 3 Check 1 Tighten or replace 2 Clean 3 1st 5 hours Engine oil 1 Change 1 Annually or 25 hours Spark plug 1 Control linkages and pivots 2 Wheels 3 Gear shaft and Auger shaft 4 Check 1 Lube with light oil 2 Lube with multipurpose auto grease 3 Lube with light oil 4 Annually or 50 hours Engine oil 1 Change 1 Annually or 100 hours Spark plug 1 Change 1 B...

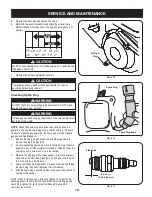
Страница 19: ...trode See Figure 24 The gap should be set to 02 03 inches 0 60 0 80 mm Check that the spark plug washer is in good condition and thread 4 the spark plug in by hand to prevent cross threading After the spark plug is seated tighten with a spark plug wrench to 5 compress the washer NOTE When installing a new spark plug tighten 1 2 turn after the spark plug seats to compress the washer When reinstalli...

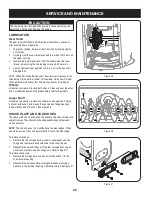
Страница 20: ...eason remove the shear pins on auger shaft Spray lubricant inside shaft and around the spacers and flange bearings found at either end of the shaft See Figure 26 Shave Plate and Skid Shoes The shave plate and skid shoes on the bottom of the snow thrower are subject to wear They should be checked periodically and replaced when necessary NOTE The skid shoes on this machine have two wear edges When o...

Страница 21: ... push the snow 2 thrower forward The wheels should not turn The unit should not roll freely With the drive control released move the shift lever back and 3 forth between the R2 position and the F6 position several times There should be no resistance in the shift lever If any of the above tests failed the drive cable is in need of 4 adjustment Proceed as follows Shut off the engine as instructed in...

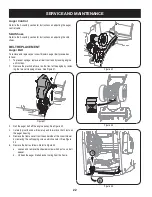
Страница 22: ...e the plastic belt cover on the front of the engine by remov 2 ing the two self tapping screws See Figure 31 Roll the auger belt off the engine pulley See Figure 32 3 Carefully pivot the snow thrower up and forward so that it rests on 4 the auger housing Remove the frame cover from the underside of the snow thrower 5 by removing the self tapping screws which secure it See Figure 33 Remove the belt...

Страница 23: ...ulley 4 Carefully pivot the snow thrower up and forward so that it rests on the auger housing 5 Remove the frame cover from the underside of the snow thrower by removing the self tapping screws which secure it Refer to Figure 33 6 Back out the stop bolt to increase the clearance between the friction wheel disc and friction wheel See Figure 37 7 Slip the drive belt off the friction wheel disc and b...

Страница 24: ...t and coat other areas that may rust with a light film of oil Store in a clean dry and well ventilated area away from any ap 5 pliance that operates with a flame or pilot light such as a furnace water heater or clothes dryer Also avoid any area with a spark producing electric motor or where power tools are operated If possible also avoid storage areas with high humidity because 6 that promotes rus...

Страница 25: ...rk plug 1 wire Tighten all bolts and nuts If vibration continues have unit serviced by an authorized Service Center Loss of power Spark plug wire loose 1 Gas cap vent hole plugged 2 Connect and tighten spark plug wire 1 Remove ice and snow from gas cap Be certain vent 2 hole is clear Unit fails to propel itself Drive control cable in need of adjustment 1 Drive belt loose or damaged 2 Friction whee...

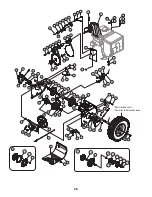
Страница 26: ...25 8 40 5 41 1 A A 45 6 69 38 27 26 46 43 26 27 42 61 36 62 60 51 55 52 58 53 50 49 48 47 67 59 20 54 19 64 64 72 65 66 63 56 57 56 28 18A 14 16 21 43 42 42A 42E 42B 42C 42F 42D 42H 42G 43A 77 43B 43 71 74 76 73 39 13 82 75 81 80 30 1 83 35 79 2 3 85 86 Refer to wheel chart Consultez le tableau des roues 87 86 85 ...

Страница 27: ... Ass y 500 Ensemble de l engrenage 500 42H 716 0194 Retaining Ring 1 56 diam Bague de retenue 1 56 diam 43 684 04159 Friction Wheel Assembly Ensemble de la roue de frottement 43A 935 04054 Friction Wheel Rubber Roue du friction en caoutchouc 43B 790 00174 Friction Plate Plaque du friction 44 716 0136 Retainer Ring Bague de retenue 45 726 0221 Cap Speed Nut 1 4 Rod Chapeau à enfoncer 46 790 00183B ...

Страница 28: ... 33 53 57 48 55 49 60 51 46 47 58 54 42 45 28 52 59 56 31 29 31 33 33 41 32 27 27 27 11 11 34 27 29 29 29 20 20 34 33 41 61 30 in po 62 63 38 7 4 9 67 7 64 Refer to auger housing component chart Consultez le tableau des composants du logement des tarières 7 66 67 7 39 ...

Страница 29: ... 1 0 DE x 0 975 43 946 04230A Auger Clutch Cable Câble de tarière 44 784 5580 0637 Slide Shoe Sabot coulissant 45 918 0123A RH Reduced Auger Housing Carter de l engrenage CD 46 918 0124A LH Reduced Auger Housing Carter de l engrenage CG 47 921 0338 Oil Seal 75 x 1 0 x 125 Joint d étanchéité d huile 0 75 x 1 0 x 0 125 48 741 0662 Flange Bearing 75 ID x 1 00 OD x 50 Roulement 0 75 DI x 1 00 DE x 0 5...

Страница 30: ...30 A B Models w heated grips Modèles avec poignées chauffée ...

Страница 31: ...x 0 88 po de lg 30 732 04219C Spring Clutch Lock Ressort Verrou d embrayage 31 732 04238 Torsion Spring 8156 x 3038 Ressort de torsion 0 8156 x 0 3038 32 935 0199A Rubber Bumper Pare chocs en caoutchouc 33 749 04190A 0637 Upper Handle RH Guidon supérieur CD 34 936 0267 Flat Washer 38 ID x 87 OD x 09 Rondelle plate 0 38 DI x 0 87 DE x 0 09 35 738 04348 Shoulder Screw 437 x 1 345 1 4 20 Vis à épaule...

Страница 32: ...lotte à 4 fonctions 16 20 19 15 14 17 28 7 1 24 12 8 4 40 3 18 23 27 5 6 11 22 44 45 40 26 26 42 51 43 10 54 25 52 13 29 21 10 2 48 47 49 53 26 38 35 31 36 32 38 35 33 37 34 30 39 9 41 40 w 277 cc 357 cc engine only avec moteur de 277 cc et 357 cc seulement 46 50 25 ...

Страница 33: ...04446 Flat Washer 25 ID x 63 OD x 0515 HT Rondelle plate 0 25 DI x 0 63 x 0 0515 25 984 04324A Shift Lever Levier de changement de la vitesse 26 731 04893A Plunger joystick Plongeur 27 738 04367 Flg Shoulder Screw 312 x 3 5 1 4 20 Vis à épaulement 0 312 x 3 5 1 4 20 28 747 05116 Chute Crank Rod Tige du bras de goulotte d ejection 29 784 5594 Cable Bracket Chute Tilt Support de câble 30 717 04667 G...

Страница 34: ...REMEDY FOR ANY BREACH OF WARRANTY Customer Responsibilities In additional to complying with all suggested maintenance guidelines and instructions customers obligations shall include but shall not be limited to operating the product in accordance with the owner s manual or any additional instructions or information provided at the time of purchase or in subsequent communications to the purchaser fr...

Страница 35: ...02488 Trademarks of Sears Brands Management Corp used under license by Sears Canada Marque déposée MC Marque de commerce de Sears Brands Management Corp utilisée en vertu d une licence de Sears Canada ...

Страница 36: ...29 notes ...
Страница 37: ...es Pour connaître le no de téléphone du Service des pièces et de l entretien Sears afin de commander les pièces de rechange accessoires et manuels d instructions requis pour effectuer vous même les réparations www sears ca Pour acheter ou demander des renseignements sur un contrat d entretien Sears téléphonez au 1 800 361 6665 de 9 h à 23 h du lundi au vendredi HNE de 9 h à 16 h le samedi For serv...

Страница 38: ...e remplacer le produit ou encore d offrir un remboursement complet de son prix d achat à sa seule discrétion CE RECOURS SERA LE SEUL ET UNIQUE RECOURS DONT VOUS DISPOSEREZ EN CAS D INEXÉCUTION QUELLE QU ELLE SOIT DE LA GARANTIE Responsabilités du client En plus d observer toutes les consignes et directives d entretien le client doit s acquitter entre autres des obligations suivantes utiliser le pr...

Страница 39: ...la bougie Serrez tous les boulons et écrous Si les vibrations persistent faites vérifier la machine par une station technique agréée Perte de puissance Fil de la bougie desserré 1 Chapeau d échappement d aération bouché 2 Branchez et serrez le fil de la bougie 1 Dégagez la glace et la neige du chapeau Assurez 2 vous de la propreté d aération La souffleuse n avance pas Câble d entraînement mal régl...

Страница 40: ...n aéré 5 loin de tout appareil à veilleuse ou flamme nue calorifère chauffe eau ou sèche linge Évitez tout endroit où un moteur électrique ou des outils électriques pouvant produire des étincelles sont utilisés Dans la mesure du possible évitez de remiser la souffleuse dans 6 un local très humide qui encouragera la rouille et la corrosion Placez le moteur sur une surface plane car toute inclinaiso...

Страница 41: ...remplacer la roue de frotte ment Assurez vous qu il n y a aucun signe d usure ou de fendillement sur la roue de frottement et remplacez la au besoin REMARQUE Des outils spéciaux sont nécessaires et certaines pièces doivent être démontées pour remplacer le caoutchouc de la roue de frottement Adressez vous à Sears au 1 800 4 MY HOME pour localiser la station technique agréée par Sears la plus proche...

Страница 42: ...yez pas de verser l essence du moteur Retirez le couvre courroie en plastique sur le devant du moteur 2 en enlevant les deux vis auto taraudeuses Voir la Figure 31 Dégagez la courroie commit suit Voir la Figure 36 3 a Dégagez la courroie de la tarière de la poulie motrice b Pivoter la poulie de tension vers la droite c Dégagez la courroie de transmission de la poulie motrice Basculez doucement la ...

Страница 43: ...câble de la commande de la tarière Patins Consultez le chapitre Assemblage et Montage pour des instruc tions sur le réglage de les patins Remplacement de la courroie Courroie de la tarière Pour démonter et remplacer la courroie de la tarière de la souffleuse procédez comme suit Laissez le moteur tourner jusqu à ce qu il tombe en panne 1 d essence N essayez pas de verser l essence du moteur Retirez...

Страница 44: ...es sont nécessaires déplacez le câble de 5 changement de vitesses dans un autre trou du support indexé du câble Commande de la transmission Le câble doit présenter très peu de jeu quand la commande de la transmission est débrayée et en position relevée Le câble ne doit PAS être tendu Si un mou excessif est présent dans le câble d entraînement ou si l entraînement de la souffleuse désengage par int...

Страница 45: ...pliquez une légère couche d huile polyvalente toutes saison sur 4 l arbre hex Voir la Figure 25 REMARQUE Évitez de répandre de la graisse ou de l huile sur la roue de frottement en caoutchouc et sur la plaque d entraînement en aluminum en lubrifiant l arbre hex Faissant ceci gênera le systême d entraînement de la souffleuse Essuyez toute éclabousure ou excès de l huile Roues Huilez ou vaporisez du...

Страница 46: ...l eau et du savon dès que possible après tout contact 30º 20º 10º 0º 0º 20º 40º 20º 5W 30 0W 30 40º Synthetic L huile usagée est un déchet dangereux dont l élimination est réglementée Ne la jetez pas avec les ordures ménagères Rensei gnez vous auprès des autorités locales ou 1 800 4MY HOME quant aux installations de recyclage agrémentées AVERTISSEMENT Ne vérifiez pas l état de la bougie si celle c...

Страница 47: ...e à usages multiples Lubrifiez avec une huile légère 4 Tous les ans ou toutes les 50 heures Huile à moteur 1 Changez 1 Tous les ans ou toutes les 100 heures Bougie 1 Changez 1 Avant le remisage Système de carburant 1 Laissez le moteur tourner jusqu à ce 1 qu il tombe en panne d esssence Suivez le calendrier d entretien ci dessous Le tableau énumère les entretiens et intervalles recommandés Utilise...

Страница 48: ...ssez la commande de la transmission pour avancer Lâcher la pour arrêter Ne changez pas de vitesse quand la commande de la transmission est embrayée REMARQUE Cette même poignée permet de bloquer la commande de la tarière pour permettre au conducteur puisse orienter la goulotte sans cesser de projeter la neige 3 Débrayez la commande de la tarière le mécanisme de blocage maintient la tarière engagée ...

Страница 49: ...vec le volet de départ à moitié fermé pendant quelques instants Puis déplacez lentement le volet de départ à la position Run 7 Quand le moteur tourne débranchez le fil électrique du démar reur électrique Débranchez toujours la prise murale avant de débrancher la prise au moteur Démarreur à lanceur 1 Placez l obturateur à la position FAST 2 Tournez le bouton du volet de départ à la position VOLET F...

Страница 50: ...chon de remplissage de l huile et essuyez la jauge à huile 2 Enfoncez la jauge à huile dans le goulot de remplissage de l huile sans la visser 3 Enlevez le capuchon de remplissage de l huile Si le niveau d huile est bas ajoutez lentement de l huile jusqu à ce que le niveau d huile soit entre les repères haut H et le bas L REMARQUE Ne remplissez pas excessivement Une quantité excessive d huile caus...

Страница 51: ...ffleuse dans des espaces dégagés jusqu à ce que vous soyez plus habituéaux commandes COMMUTATEUR DE CHAUFFAGE DES POIGNÉES le cas échéant Ce commutateur se trouve sur l arrière du tableau de commande de la souffleuse Pour que les poignées chauffent poussez le commutateur à la position On Poussez le commutateur à la position Off après avoir utilisé la souffleuse COMMANDE DE LA TARIÈRE Elle se trouv...

Страница 52: ...tact est en fait un dispositif de sécurité Insérez la clé sans la tourner Retirez la clé quand la machine n est pas utilisée REMARQUE Sortez la clé à mi distance pour arrêter le moteur Faisant ainsi la casserez VOLET DE DÉPART Le volet de départ est trouvé sur l arrière du moteur et est activé en tournant le bouton dans le sens des aiguilles d une montre Le bouton du volet de départ ferme la plaqu...

Страница 53: ...on débrayée et relevée placez vous devant la machine 6 Vérifiez que la tarière est totalement immobilisée et qu aucune pièce ne bouge Si la tarière n est pas complètement immobile retournez immédiatement à la position de conduite et arrêtez le moteur Attendez que TOUTES les pièces se soient immobilisées avant d ajuster à nouveau le câble de la tarière 7 Pour ajuster à nouveau le câble de commande ...

Страница 54: ... les patins 1 Ajustez les patins en desserrant les contre écrous à embase rondelles le cas échéant et les boulons ordinaires Placez les patins à la position voulue Voir la Figure 16 et Figure 17 2 Vérifiez que toute la surface inférieure des patins est de niveau et en contact avec le sol pour éviter leur usure inégale 3 Serrez les écrous les rondelles le cas échéant et les boulons à fond AVERTISSE...

Страница 55: ...t le faisceau de câbles sur le guidon inférieur doit être enfoncée dans le trou du guidon inférieur Faites passer la partie détendue du faisceau de câbles dans l attache pour éviter toute interférence avec la poignée du démarreur à lanceur Voir la Figure 15 Figure 15 Figure 14 Pression des pneus Les pneus sont gonflés excessivement pour l expédition Avant l utilisation vérifiez la pression des pne...

Страница 56: ...la commande de la goulotte dans le pignon si besoin est Référez vous au Tige de commande de la goulotte au chapitre Réglages 9 Fixez l ensemble de rotation de la goulotte au support de la goulotte avec l écrou à oreilles l axe de chape et la goupille fendue enlevée précédemment Voir la Figure 11 REMARQUE Pour l expédition le fil électrique est maintenu sur l arrière de l habitacle de la tarière av...

Страница 57: ...cé sur le devant de l unité en dessous du tableau de bord REMARQUE Le levier de commande devrait être légèrement incliné vers la droite comme illustré à la Figure 6 et la flèche sur le pignon sur le haut pour assurer le pivotement complet de la goulotte 6 Vérifiez que tous les câbles sont acheminés dans le guide et qu ils restent placés sur le côté gauche de la tige de la commande de la goulotte V...

Страница 58: ...dans ce notice sont applicables à tous les modèles de souffleuse 1 Placez le levier de vitesses dans la 6e position de marche avant 2 Assurez vous que les deux câbles sur la partie inférieure de la souffleuse sont bien alignés avec les rouleaux de guidage Voir la Figure 1 a Redressez le guidon supérieur comme à la Figure 1 Alignez le guidon supérieur avec le guidon inférieur b Serrez les boutons q...

Страница 59: ...otte Cet outil a été fixé avec un attache câble à l usine Coupez l attache câble avant de mettre la souffleuse en marche AVERTISSEMENT Ne vous servez jamais de vos mains pour dégager une obstruction dans la goulotte Arrêtez le moteur et restez derrière les guidons jusqu à ce que toutes les pièces se soient arrêtées avant de vous servir de l outil de dégagement pour nettoyer la goulotte Outil de dé...

Страница 60: ...TS PROJETÉS Cette machine peut ramasser et projeter des objets ce qui peut causer des blessures graves AVERTISSEMENT L ESSENCE EST UN PRODUIT INFLAMMABLE Laissez le moteur refroidir pendant au moins deux minutes avant de refaire le plein AVERTISSEMENT MONOXYDE DE CARBONE Ne faites jamais fonctionner un moteur à l intérieur ou dans un bâtiment mal ventilé Les gaz d échappement contiennent du monoxy...

Страница 61: ...êtez le moteur Attendez que la tarière turbine se soit complètement immobilisée Débranchez le fil de la bougie et mettez le à la terre pour empêcher tout démarrage accidentel pendant le nettoyage la réparation ou l examen de la machine 3 Vérifiez régulièrement que les boulons et vis sont bien serrés et maintenez la machine en bon état de marche Examinez soigneusement la machine pour vous assurer q...

Страница 62: ...ais le capuchon d essence et n ajoutez pas d essence pendant que le moteur tourne e Laissez le moteur refroidir pendant au moins deux minutes avant de faire le plein f Ne faites jamais déborder le réservoir Laissez un espace d un demi pouce environ pour permettre l expansion du carburant g Resserrez bien le capuchon d essence h En cas de débordement essuyez toute éclaboussure sur le moteur et la m...

Страница 63: ...emisage hors saison 25 Dépannage 26 Pièces détachées voir la page 26 de la version anglaise de cette notice d utilsation Garantie 27 1 800 4 MY HOME 28 Numéro de modèle Numéro de série Date d achat Inscrivez le numéro de modèle le numéro de série et la date d achat ci dessus TABLE DES MATIÈRES NUMÉRO DE MODÈLE ...

Страница 64: ...ttentivement les règles de sécurité et les instructions avant de mettre la machine en marche Notice d utilisation SOUFFLEUSE À NEIGE À DEUX PHASE Modèle Nos C459 52103 24 po C459 52105 26 po C459 52106 26 po C459 52107 30 po 06 01 11 769 07198 SÉCURITÉ MONTAGE UTILISATION ENTRETIEN PIÈCES DÉTACHÉES ...

Отзывы: