background image

17

WARRANTY STATEMENT

General: Craftsman products are warranted to be free from defects in materials or workmanship for a specific time period as set-out below (the 

“Warranty Period”).  Warranties extend to the original purchaser of a Craftsman product only.  Purchases made through an online auction or 

through any website other than www.sears.ca are excluded.  The relevant Warranty Period commences on the original date of purchase. Within 

this period, Sears Canada, Inc. will, at its sole option, repair or replace any products or components which fail in normal use. Such repairs or 

replacement will be made at no charge to the customer for parts or labor, provided that the customer shall be responsible for any transportation 

cost.
Exclusions: This warranty does not cover failures due to normal wear, abuse, misuse, neglect (including but not limited to the use of stale fuel, 

dirt, abrasives, moisture, rust, corrosion, or any adverse reaction due to improper storage or use habits), improper maintenance or failure to follow 

maintenance guidelines and/or instructions, failure to operate the product in accordance with the owner’s manual or any additional instructions or 

information provided at the time of purchase or in subsequent communications with the original purchaser, accident or unauthorized alterations or 

repairs made or attempted by others.  Also excluded from warranty coverage – except as provided below - are the following: maintenance, adjust-

ments, components subject to wear including but not limited to: cosmetic components, belts, blades, blade adapters, bulbs, tires, filters, guide 

bars, lubricants, seats, grips, recoil assy’s, saw chains and bars, trimmer lines and spools, spark plugs, starter ropers and tines, and discoloration 

resulting from ultraviolet light.  Any product missing the model and/or serial number identification label will be disqualified from coverage under 

this warranty.
Repairs: Repairs conducted within the Warranty Period will be warranted until the  end of the original Warranty Period. 
Disclaimers: THE WARRANTIES AND REMEDIES CONTAINED HEREIN ARE EXCLUSIVE AND IN LIEU OF ALL OTHER WARRANTIES, 

WHETHER ORAL OR WRITTEN (OTHER THAN AS STATED HEREIN), AND WHETHER EXPRESS, IMPLIED OR STATUTORY, INCLUDING 

BUT NOT LIMITED TO ANY. THIS WARRANTY GIVES YOU SPECIFIC LEGAL RIGHTS, WHICH MAY VARY FROM PROVINCE TO PROVINCE.
IN NO EVENT SHALL SEARS BE LIABLE FOR ANY INCIDENTAL, SPECIAL, INDIRECT OR CONSEQUENTIAL DAMAGES, WHETHER 

RESULTING FROM THE USE, MISUSE OR INABILITY TO USE THE PRODUCT OR FROM DEFECTS IN THE PRODUCT.   THE EXCLUSIONS 

IN THIS PARAGRAPH SHALL NOT APPLY IN JURISDICATIONS WHERE APPLICABLE LAW DOES NOT ALLOW FOR THE EXCLUSION OF 

INCIDENTAL OR CONSEQUENTIAL DAMAGES.  IN SUCH JURISDICTIONS, THIS PARAGRAPH SHALL NOT APPLY, BUT THE REMAINING 

PROVISIONS OF THIS DOCUMENT SHALL REMAIN VALID.
Sears retains the exclusive right to repair or replace the product or offer a full refund of the purchase price at its sole discretion. SUCH REMEDY 

SHALL BE YOUR SOLE AND EXCLUSIVE REMEDY FOR ANY BREACH OF WARRANTY.
Customer Responsibilities: In additional to complying with all suggested maintenance guidelines and instructions, customers’ obligations shall 

include but shall not be limited to: operating the product in accordance with the owner’s manual or any additional instructions or information 

provided at the time of purchase or in subsequent communications to the purchaser from time to time, exhibit reasonable care in the use, opera-

tion, maintenance, general upkeep and storage of the product.  Failure to comply with these requirements will void any applicable warranty.
List of Applicable Warranty Periods: The following list contains the applicable Warranty Period for your Craftsman product and is based on a 

combination of the type of product or component and the intended and actual use of the product or component:
1.  90 days: Craftsman products intended for use or actually used for commercial, institutional, professional or income-producing purposes
2.  2 years: Craftsman riding lawn mowers, yard and garden tractors, walk behind mowers, tillers, brush cutters, snow blowers, handheld blowers, 

backpack blowers, hedge trimmers and electrical products for noncommercial, nonprofessional, non-institutional, or non-income-producing 
use, except for those components which are part of engine systems manufactured by third party engine manufacturers for which the purchase 
has received an separate warranty with product information supplied at the time of purchase.

3.  1 year: Craftsman power cutters, stump grinders, pole pruners, gas chain saws, electric chain saws, trimmer attachments, baggers and pole 

saws for noncommercial, nonprofessional, non-institutional, or non-income-producing use.

4.  90 days: All defective batteries, which will be replaced during this 90-day Warranty Period.
5.  60 days: Additional Warranty Period of 60 days will apply to adjustments and worn products or components BUT DOES NOT INCLUDE 

WEAR OR ADJUSTMENTS for products used for commercial, institutional, professional or income-producing purposes.  Wear items include 

but are not limited to: belts, blades, tires, spark plugs, air filters, chains, shear bolts, skid plates, scraper bars, drift cutters, ropes, tines, 

collection bags and pulleys.

As the Warranty Period runs from the date of purchase and NOT from the date that a product is delivered, opened, assembled or first used, 

please ensure during this time period that your product or component has been assembled and tested for correction operation regardless of 

when you intend to actually use it.  Claims made after the Warranty Period has expired will not be honored.
Proof of Purchase/Documentation: Warranty coverage is conditioned upon the original purchaser furnishing Sears Canada or its authorized third 

party service provider if applicable, with the original sales receipt or other adequate written proof of the original purchase date and identification 

of the product.  In the event that the original purchaser is unable to provide a company of the original sales receipt, Sears Canada Inc. reserves 

the right to determine in its sole discretion what other written proof of the original purchase date and identification of the product is acceptable.

Содержание C459-36101

Страница 1: ...llow all safety rules and operating instructions Operator s Manual SAFETY ASSEMBLY OPERATION MAINTENANCE PARTS LIST Sears Canada Inc 290 Yonge Street Toronto On M5B 2C3 Visit our web sears ca 2 15 2011 769 06600A 21 LAWN MOWER Model Nos C459 36101 C459 36108 ...

Страница 2: ...s 10 Operation 11 Maintenance 13 Off Season Storage 15 Troubleshooting 16 Warranty Statement 17 Parts List 18 1 800 4 MY HOME 20 TABLE OF CONTENTS Model Number Serial Number Date of Purchase Record the model number serial number and date of purchase above MODEL NUMBER ...

Страница 3: ...g canvas shoes Do not put hands or feet near rotating parts or under the cutting deck Contact with blade can amputate fingers hands toes and feet A missing or damaged discharge cover can cause blade contact or thrown object injuries Many injuries occur as a result of the mower being pulled over the foot during a fall caused by slipping or tripping Do not hold on to the mower if you are falling rel...

Страница 4: ...ing this machine on a sloped or hilly area If the slope is greater than 15 degrees do not mow it Do Mow across the face of slopes never up and down Exercise extreme caution when changing direction on slopes Watch for holes ruts rocks hidden objects or bumps which can cause you to slip or trip Tall grass can hide obstacles Always be sure of your footing A slip and fall can cause serious personal in...

Страница 5: ...ponents discharge cover and trail shield are subject to wear and damage which could expose moving parts or allow objects to be thrown For safety protection frequently check components and replace immediately with original equipment manufacturer s O E M parts only listed in the Parts pages of this manual Use of parts which do not meet the original equipment specifications may lead to improper perfo...

Страница 6: ... damaged replace immediately DANGER BYSTANDERS Do not mow when children or others are around DANGER HAND FOOT CUT Keep hands and feet away from rotating parts DANGER THROWN DEBRIS Remove objects that can be thrown by the blade in any direction Wear safety glasses DANGER SLOPES Use extra caution on slopes Do not mow slopes greater than 15 WARNING GASOLINE IS FLAMMABLE Allow the engine to cool at le...

Страница 7: ...r e s e n t i n g a 1 5 s l o p e Use this page as a guide to determine slopes where you may not operate safely Do not operate your lawn mower on such slopes Do not mow on inclines with a slope in excess of 15 degrees a rise of approximately 2 1 2 feet every 10 feet Operate walk behind mowers across the face of slopes never up and down slopes WARNING ...

Страница 8: ...lts removed earlier into c lower holes of handle as shown in Figure 5 IMPORTANT This unit is shipped WITHOUT GASOLINE or OIL After assembly service engine with gasoline and oil as instructed in the separate engine manual packed with your unit NOTE Reference to right left rear and front of the lawn mower is in relation to the operating position Handle Remove any packing material which may be betwee...

Страница 9: ...t side out before assembling warning label will be on the outside Place bag over frame so that its black plastic side is at the a bottom Slip plastic channel of grass bag over hooks on the frame b See Figure 7 Follow steps below to attach grass catcher Lift rear discharge door a Place grass catcher into the slots in the handle brackets as b shown in Figure 8 Let go of discharge door so that it res...

Страница 10: ... Add oil provided before starting unit for the first time out of the 1 box Service the engine with gasoline as instructed in the separate 2 engine owner s manual Side Discharge Chute Your mower may be shipped as a mulcher To convert to side discharge make sure grass catcher is off of the unit and rear discharge door is closed On the side of the mower lift the side mulching plug See Figure 9 1 Slid...

Страница 11: ...ction to attach the side discharge chute Figure 12 BLADE CONTROL The blade control is attached to the upper handle of the mower Depress and squeeze it against the upper handle to operate the unit Release it to stop engine and blade CUTTING HEIGHT ADJUSTMENT LEVERS One adjustment lever is located on each wheel and is used to adjust the cutting height All four levers have to be at the same position ...

Страница 12: ...if equipped and allow the rear discharge door if equipped to close the rear opening of mower For effective mulching do not cut wet grass If the grass has been allowed to grow in excess of four inches mulching is not recommended Use the grass catcher to bag clippings instead USING GRASS CATCHER You can use the grass catcher to collect clippings while you are operating the mower Attach grass catcher...

Страница 13: ...s dirt and combustible debris from muffler area Lubrication 1 Lubricate the pivot points on the blade control handle at least once a season with light oil The blade control must operate freely in both directions See Figure 14 2 If your mower is equipped with ball bearing wheels lubricate at least once a season with a light oil all other types require no lubrication However if the wheels are remove...

Страница 14: ...ck the blade bolt for correct torque Deck Wash Your mower s deck may be equipped with a water port on its surface as part of its deck wash system Use the deck wash to rinse grass clippings from the deck s underside and prevent the buildup of corrosive chemicals Complete the following steps AFTER EACH MOWING Push the mower to a level clear spot on your lawn near enough 1 for your garden hose to rea...

Страница 15: ...lubrica tion instructions Coat mower s cutting blade with chassis grease to prevent rusting Refer to engine manual for correct engine storage instructions Store mower in a dry clean area Do not store next to corrosive materials such as fertilizer NOTE When storing any type of power equipment in a poorly ventilated or metal storage shed care should be taken to rust proof the equipment Using a light...

Страница 16: ...an fuel line fill tank with clean fresh gasoline 2 Clear vent 3 Drain fuel tank Refill with fresh fuel 4 Refer to engine manual 5 Put CHOKE in the OFF position 6 Engine overheats Engine oil level low 1 Air flow restricted 2 Fill crankcase with proper oil 1 Clean area around and on top of engine 2 Occasional skips hesitates at high speed Spark plug gap too close 1 Adjust gap to 030 Refer to engine ...

Страница 17: ...REMEDY FOR ANY BREACH OF WARRANTY Customer Responsibilities In additional to complying with all suggested maintenance guidelines and instructions customers obligations shall include but shall not be limited to operating the product in accordance with the owner s manual or any additional instructions or information provided at the time of purchase or in subsequent communications to the purchaser fr...

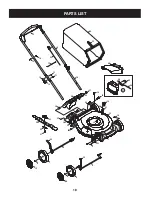
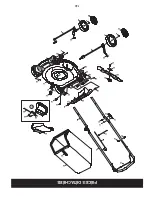
Страница 18: ...18 PARTS LIST 45 50 49 48 51 38 41 42 14 19 26 9 10 11 13 36 34 29 20 22 21 24 25 31 16 34 34 33 52 52 35 12 15 1 2 53 7 4 4 39 40 5 8 6 18 17 30 23 16 27 29 32 28 ...

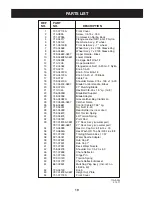
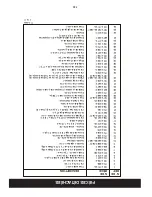
Страница 19: ...olt 3 8 24 x 1 5 Lg Gr 8 22 736 0524B Blade Bell Support 23 748 04096 Blade Adapter 24 764 04082A Grasscatcher Bag Craftsman 25 747 05226 0637 Catcher Frame 26 946 04661 Control Cable 37 58 Lg 27 712 04222 Sq Nut 1 4 20 28 631 04389 Rear Baffle Incl rear door 30 732 04673 RH Torsion Spring 31 732 04674 LH Torsion Spring 32 747 05183 Pivot Rod 33 787 01874A 0691 21 Deck Ass y w water port 787 01869...

Страница 20: ...199260 07 21 05 BY Printed in U S A 02488 ...

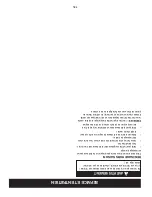
Страница 21: ... proche afin d apporter à l atelier des produits tels que des aspirateurs tondeuses à gazon ou appareils électroniques Pour connaître le no de téléphone du Service des pièces et de l entretien Sears afin de commander les pièces de rechange accessoires et manuels d instructions requis pour effectuer vous même les réparations www sears ca Pour acheter ou demander des renseignements sur un contrat d ...

Страница 22: ...la lame 23 748 04096 Adaptateur de la lame 24 764 04082A Sac à herbe Crafts man 25 747 05226 0637 Sac à herbe bâti 26 946 04661 Câble de la commande 37 58 po 27 712 04222 Écrou carré 1 4 20 28 631 04389 Déflecteur arrière Comprend le porte arrière 30 732 04673 Ressort de tor sion CD 31 732 04674 Ressort de tor sion CG 32 747 05183 Tige de pivotement 33 787 01874A 0691 Pla teau de coupe de 21 po av...

Страница 23: ...18 PIÈCES DÉTACHÉES 45 50 49 48 51 38 41 42 14 19 26 9 10 11 13 36 34 29 20 22 21 24 25 31 16 34 34 33 52 52 35 12 15 1 2 53 7 4 4 39 40 5 8 6 18 17 30 23 16 27 29 32 28 ...

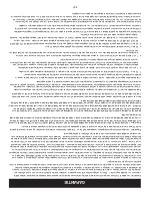
Страница 24: ...e remplacer le produit ou encore d offrir un remboursement complet de son prix d achat à sa seule discrétion CE RECOURS SERA LE SEUL ET UNIQUE RECOURS DONT VOUS DISPOSEREZ EN CAS D INEXÉCUTION QUELLE QU ELLE SOIT DE LA GARANTIE Responsabilités du client En plus d observer toutes les consignes et directives d entretien le client doit s acquitter entre autres des obligations suivantes utiliser le pr...

Страница 25: ...le plein avec une 2 essence propre et fraîche Débouchez l évent 3 Videz le réservoir à carburant Faites le plein avec une 4 essence fraîche Consultez la notice d utilisation du moteur 5 Placez le volet de départ à la position OFF 6 Le moteur surchauffe Niveau d huile trop bas 1 La circulation d air est gênée 2 Faites le plein d huile du carter 1 Démontez l habitacle du ventilateur et nettoyez le 2...

Страница 26: ...ssis pour l empêcher de rouiller Entreposez la tondeuse dans un endroit sec et propre Ne la remisez pas près de produits corrosifs comme des engrais REMARQUE Il est très important de bien protéger le matériel contre la rouille s il doit être entreposé dans un abri métallique non ventilé Enduisez toute la machine en particulier les câbles et toutes les pièces mobiles avec une huile légère ou de la ...

Страница 27: ...us du plateau de coupe et pour empêcher toute accumula tion de produits chimiques corrosifs Procédez comme suit APRÈS CHAQUE UTILISATION Stationnez la tondeuse sur une surface plane et dégagée sur la 1 pelouse suffisamment proche d un robinet d eau pour pouvoir y brancher un boyau d arrosage Vissez le raccord pour boyau d arrosage fourni avec cette notice 2 d utilisation sur l extrémité du boyau d...

Страница 28: ... moteur 2 Utilisez l huile à moteur recommandée dans la notice d utilisation du moteur fournie avec la tondeuse Lisez attentivement les instruc tions et suivez les 3 Dans des conditions normales nettoyez le filtre à air recommandée dans la notice d utilisation du moteur fournie avec la tondeuse Nettoyez le à intervalles plus rapprochés dans des conditions très poussiéreuses Une mauvaise performanc...

Страница 29: ...le moteur Ces objets pourraient être projetés par la tondeuse dans une direction ou une autre et blesser grièvement le conducteur ou toute autre personne présente Figure 13 Fonction de déchiquetage Pour déchiqueter l herbe enlevez la goulotte d éjection latérale le cas échéant ou le sac à herbe le cas échéant et le clapet d éjection arrière le cas échéant bloquera l ouverture arrière de la tondeus...

Страница 30: ...onne Le fait de lâcher la poignée arrête le moteur et la lame Leviers de réglage de la hauteur de coupe Un levier de réglage de la hauteur se trouve sur chacune des roues Les quatre leviers doivent se trouver à la même position relative pour assurer une coupe régulière Déflecteur de déchiquetage Il sert à renvoyer les brins d herbe dans la pelouse Installez le de la manière expliquée dans le chapi...

Страница 31: ...etites roues Les manettes de réglage bougent dans la même direction sur les tondeuses à grandes roues Laissez la manette revenir vers le plateau de coupe 3 IMPORTANT Les roues avant et arrière doivent être réglées à la même position relative Pour travailler sur un terrain accidenté placez le levier à une hauteur plus élevée Vous éviterez ainsi d arracher l herbe Inclinaison du guidon les cas échea...

Страница 32: ...démonté de la tondeuse et que le clapet d éjection arrière est fermé Relevez le bouchon de déchiquetage à charnière qui se trouve 1 sur le côté du plateau de coupe Voir la Figure 9 4 Le guide de la corde du démarreur est installé sur la droite du guidon supérieutr Desserrez le boulon à oreilles qui maintient le guide de la corde en place Voir la Figure 6 Tenez la commande de la lame contre le guid...

Страница 33: ...NT Cette machine est expédiée SANS HUILE NI ESSENCE Après l assemblage faites les pleins d essence et d huile conformément aux instructions de la notice d utilisation du moteur fournie avec la machine REMARQUE Les côtés droit et gauche s entendent vus de la position de conduite de la machine Guidon Retirez les pièces détachées et les garnitures d emballage qui 1 peuvent se trouver entre les guidon...

Страница 34: ... é c l i v i t é d e 1 5 Servez vous de cet inclinomètre pour déterminer les pentes sur les quelles il serait dangereux de travailler N utillisez pas cet équipment sur de telles pentes Ne tondez pas sur des pentes supérieures à 15 soit une déclivité de 2 1 2 pi par 10 pi Utilisez les tondeuses à pousser perpendiculairement à la pente jamais parallèlement AVERTISSEMENT ...

Страница 35: ...diatement DANGER SPECTATEURS Ne tondez pas si des enfants ou autres spectateurs sont à proximité DANGER AMPUTATION DES MAINS PIEDS N approchez jamais les mains ni les pieds des pièces en mouvement DANGER OBJETS PROJETÉS Enlevez tous les objets qui pourraient être projetés par les lames dans des directions différentes Portez des lunettes de sécurité DANGER PENTES Soyez très prudent sur des pentes N...

Страница 36: ...endant que la moteur tourne Les pièces du sac à herbe et le clapet de la goulotte d éjection peuvent s user et être endommagés et par conséquent exposer les pièces mo biles ou causer la projection de débris Par mesure de sécurité vérifiez souvent les pièces et remplacez les immédiatement avec des pièces authentiques seulement de la liste de pièces qui se trouve dans cette notice L emploi de pièces...

Страница 37: ... aise sur la pente n y travaillez pas Par mesure de sécurité utilisez l inclinomètre fourni dans la notice d utilisation pour mesurer la pente du terrain avant de commencer à travailler Si selon l inclinomètre la pente est supérieure à 15 n utilisez pas la tondeuse pour éviter toute blessure grave À faire Travaillez parallèlement à la pente jamais perpendiculairement Faites très attention en chang...

Страница 38: ... ou d un obstacle De cette façon les débris éventuels ne risquent pas de ricocher et de blesser quelqu un Pour éviter tout risque de contact avec la lame ou de blessure par un projectile éloignez les enfants passants et animaux à au moins 75 pieds de la tondeuse pendant qu elle fonctionne Arrêtez la machine si quelqu un s approche Portez toujours des lunettes de sécurité en utilisant la machine ou...

Страница 39: ...10 Utilisation 11 Entretien 13 Remisage hors saison 15 Dépannage 16 Garantie 17 Pièces détachées 18 1 800 4 MY HOME 20 Numéro de modèle Numéro de série Date d achat Inscrivez le numéro de modèle le numéro de série et la date d achat ci dessus TABLE DES MATIÈRES NUMÉRO DE MODÈLE ...

Страница 40: ...te web sears ca ATTENTION LISEZ ATTENTIVEMENT LES RÉGLES DE SÉCURITÉ ET LES INSTRUCTIONS AVANT DE METTRE EN MARCHE LA MACHINE Notice d utilisation SÉCURITÉ MONTAGE UTILISATION ENTRETIEN PIÈCES DÉTACHÉES 2 15 2011 769 06600A TONDEUSE 21 PO Modèle Nos C450 36101 C459 36108 ...

Отзывы: