background image

Содержание 917.298353

Страница 1: ...Rules and Instructions Before Operating This Equipment w iii i i i i i 5 0 HP 24 HNCH TNNE DTH FRONT TINE T_LLER oAssembBy Operation Customer ResponsibiBities Service and Adjustments o Repair Parts Sears Roebuck and Co Hoffman Estates JL 60179 U S A IIHIIII ...

Страница 2: ...ossible precautions when leaving the ma chine unattended Disengage the tines shift into neutral and stop the engine_ o Before cleaning repairing or inspecting shut off the engine and make certain all moving parts have stopped Disconnect the spark plug wire and keep the wire away from the plug to prevent accidental starting Disconnect the cord on electric motors Do not run the engine indoors exhaus...

Страница 3: ...COVERED BRUSH COVERED OR GRASS COVERED LAND UNLESS THE ENGINE S EXHAUST SYSTEM iS EQUIPPED WITH A SPARK ARRESTER MEETING APPLICABLE LOCAL OR STATE LAWS IF ANY IFA SPARK ARRESTER tS USED IT SHOULD BE MAINTAINED IN EFFECTIVE WORKING ORDER BY THE OPERATOR IN THE STATE OF CALIFORNIA THE ABOVE tS REQUIRED BY LAW SECTION 4442 OF THE CALIFORNIA PUBLIC RESOURCES CODE OTHER STATES MAY HAVE SIMILAR LAWS FED...

Страница 4: ...ion 13 Oil Level 10 Engine cont d Oil Type 10 13 Repair Parts 26 30 Spark Plug 14 Starting 10 Stopping 9 Storage 18 Winter Operation 13 F Fuel Filling Tank 10 Storage 18 Type 10 Finish Maintenance 14 H Handle Height Adjustment 14 Repair Parts 20 L Lubrication Lubrication Chart 12 Engine 13 M Muffler Maintenance 14 Spark Arrester 3 O Oil Level 10 Type 10 13 Operation Cultivating 1t Fill Fuel Tank 1...

Страница 5: ...t most Sears Retail outlets and Service Centers Most Sears Stores can order repair parts for you when you provide the model number of your tiller ENGINE SPARK PLUG _ LL MUFFLER AIR FILTER STABILIZER GAS CAN ENGINE OIL TILLER MAINTENANCE CLEVIS PIN HAIRPIN CLIP ii q i HIIII ll jl 2 BEEr TINES _ CD I ...

Страница 6: ...nch set will make assembly easier Standard wrench sizes are listed 1 Utility knife 1 Screwdriver t Pair of pliers 2 1 2 wrenches OPERATOR S POSITION See Fig 1 When right or left hand is mentioned in this manual it means when you are in the operating position standing behind tiller handles LEFT FRONT _ IGHT OPERATOR S POSITION CONTENTS OF HARDWARE PACK FIGo I i 1 Owner s Manual 1 Plastic Cable Clip...

Страница 7: ...NECONTROL CABLE HANDLE MOUNT HANDLE COLUMN BOLT FLANGE LOCKNUT CABLE Cl IP INSTALL DEPTH STAKE ASSEMBLY See Fig 3 Insert stake support between engine bracket halves with stake spring down NOTE It may be necessary to loosen nut A Bolt stake support to engine brackets with bolts lock washers and nuts Tighten securely Also tighten nut A if it was necessary to loosen Depth stake must move freely If it...

Страница 8: ...is manua_ for future reference TINE CONTROL 5CONTROL DEPTH STAKE tROTTLE CONTROL SHIELD RECOIL STARTER HANDLE FIG 4 MEETS ANSl SAFETY REQUIREMENTS Our tillers conform to the safety standards of the American National Standards institute TINE CONTROL Engages tines CHOKE CONTROL Used when starting a cold engine THROTTLE CONTROL Controls engine speed_ DEPTH STAKE Controls forward speed and the depth a...

Страница 9: ...ol to handle TILLING The speed and depth of tilling is regulated by the position of the depth stake and wheel height The depth stake should always be below the wheels for digging It serves as a brake to slow the titler s forward motion to enable the tines to penetrate the ground Also the more the depth stake is lowered into the ground the deeper the tines wiII dig DEPTH STAKE See Fig 6 Adjust dept...

Страница 10: ... ethanol or methanol cart attract moisture which leads to separation and formation of acids during storage Acidic gas can damage the fuel system of an engine while in storage To avoid engine problems the fuel system should be emptied before stor age of 30 days or longer Drain the gas tank start the engine and Iet it run until the fuel lines and carburetor are empty_ Use fresh fuel next season See ...

Страница 11: ... on the climate rainfall and wind it may be advisable to till the soil at the end of the growing season to further condition the soil Soil conditions are important for proper tilling Tines will not readily penetrate dry hard soil which may contrib ute to excessive bounce and difficult handling of your tiller Hard soil should be moistened before tilling however extremely wet soil will bali up or cl...

Страница 12: ...o properly maintair_ your tiller All adjustments in the Service and Adjustments section of this manual should be checked at least once each season Once a year you should replace the spark plug clean or replace air filter and check tines and belt for wear A new spark plug and clean air filter assure proper air fuel mixture and help your engine run better and last longer BEFORE EACH USE Check engine...

Страница 13: ...before oil change All oil must meet API service classification SGo Be sure tiller is on level surface o Oil will drain more freely when warm Catch oil in a suitable container Remove drain ptug Tip tiller forward to drain oil After oil has drained completely replace oil drain pfug and tighten securelyo Remove oil filler plug Be careful not to allow dirt to enter the engine o Refilt engine with oit ...

Страница 14: ... carburetor are covered to keep water out Water inengine can result in ashortened engine life i III I IIIHHI IH 1 I 1 1 1 1 I 1 1 SERVtCE ADJUSTMENTS i i 11 i i 1 i i i i1 1 111 11 i CAUTION Disconnect spark plug wire from spark plug and place wire where it cannot come into contact with plug i HH H TILLER TO ADJUST HANDLE HEIGHT See Fig 15 Factory assembly has provided lowest handle heighL Se lect...

Страница 15: ...le clip_ FINAL CHECK OFF POSITION o With tine control OFF up push down on handle to raise tines off the ground Slowly pull recoil starter handle while observing tines Tines should not rotate o If tines rotate inner wire of control cable is too tight which is extending lower spring and engaging tines Loosen cabte clip and push down on cable only enough to relieve spring tension Tighten cable clip R...

Страница 16: ...sitioned on inside groove of both pulleys inside all belt guides and rests on idler pulley CHECK TINE OPERATION o See I INE OPERATION CHECK in this section of manual REPLACE BELT GUARD BELT GUIDE _ ENG HE PO EY PULLEY TRANSMISSION PULLEY FIG 20 TO REMOVE BELT GUARD See Fig 21 Remove cap nut and washer from side of belt guard Loosen do not remove tine shield nut on underside of tine shield and cap ...

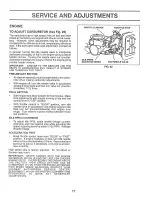
Страница 17: ...ngine running at idle and fine control lever in OFF position With throttle control in SLOW position turn idle needle valve in clockwise until engine begins to die then turn out counterclockwise until engine runs rough Turn valve to a point midway between those two positions IDLE RPM ADJUSTMENT To adjust idle RPM rotate throttle linkage counter clockwise and hold against stop whNe adjusting idle sp...

Страница 18: ...l tank o Start the engine and let it run until the fuel lines and carburetor are empty Never use engine or car buretor cleaner products in the fuel tank or permanent damage may occur Use fresh fuel next season NOTE Fuel stabilizer is an acceptable alternative in minimizing the formation of fuel gum deposits during stor age Add stabilizer to gasoline in fuel tank or storage container Always follow ...

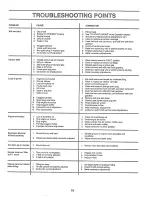
Страница 19: ...n or replace air cleaner cartridge 3r Check elllevel change oil 4r Clean and regap or change spark plug 5 Drain and clean fuel tank and refill and clean carburetor 6 Drain fuel tank and refill with fresh gasollnso 7 Drain fuel tank and carburetor and refill tank with fresh gasoline 8 Remove fuel tank and clean 9 Connect and tighten spark plug wire tO Cfean engine air screen r Engine overheats Exce...

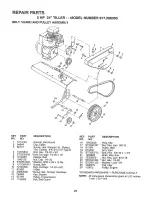
Страница 20: ... Panel Control Assembly Handle Column Grip Handle Cable Tine Control Lever Control Tine Ring Clip KEY PART NO NO 8 23200405 9 73970500 10 t2t145X 11 110514X 12 98000129 13 STD533107 DESCRIPTION Screw Set Locknut Flange 5 16 18 UNC Clip Cable Assembly Panel and Tube Nut Flange Bolt Carriage 5 16 I8 x 3 4 STANDARD HARDWARE PURCHASE LOCALLY NOTE All component dimensions given in UoS inches 1 inch 25 ...

Страница 21: ... 16 Ga 131158X417 72140405 9180R 23230506 2649M 9175R 110528X Guard Belt Bolt Carriage 1 4 20 x 5 8 V Belt Screw Set Socket Headless Key Square Pulley Transmission Bolt Belt Guard KEY PART DESCRIPTION NO NO t6 12000036 Ring Klip 17 STD541237 Nut Hex Jam 3 8 6 18 9t78R Pulley Idler 19 674A30 Arm Idler 20 STD523712 Bolt Hex 3 8 16 x 1 1 4 21 106968X Shaft IdlerArm 22 73350500 Nut Hex Jam 5 16 18 23 ...

Страница 22: ...er Lock 5 16 Locknut 3 8 24 Clip Hairpin Support Depth Stake Roll Stake Depth Pin Clevis Bolt Hex 3 8 24 x 1 1 2 Gr 5 KEY PART NO NO 12 74760524 13 195tj 14 120958X 15 5388J t6 121117X 17 t27832 18 STD551037 19 9190R 20 STD541437 21 74760516 DESCRIPTION Bolt Hex 5 16 18 x t 1 2 Gr 2 Support Depth Stake L H Washer Spring Stake Bolt Shoulder Wheel Washer 13 32 x 13 16 x 11 Ga Bracket Wheel Locknut C...

Страница 23: ...24 TILLER MODEL NUMBER 917 298353 2 6 6 6 I 6 KEY NO 1 2 3 PART NO 674A66 3146R 674A64 DESCRIPTION Tine Outer R H Clip Hairpin Tine Inner RH KEY NO 4 5 6 PART NO 674A63 674A65 4929H DESCRIPTION Tine Inner LH Tine Outer L H Pin Clevis 23 ...

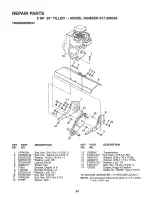
Страница 24: ...8 Locknut 3 8 24 Shield Tine Bracket Engine R H Bracket Engine L_H Washer Lock 5 10 Nut Hex 5 16 18 Bolt Hex 5 16o18 x 2 3 4 Spacer Split 12 8 KEY PART NO NO DESCRIPTION 13 126669X 14 STD541431 15 19091412 16 19092016 17 STD551125 18 74610412 19 137263 Transmission Nut Kegs 5 16 18 UNC Washer 9 32 x 7 8 x t2 Ga Washer 9 32 x 1 1 4 x 16 Ga Washer Lock 1 4 Bolt Hex 1 4o28 x 3 4 Gr 5 Engine Briggs St...

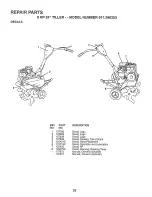
Страница 25: ...132606 3 127836 4 137539 5 120431X 6 1107t9X 7 132402 8 120075X 137873 137874 DESCRIPTION Decal Logo Decal Logo Decal Logo Decal Caution Tine Control Decal Hand Placement Decal Operation and Lubrication Decal HP Decal Warning Rotating Tines Manual Owner s English Manual Owner s Spanish 25 ...

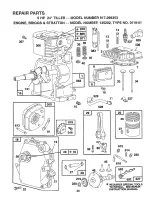
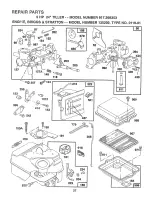
Страница 26: ...REPAIR PARTS 5 HP 24 TILLER MODEL NUMBER 917 298353 ENGINE BRIGGS STRATTON MODEL NUMBER 135202 TYPE NO 0119 01 307 741 613 81 i 2O 21 13 15 10 529 528 m 37 635 308 33 26 7 34 ...

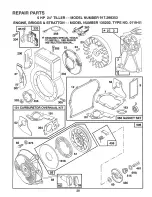
Страница 27: ...A_R PARTS 5 HP 24 TILLER _ ODEL NUMBER 917 298353 ENGIHE BRnGGS STRATTON MODEL NUMBER 135202 TYPE NO 0 9 01 679 52 256 10 12 9_ 414 153 _ Q_ 542 190A 118 203 191 205 216 779 621 467 _m __ _ _ 969 208 967 27 ...

Страница 28: ...E BRaGGS STRATTON MODEL NUMBER 135202 TYPE NO 0119 01 356 A REQUIRES SPECIAL TOOLS TO INSTALL SEE REPAIR INSTRUCTION MANUAL 23 73 24 20O _a_ O 37 334 307 332 455 305 121 CARBURETOR OVERHAUL KIT 191 394 1016 58 57 52 7 9 3 163 358 GASKET SET 461 69A 515 456 28 ...

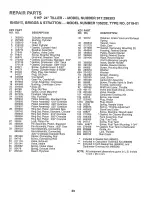
Страница 29: ...ly 020 Oversize 49 26336 Piston Assembly 030 Oversize 152 260575 Ring Set Piston Standard Size I53 490589 Ring Set Piston Standard Chrome t54 93527 Ring Set Piston _010 Oversize 163 271935 Ring Set Piston 020 Oversize 180 495405 Ring Set Piston 030 Oversize I81 494559 Loci Piston Pin t90 94712 Pin Assembly Piston Standard 190A 94677 Pin Assembly Piston _005 Over 191 272489 Rod Assembly Connecting ...

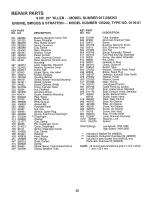
Страница 30: ...9069 Flywheel Puller 968 495357 373 92987 Nut Hex 969 490073 383 89838 Wrench Spark Plug 971 94018 392 262328 Spring Fuel Pump Diaphragm 987 398970 394 272538 Diaphragm 995 223887 414 220982 Washer 1012 490507 432 221377 Cap Spring 1016 224278 433 93265 Pin Diaphragm Cover 434 214021 Cover Diaphragm 435 93141 Screw Diaphragm Cover 455 224250 Cup Starter 456 224321 Retainer 459 492833 Pawl Starter ...

Страница 31: ...i1 1 i i i i 11 i i in 11 i 11 iiii ii iir1111 1 i 1 I SERVICE NOTES i 1 111 ii i ii i iiii i 31 ...

Страница 32: ...t Retail Stores WHEN ORDERING REPAIR PARTS ALWAYS GIVE THE FOLLOW ING INFORMATION PRODUCT FRONT TINE TILLER MODEL NUMBER 917 298353 ENGINE MODEL NUMBER 135202 TYPE NUMBER 0119 01 PART NUMBER PART DESCRIPTION Your Sears merchandise has added value when you consider Sears has service units nationwide staffed with Sears trained technicians profes sional technicians specifically trained to insure that...

Отзывы: