background image

Содержание 917.274032

Страница 1: ...uilt engines Before you start the engine read and understand this Owner s Manual Read and follow all Safety Rules and instructions before operating this equipment For answers to your questions about this product Call 1_800 659 5917 Sears Craftsman Help Line 5 am o5 pm Men o Sat Sears Roebuck and Co Hoffman Estates IL 60179 U S A Visit our Craftsman website www sears com craftsman ...

Страница 2: ...cessarybecauseof operatorabuse includingbut not limitedto damage causedby towingobjectsbeyondthe capabilityof the ridingequipment impacting objectsthat bendthe frameor crankshaft or over speedingthe engine Repairsnecessarybecauseof operatornegligence includingbut not limitedto elec tricaland mechanicaldamagecausedby improperstorage failureto usethe proper gradeand amount of engine oil failureto ke...

Страница 3: ...thrown by the blade Be sure the area is clear of other people before mowing Stop machine if anyone enters the area Never carry passengers Do not mow in reverse unless abso lutely necessary Always look down and behind before and while backing Be aware of the mower discharge direc tion and do not point it at anyone Do not operate the mower without either the entire grass catcher or the guard in plac...

Страница 4: ...onsible adult Be alert and turn machine off if children enter the area Before and when backing look behind and down for small children Never carry children They may fall off and be seriously injured or interfere with safe machine operation Never allow children to operate the machine Use extra care when approaching blind corners shrubs trees or other objects that may obscure vision iV SERVICE Use e...

Страница 5: ... if children enter the area Before and when backing look behind and down for small children Mow up and down slopes 15 Max not across Remove obstacles such as rocks tree limbs etc Watch for holes ruts or bumps Uneven terrain could overturn the machine Tall grass can hide obstacles Use slow speed Choose a low gear so that you will not have to stop or shift while on the slope Avoid starting or stoppi...

Страница 6: ...rces Code Other states may have similar laws Federal laws apply on federal lands A spark arrester for the muffler is available through your nearest Sears service center See REPAIR PARTS section of this manual REPAmR PROTECTmON AGREEMENTS Congratulations on making a smart pur chase Your new Craftsman product is designed and manufactured for years of dependable operation But like all products it may...

Страница 7: ...Mower Leveling Wrench Bubble Level Keys 2 Keys 1 Oil Drain Tube For Future Use Slope Sheet Video Cassette t ...

Страница 8: ...y down 4 Get off seat without moving its ad justed position 5 Raise seat and tighten adjustment knob securely Knob NOTE You may now roll or drive your tractor off the skid Follow the appropriate instruction below to remove the tractor from the skid TO ROLLTRACTOR OFF SKmD See Operation section for mocation and function of controms 1 Press lift lever plunger and raise attachment lift lever to its h...

Страница 9: ...el assembly and reinstall from the bottom as shown To adjust gauge wheels see the Operation section in this manual mNSTALL MULCHER PLATE If previousmy removed 1 Raise and hold deflector shield in upright position 2 Place front of mulcher plate over front of mower deck opening and slide into place as shown 3 Hook front latch into hole on front of mower deck 4 Hook rear latch into hole on back of mo...

Страница 10: ...you receive the best performance and satisfaction from this Quality Product Please review the following checklist All assembly instructions have been completed No remaining loose parts in carton Battery is properly prepared and charged Minimum 1 hour at 6 amps Seat is adjusted comfortably and tight ened securely All tires are properly inflated For ship ping purposes the tires were overin fiated at...

Страница 11: ...E FORWARD SLOW IGNITION PARKING BRAKE PARKING BRAKE LOCKED UNLOCKED MOWER HEIGHT MOWER LIFT DANGER KEEP HANDS AND FEET AWAY KEEP AREA CLEAR SLOPE HAZARDS SEE SAFETY RULES SECTION DANGER indicatesa hazard which if not avoided will result in death or serious injury WARNING indicates a hazard which if not avoided could result in death or serious injury CAUTION indicatesa hazard which if not avoided m...

Страница 12: ...ENT CLUTCH LEVER Used to engage the mower blades or other at tachments mounted to your tractor ATTACHMENT UFT LEVER Used to raise lower and adjust the mower deck or other attachments mounted to your tractor CLUTCH BRAKE PEDAL Used for declutching and braking the tractor and starting the engine GEARSHIFT LEVER Selects the speed and direction of tractor mGNmON SWmTCH Used for starting and stopping t...

Страница 13: ...aving the ignition switch in any position other than STOP will cause the battery to discharge and go dead NOTE Under certain conditions when tractor is standing idle with the engine running hot engine exhaust gases may cause browning of grass To eliminate this possibility always stop engine when stopping tractor on grass areas _CAUTmON Always stop tractor com pletely as described above before leav...

Страница 14: ... must remain fully and centrally positioned in the seat to prevent the engine from hesitating or cutting off when operating your equip ment on rough rolling terrain or hills 1 Select desired height of cut 2 Start mower blades by engaging at tachment clutch control TO STOP MOWER BLADES disengage attachment clutch control _CAUTmON Do not operate the mower without either the entire grass catcher on m...

Страница 15: ...l system of an engine while in storage To avoid engine problems the fuel system should be emptied before storage of 30 days or longer Drain the gas tank start the engine and let it run until the fuel lines and carburetor are empty Use fresh fuel next season See Storage Instructions for additional information Never use engine or carburetor cleaner products in the fuel tank or permanent damage may o...

Страница 16: ...clumps Allow grass to dry before mowing Always operate engine at full throttle when mowing to assure better mowing performance and proper discharge of material Regulate ground speed by selecting a low enough gear to give the mower cutting performance as well as the quality of cut desired When operating attachments select a ground speed that will suit the terrain and give best performance of the at...

Страница 17: ...is manual Some adjustments will need to be made periodically to properly maintain your tractor At least once a season check to see if you should make any of the adjustments described in the Service and Adjustments section of this manual At least once a year you should replace the spark plug clean or replace air filter and check blades and belts for wear A new spark plug and clean air filter assure...

Страница 18: ...is in the seat BLADE CARE For best results mower blades must be kept sharp Replace bent or damaged blades mMPORTANT To ensure proper assembly center hole in blade must align with star on mandrel assembly 4 Reassemble blade bolt lock washer and flat washer in exact order as shown 5 Tighten blade bolt securely 27 35 Ft Lbs torque mMPORTANT Blade bolt is heat treated If bolt needs replacing replace o...

Страница 19: ... you check the oil level TO CHANGE ENGINE OIL Determine temperature range expected before oil change All oil must meet API service classification SG SL Be sure tractor is on level surface Oil will drain more freely when warm Catch oil in a suitable container 1 Remove oil fill cap dipstick Be careful not to allow dirt to enter the engine when changing oil 2 Remove yellow cap from end of drain valve...

Страница 20: ...arrester if equipped as it couldcre ate a fire hazardand ordamage SPARK PLUG S Replace spark plug s at the beginning of each mowing season or after every 100 hours of operation whichever occurs first Spark plug type and gap setting are shown in PRODUCT SPECIFICATIONS section of this manual mN UNE FUEL FmLTER The fuel filter should be replaced once each season If fuel filter becomes clogged obstruc...

Страница 21: ...moving retainer spring 5 Disconnect suspension arms from rear deck brackets by removing retainer springs 6 Disconnect front links from deck by removing retainer springs 7 Raise lift lever to raise suspension arms Slide mower out from under trac tor IMPORTANT If an attachment other than the mower deck is to be mounted on the tractor remove the front links TO INSTALL MOWER 1 Raise attachment lift le...

Страница 22: ...nts after ad justing Bottom Edge of Bottom Edge of Suspension Arm Lift Link Adjustment Nut FRONT TO BACK ADJUSTMENT mMPORTANT Deck must be level side to side If the following front to back adjust ment is necessary be sure to adjust both front links equally so mower will stay level side to side To obtain the best cutting results the mower housing should be adjusted so that the front is approximatel...

Страница 23: ...th an adjustable brake system which is mounted on the right side of the transaxle If tractor requires more than five 5 feet to stop at highest speed in highest gear on a level dry concrete or paved surface then brake must be checked and adjusted TO CHECK BRAKE 1 Park tractor on a level dry concrete or paved surface depress clutch brake pedal all the way down and engage parking brake 2 Place gear s...

Страница 24: ...in neutral when the gear shift lever is in neutral N lock gate position The adjustment is preset at the factory however if adjustment is needed proceed as follows 1 Make sure transaxle is in neutral N NOTE When the tractor rear wheels move freely the transaxb is in neutral 2 Loosen adjustment bolt in front of the right rear wheel 3 Position the gear shift lever in the neu tral N position 4 Tighten...

Страница 25: ...racelets wristwatch bands rings etc Positive terminal must be connected first to prevent sparking from accidental grounding 1 Lift hood to raised position 2 Remove terminal guard 3 Disconnect BLACK battery cable then RED battery cable and carefully remove battery from tractor 4 Install new battery with terminals in same position as old battery 5 Reinstall terminal guard 25 6 First connect RED batt...

Страница 26: ...the supply of fuel to the engine giving a leaner fuel air mix ture Turning the idle mixture valve out counterclockwise increases the supply of fuel to the engine giving a richer fuel air mixture mMPORTANT Damage to the needle valve and the seat in carburetor may result if screw is turned in too tight PRELIMINARY SETTING 1 Air cleaner assembly must be assem bled to the carburetor when making carbur...

Страница 27: ... forming in essential fuel system parts such as carburetor fuel hose or tank during storage Also alcohol blended fuels called gasohol or using ethanol or methanol can attract moisture which leads to separation and formation of acids during storage Acidic gas can dam age the fuel system of an engine while in storage Empty the fuel tank by starting the en gine and letting it run until the fuel lines...

Страница 28: ...4 Faulty solenoid or starter GORRECTmON 1 Fill fuel tank 2 See TO START ENGINE in Operation section 3 Wait several minutes before attempting to start 4 Replace spark plug 5 Clean replace air filter 6 Replace fuel filter 7 Empty fuel tank and carbure tor refill tank with fresh gas oline and replace fuel filter 8 Check all wiring 9 See To Adjust Carburetor in Service and Adjustments section 10 Conta...

Страница 29: ...deck vent holes from buildup of grass leaves and trash around mandrels POOr cut _ uneven Raise cutting height reduce speed 2 Adjust throttle control 3 Clean underside of mower housing 4 Clean replace air filter 5 Check oil level change oil 6 Clean and regap or change spark plug 7 Replace fuel filter 8 Empty fuel tank and refill tank with fresh clean gasoline 9 Empty fuel tank and carbure tor refil...

Страница 30: ...witch 4 Loose or damaged wiring 5 Blown fuse 1 Bad battery cell s 2 Poor cable connections 3 Faulty regulator if so equipped 4 Faulty alternator Engine throttle control not set at SLOW position for 30 seconds before stopping engine 2 Replace mower drive belt 3 Replace idler pulley 4 Contact a Sears or other qualified service center 1 Place throttle control in FAST position 2 Shift to slower speed ...

Страница 31: ...CLIPS WERE REMOVED FOR POSITION CIRCUIT MAKE SERVICING OF UNIT THEY OFF M G A1 NONE SHOULD BE REPLACED TO ON LIGHTS B A1 L A2 PROPERLY SECURE YOUR ON B A1 NONE WIRING START B S A1 NONE 02762 PTO SWITCH POSITION CIRCUIT OFF C G B H ON C F B E A D REMOVABLE CONNECTIONS HEADLIGHTS GFC DA NON REMOVABLE PTO SWITCH CONNECTIONS CONNECTOR 31 ...

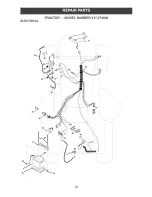
Страница 32: ...ELECTRICAL TRACTOR MODEL NUMBER 917 274032 12 I 41 16 I I 12 32 ...

Страница 33: ...24 8860R Cable Starter 25 146148 Cable 26 175158 Fuse 27 73510400 Nut Hex Keps 1 4 20 Uric 28 145491 Cable Ground 29 121305X Switch Seat 30 175566 Switch Ignition 33 140403 Key 40 188031 Harness Ignition 41 17720408 Screw Thd Cut 1 4 20 x 1 2 42 131563 Cover Terminal 43 178861 Sotinoid w brass plunger 45 122822X Ammeter 46 169635 Hourmeter 50 174652 Switch PTO 55 17490508 Screw Thd Roll 5 16 18 x ...

Страница 34: ...TRACTOR o o MODEL NUMBER 917 274032 CHASSmS AND ENCLOSURES 90 209 60 54 278 _j209 J 20 59 209 209 2_ 114 chassis stealth stlt 22 74 142 14 38 209 34 ...

Страница 35: ...w 8 18 x 7 8 58 175351 Duct Hood 59 187495 Bushing 60 STD533707 Bolt Rdhd Sqnk 3 8 16 Unc x 3 4 64 174997 Dash Lower 74 STD541437 Nut Crownlock 3 8 16 Unc 90 124346X Nut Self Thrd Wshd 1 4 Zinc 114 158112 Keeper Bett Rear LH 142 175702 Plate Reinforcement 143 186689 Bracket Swaybar Chassis 144 175582 Bracket Footrest 145 156524 Rod Pivot Chassis Hood 148 17060620 Screw 3 8 16 x 1 1 4 154 161897 Br...

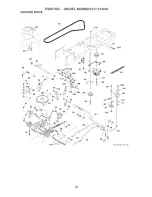
Страница 36: ...TRACTOR MODEL NUMBER 917 274032 GROUND DRIVE 15 22 26 27 drive fender stlt 45 1 36 ...

Страница 37: ...571810 RolI Pin 163 74780416 3B 179114 Pulley Composite Flat 165 165623 39 72110622 Bolt Rdhd 3 8 16 unc x 2 3 4 166 17490510 41 175556 Keeper Belt IdIer 168 165492 47 127783 Pulley Idler V Groove Plastic 169 165580 48 154407 Bellcrank Clutch Grad Drv Stl 170 187414 49 123205X Retainer Belt 197 169613 50 72110612 Bolt 198 169593 51 STD541437 Nut Crown Lock 3 8 16 uric 202 72110614 53 105710X Link ...

Страница 38: ...STEERmNG TRACTOR o o MODEL NUMBER 917 274032 L _ 38 _72 88 J J 68 67 67 67 13 65 94 34 35 43 _J 8 steering steaffh prem 7 38 ...

Страница 39: ...040500 Washer Lock 5 16 35 73540500 Nut 5 16 24 unf 36 155105 Bushing Strg 37 152927 Screw 38 159946X428 insert Cap Strg Wh 40 73540600 Nut 3 8 24 41 159945 Adaptor Wheel Strg 42 163888X428 Boot Steering 43 121749X Washer 25 32 1 1 4 x 16 Ga 46 184946X505 Cap Spindle 65 160367 Spacer Brace Axle 67 72110618 Bolt Rdhd Sqnk 3 8 16 x 2 1 4 68 169827 Axle Brace 71 175146 Steering Asm 72 19182411 Washer...

Страница 40: ...ENGmNE TRACTOR o o MODEL NUMBER 917 274032 2 1 14 38 13 32 I 33 1C _ 33 23 29 OPTIONAL EQUIPMENT Spark Arrester engine bs intek twin 39 17 81 4O ...

Страница 41: ... 13 165391 Muffler Gasket 14 148456 Tube Drain oiI 17 17060624 Screw 3 8 16 x 1 1 2 23 169837 Shie d Heat 25 187767X505 Control Choke 29 137180 Kit Spark Arrestor Flat Scrn 31 179022 Tank Fuel 4 0 Rear 32 179124X428 Cap Asm Fuel 33 123487X Clamp Hose Black 37 8543R Line Fue 38 181654 P ug Drain OiI Easy 41 139277 Stem Tank Fuel 45 17000612 Screw Hexwsh Thdr 3 8 16 x 3 4 72 183906 Screw 5 16 18 x 1...

Страница 42: ...her 13 32 x 1 x 14 Ga 10 182493 Pan Seat 11 166369 Knob Seat Adj Wingnut 12 121246X Bracket Mounting Switch KEY PART NO NO DESCRIPTION 13 121248X 14 72050412 15 121249X 16 123740X 17 123976X 18 124238X 21 171852 22 STD541431 24 19171912 25 127018X Bushing Snap BIk Nyl 50 Id Bolt Rdhd Sqnk 1 4 20 x 1 1 2 Spacer Split 28x 88 Zinc Spring Cprsn Hate 1 310 Ga Nut Lock 1 4 Lge Fig Gr 5 Zinc Cap Spring S...

Страница 43: ...6 Replacement Parts 193267 Reflector RH DESCRIPTION DecaI Steering Wheel Decal Fender Operator Inst Decal Fender Deca Battery Deca Hood Side Panel Decal Engine Decal Dash Decal Deck level Pad Footrest ST LT LH Pad Footrest ST LT RH Manual Owner s English Manual Owner s Spanish 4 10 3 9 wheel 1 11 KEY PART NO NO DESCRIPTION 1 2 3 4 5 6 7 59192 65139 106222X 59904 106732X624 278H 9040H 8 106108X624 ...

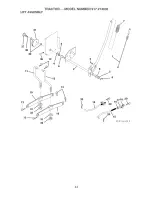
Страница 44: ...TRACTOR o o MODEL NUMBER 917 274032 UFT ASSEMBLY 41 38 40 11 13 4 6 1 6 5 19 13 32 13 19 20 20 44 ...

Страница 45: ...R H 13 STD624008 Retainer Spring 15 173288 Link Front 16 73350800 Nut Hex Jam 1 2 13 unc 17 175689 Trunnion 18 73800800 Locknut Hex with Washer Hnsert 1 2 13 unc 19 139868 Arm Suspension Rear 20 163552 Retainer Spr ng 31 169865 Bearing Pvt Lift 32 73540600 Nut Crownlock 3 8 24 36 155097 Pointer Height Hndicator 37 123935X PIug HoIe 38 17060516 Screw 5 16 18 x 1 40 19112410 Washer 11 32 x 1 1 2 10 ...

Страница 46: ...TRACTOR o o MODEL NUMBER 917 274032 MOWER DECK 117 11 34 92__ 92 4 149 5 6 19F 21 140 _184 59 138 2 16 14 116 21 2 23 24 _ _ 6 28 29 27 18 13 42 D elec t path adjwl stlt 3 46 ...

Страница 47: ...6 Pulley Mandrel 149 165898 33 178342 Nut TopIock Flanged 150 19091210 34 72110612 Bolt Carr Sh 3 8 16 x 1 1 2 Gr 5 159 STD533717 36 173438 Pulley Idler Flat 182 179126 40 73900600 Nut Lock Fig 3 8 16 uric 183 163552 44 140088 Guard Mandrel LH 184 19131410 45 STD624003 Retainer 130794 46 137729 Screw Thd Roll 1 4 20 x 5 8 54 178515 Washer Hardened 55 155046 Arm IdIer 181542 56 122052X Spacer Retai...

Страница 48: ...TRACTOR MODEL NUMBER 917 274032 PEERLESSTRANSAXLE MODELNUMBER206o545C 35A 8 3 18 4 44 57 58 59 6 0 61 29 35 t57 42A 48 ...

Страница 49: ...786102 Spacer 1 130 X 695 59 778351 Spur Gear 21 teeth 20 792077A Ball 5 16 dia 60 778349 Spur Gear 24 teeth 21 792078 Set Screw 3 8 16 x 3 8 61 778345 Spur Gear 25 teeth 22 792079 Spring 310OD x 625 L 65 780189 Flat Washer 563 D x 062W 25 792073A Screw 1 4 20 x 1 1 4 66 776422 hput Shaft 25A 792177 Screw 1 4 20 x 1 3 8 67 776396 Shifter Brake Shaft 26 792125 Retaining Ring pkg of 2 69 792170 Reta...

Страница 50: ...284 E1 216 lO I 11_ _ 28_ 267 _ 9 _ 18s 11 265 267 _ _23_ __ 842 _ lO28_ 287 524 _ 252 _ I 41 1013 _329 REPLACEMENT ENGIN_ I 1019 LABEL KIT I I 1 58 wNER S MANUALI I lO38 EMISSION LABELI 24 _ 741 467_ 445 _ 967 305 304 855 4 7 1330REPA R MANOAL I _IB_ 89 691 122_ 51 51A 1027 89 526 _ 501 5O ...

Страница 51: ...ER 0284 E1 d 35_ 36_ 1029 1100 79_ 1022 240 187 j ly y 3 _ 227 635 505 _ 385 78 387 628 918 _ 121 CARBURETOR OVERHAUL KIT 105 _ 104 633 0 276 987 _ 51A 51B _ 977 CARBURETOR GASKET SET SlB 61_ 552 _ 552A 742 404 _ 552A 691 868 211 209 _ 562 108_ _G _87_30 _ _33 _J _ 1270 lO5 51B 1127 276 51 ...

Страница 52: ...N ENGmNE MODEL NUMBER 407577 TYPE NUMBER 0284 E1 74I_ 334 lo70 _ _ 1005 __ 332 _ 75 1119 4741 695 _ 165 0 3 9_9 12 o0_ i 358 ENGINE GASKET SET 20 51B_ 51A 868 943 1022 842 691 524 1095 VALVE GASKET SET 51 51A_ 868_ 1022_ 81B_ s73 405 797A 797 697 52 ...

Страница 53: ... Control 26 499606 Ring Set Piston 020 Oversize 216 691022 Link Choke 27 690975 Lock Piston Pin 219 698231 GeaFGovernor 28 690229 PimPiston 220 690412 Washer Governor Lever 29 Rod Connecting 222 698761 Bracket Control See Reference 16 227 691048 Lever_Governor Control 32 690976 Screw Connecting Rod 231 690718 Screw Choke Valve 33 499596 Valve_Exhaust 240 691035 FilteFFuel 34 499597 Valveqntake 250...

Страница 54: ...r 1035 691042 668 691215 Spacer 1036 695704 691 690657 Seal Governor Shaft 1051 691265 695 693149 Screw Ring Gear 1054 280275 697 690372 Screw Drive Cap 1058 275475 703 691010 Clip 1059 698516 718 690959 Pin Locating 1090 691293 726 499612 Gear Ring 1095 699822 741 690980 Gear Timing 1100 690973 742 690328 Retainer E Ring 1119 691183 750 696999 Screw Oil Pump Cover 1127 690992 783 693058 Gear Pini...

Страница 55: ...pes greater than 15 degrees Make turns gradually to prevent tipping or loss of control Exercise extreme caution when changing direction on slopes 1 Fold this page along dotted Wineindicated above 2 Hotd page before you so that its Jeff edge is vertically paraJNel to a tree trunk or other upright structure 3 Sight across the fomd in the direction of hi_ smope you want to measure 4 Compare the angme...

Страница 56: ...iiii _ iiiiiiiiiiiiiiiiiii _ iiiiiiiiiiiiiiiiiii _ iiiiiiiiiiiiiiiiiii _ iiiiiiiiiiiiiiiiiii_ iiiiiiiiiiiiiiiiiii_ Your Home For repair in your home of all major brand appliances lawn and garden equipment or heating and cooling systems no matter who made it no matter who sold it For the replacement parts accessories and owner s manuals that you need to do it yourself For Sears professional install...

Отзывы: