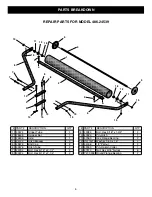
Insert one Round Flange Bearing(16) into the hole
in the End Cap(5), and insert End Cap(5) into one
end of the Striper Tube(1).
Slide the Axle(3) through the Round Flange
Bearing(16) leaving roughly 3" of axle outside the
End Cap. Place one Washer(12) over the end of
the axle.
Insert one Hex Flange Bearing(11) into the hole in
the Hitch Tube(6), and slide the Hitch Tube over
the axle. The bearing flange must face against the
washer.
Using a Hammer, tap one 1/2" Palnut(13) over the
end of the Axle(3), until it is fully seated.
1.
2.
3.
4.
Attach the Lawn Finisher behind any Lawn and Garden
tractor, with one Hitch Pin(10) and one Hairpin Cotter(14).
Tow in a "back and forth" manner across your yard, to
create the desired look. This unit can be towed while
mowing.
1.
2.
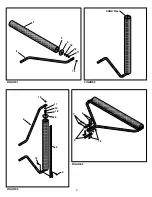
(See Figure 1)
*Refer to Illustrations on page 3.
Place the unit in an upright position and fill the
Striper Tube(1) with sand. Leave about 1" of
the tube un-filled.
5.
(See Figure 2)
With the unit still standing on end, insert one
Round Flange Bearing(16) into the hole in the
End Cap(5), and insert End Cap(5) over the axle,
until it is fully seated in the Striper Tube(1).
Place a Washer(12) over the end of the axle.
Insert one Hex Flange Bearing(11) into the hole in
the Hitch Tube(6) and slide the Hitch Tube over
the axle. The bearing flange must face against the
washer.
Using a Hammer, tap one 1/2" Palnut(13) over the
end of the Axle(3), until it is fully seated.
Carefully lay the unit down and place the Scraper
Bar (2) on top of the Hitch Tubes(6) and secure to
each end with one 5/16" x 1-3/4" Hex Bolt(9) and
one 5/16" Nylock Nut(15). Make sure both bolts
are tight.
6.
7.
8.
9.
10.
(See Figure 3)
Place two 5/16" x 2-1/2" Hex Bolts(7) through the Hitch Tubes,
and secure with two 5/16" Nylock Nuts(15).
DO NOT FULLY TIGHTEN THE NUTS AT THIS TIME.
Place two 5/16" x 2-1/4" Hex Bolts(8) through one of the
Hitch Brackets(4). From the top, slide the bolts between the
two Hitch Tubes, making sure the Bracket Bolts(8) are in
between the Tube Bolts(7).
Place the other Hitch Bracket(4) on the bottom of the Hitch
Tubes and secure with two 5/16" Nylock Nuts.
TIGHTEN ALL BOLTS.
11.
12.
13.
(See Figure 4)
ASSEMBLY
OPERATION
Roller Length
Roller Dia.
48"
4"
SPECIFICATIONS
Tools Needed:
(2) 1/2" Open End Wrench
(1) Hammer
4

