background image

Содержание 486.24320

Страница 1: ... this manuaU and follow aH Safety RuUes and Operating Instructions Safety Assembly Operation Maintenance Parts mMPORTANT For Missing Parts or AssembUy Questions Call 1 866 576 8388 Sears Roebuck and Co Hoffman Estates IL 60179 U S A www sears com c raftsman PRINTED iN USA FORM NO 49992 12 05 ...

Страница 2: ...ning safeoperation onslopes Referalsototheslope guide onpage11ofthismanual Beaware ofchanging conditions onslopes Stayoffsteepslopes Donottowthiscartonhighways orpublic thoroughfares Maximum towing speed is10m p h Donotloadmoreweight intothepushcartthanyou canhandle andcontrol comfortably Follow maintenance andlubrication instructions as outlined inthismanual Lookforthissymbol topointoutimportant ...

Страница 3: ... 4 J 9 Hex Bolt 3 8 x 1 K 10 Hex Bolt 5 16 x 1 L 3 Hex Bolt 1 4 x 1o3 4 M 3 Hex Bolt 1 4 x 1 N 1 Truss Head Bolt 5 16 x 3 4 Lg O 1 Clevis Pin 3 8 x 4 P 2 Clevis Pin 3 8 x 1 Q 1 Flat Washer 1 4 Description Nylock Nut 1 4 Nylock Nut 5 16 Nylock Nut 3 8 Hairpin Cotter 1 8 Extension Spring Plastic Cap Hub Cap Hitch Pin ...

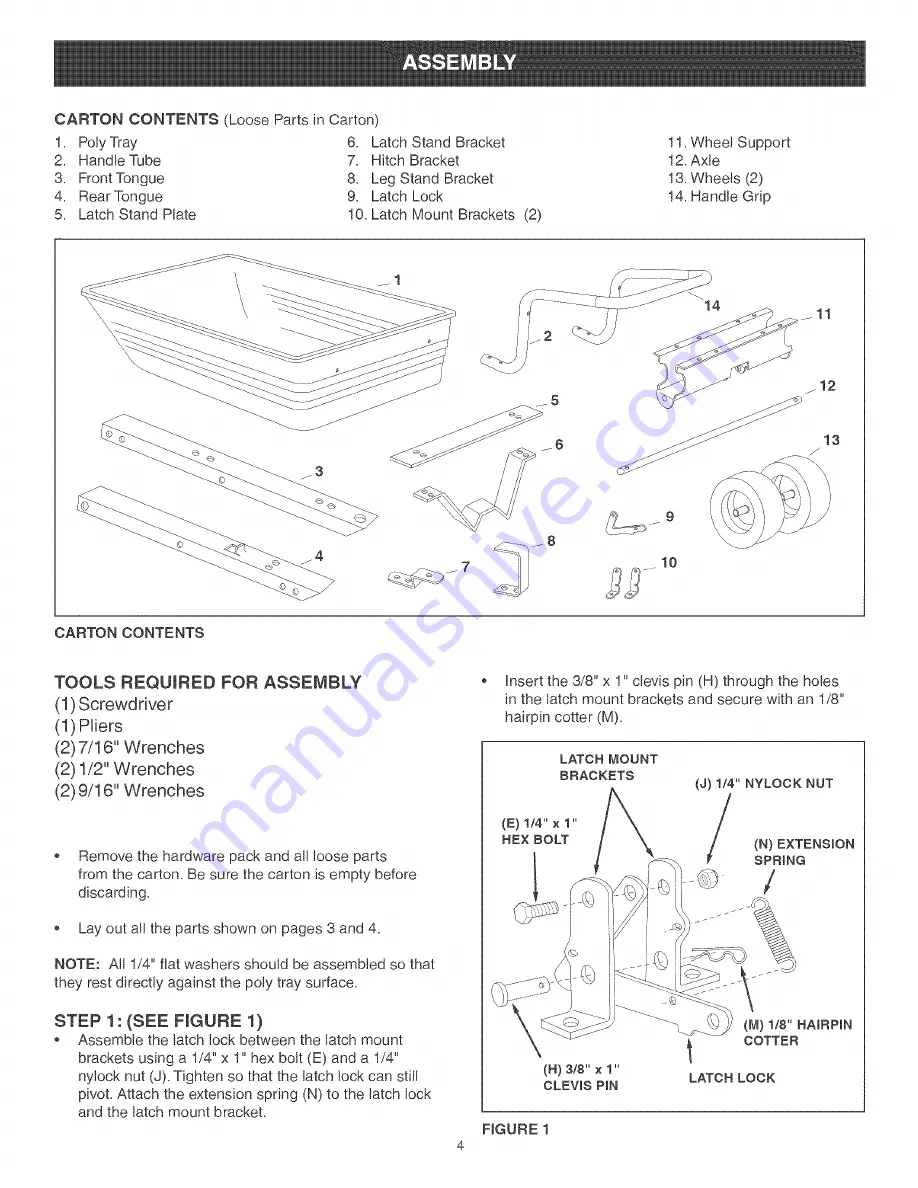
Страница 4: ...ore discarding Lay out all the parts shown on pages 3 and 4 NOTE All 1 4 fiat washers should be assembled so that they rest directly against the poly tray surface STEP 1 SEE FIGURE 1 Assemble the latch lock between the latch mount brackets using a 1 4 x 1 hex bolt E and a 1 4 nylock nut J Tighten so that the latch lock can still pivot Attach the extension spring N to the latch lock and the latch m...

Страница 5: ... 16 nylock nuts K Tighten LEG STAND BRACKET B 3 8 x 1 HEX BOLT K 5116 NYLOCK NUT L 3 8 NYLOCK NUT FIGURE 4 STEP 3 SEE FIGURE 3 Lay the rear tongue open side facing up onto the Wheel Support Assemble the axle through the wheel support and the tongue AXLE REAR TONGUE WHEEL SUPPORT FIGURE 3 STEP 5 SEE FIGURE 5 Place the front tongue inside the rear tongue as shown in figure 5 Fasten the tongues toget...

Страница 6: ...the poly tray onto the wheel support and latch stand bracket Fasten the tray to the wheel support using eight 5 16 x 3 4 truss head bolts F and 5 16 nylock nuts K Do not tighten yet Place the latch stand plate between the latch stand bracket and the poly tray STEP 8 SEE FIGURE 8 insert two 1 4 x 1o3 4 hex bolts D through the handle tube as shown in figure 8 Holding the bolts in place in the handle...

Страница 7: ... washers I and 1 4 nylock nuts J Tighten At this time tighten all bolts which were left loose WASHER D 1 4 1 3 4 HEX BOLT FIGURE 9 CART WiTH TONGUE ARRANGED FOR TOWING N 3 8 x 1 CLEVIS PIN G 3 8 x 4 CLEVIS PiN LATCH LOCK FRONT TONGUE FIGURE 10 STEP 10 SEE FIGURE 11 Assemble the hitch pin Q through the tongue and hitch bracket and secure it with the 1 8 hairpin cotter M Q HITCH PiN HITCH BRACKET FI...

Страница 8: ...levis pin and hairpin cotter which secure the front tongue in storage position underneath the rear tongue Pivot the front tongue outward and secure it in the towing position using the same clevis pin and hairpin cotter Refer to drawing above The maximum towing speed for this cart is 10 m p h Refer to the vehicle owners manual for instructions on safe operation on slopes Use the slope guide provide...

Страница 9: ...ollow the maintenance schedule and the procedures listed in the maintenance section MAINTENANCE SCHEDULE Fil in dates as you complete regular service Check for loose fasteners Check for worn or damaged parts Check tire pressure Lubricate dSY x x Clean x x Service Dates SCHEDULED MAINTENANCE Check for loose fasteners before each use Check for worn or damaged parts before each use Keep tires filled ...

Страница 10: ...cket 1 Leg Stand Bracket 1 Clevis Pin 3 8 x 4 1 Clevis Pin 3 8 x 1 REF PART QTY DESCRIPTION NO NO 17 47189 18 HA21362 19 43088 20 43001 21 43814 22 47810 23 43661 24 43000 25 43343 26 48499 27 47038 28 43063 29 43036 30 1509 69 31 48836 49992 9 Nylock Nut 1 4 20 Th read 3 Nylock Nut 3 8 16 Thread 6 Washer Flat 1 4 Std Wrought 2 Hex Bolt 3 8 16 x 1 Lg 8 Truss Hd Bolt 5 16 18 x 3 4 Lg 10 Ny ock Nut ...

Страница 11: ... degrees Make turns gradually to prevent tipping or loss of control Exercise extreme caution when changing direction on stopes Braking may be affected by tractor attachment Reduce speed on slopes 1 Fomdthis page among dotted line indicated above 2 Hold page before you so that its _eft edge is vertically parallel to a tree trunk or other upright structure 3 Sight across the fomdin the direction of ...

Страница 12: ... in items like vacuums lawn equipment and electronics call or go on line for the location of your nearest Sears Parts Repair Center 1 800 488 1222 Call anytime day or night U S A only www sears com To purchase a protection agreement U S A or maintenance agreement Canada on a product serviced by Sears 1 800 827 6655 U S A 1 800 361 6665 Canada Parapedir se_vicio de_epa_aci6n AuCanada _our service e...

Отзывы: